Where is Windows 10 Photo Viewer located
 In our today's article, we will talk about where the photo viewer is located in Windows 10. The fact is that this tool, unlike earlier OSes, has undergone major changes in the Ten. Accordingly, we received a number of new features, which we will definitely mention today.
Warning: The old photo viewer (used in Windows 11 and earlier) is disabled in Windows 10 and we do not recommend trying to bring it back. As a result, you will only cause irreparable harm to the OS registry.
Set the default application
So, in order for all our pictures to open through the default photo viewer, we need to assign these very defaults, and this is done like this:
- Launching Windows 10 Search? By clicking on the icon with the image of a magnifying glass (you can find it on the left side of the taskbar).
- We write the query "Default applications" and select the desired result from the search results.
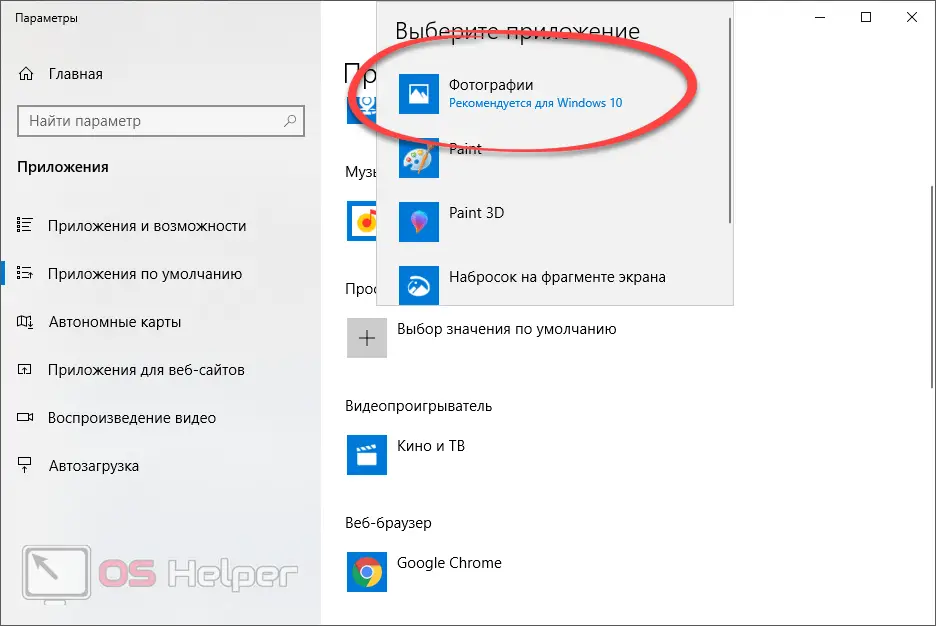
- In the new window, scroll the contents a little lower and find here the “Photos” item.
- Click on it and select the item marked in the screenshot below from the drop-down list.

After that, all your photos will be opened using the desired application.
If you need to specifically set the launch of a certain type of file, use the program installation for a specific extension.
Create an association
Set an association - in our case, it means to force a specific file and all other objects with the same extension to be opened using one of the installed applications. Let's see how this works with a specific example.
Suppose we have one photo with a JPEG extension, which for some reason is launched through Paint. We need the Windows 10 Photo Viewer to open it. To do this, we proceed as follows:
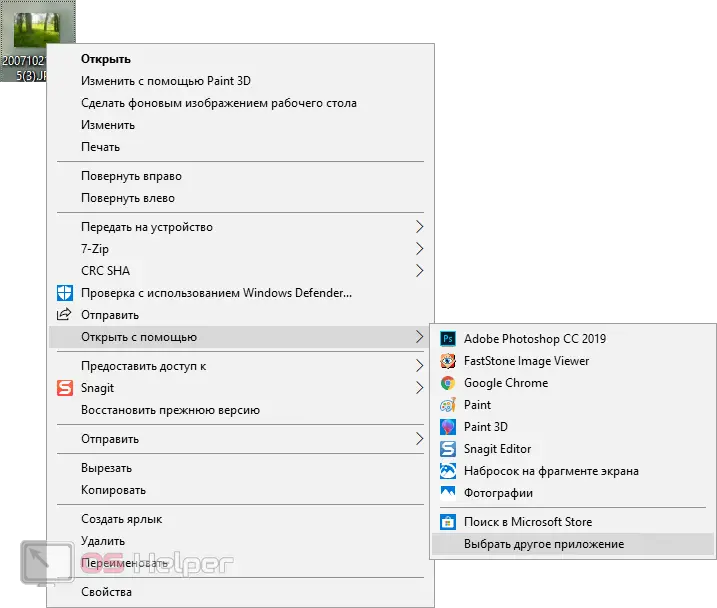
- Right-click on the target file and select "Open with" from the context menu.
- In the nested list, select "Choose another application" if there is no photo viewer in the menu.
- We select our program in Windows 10 Explorer or the list of additional programs.
- We save all the settings made.
Also Read: Headphone Setup and Audio Troubleshooting in Windows 10

After that, our file will start running using the selected program.
Using Windows 10 Search
If we need to run the program itself, we can use the search for "Tens". To do this, you need to take a few simple steps.
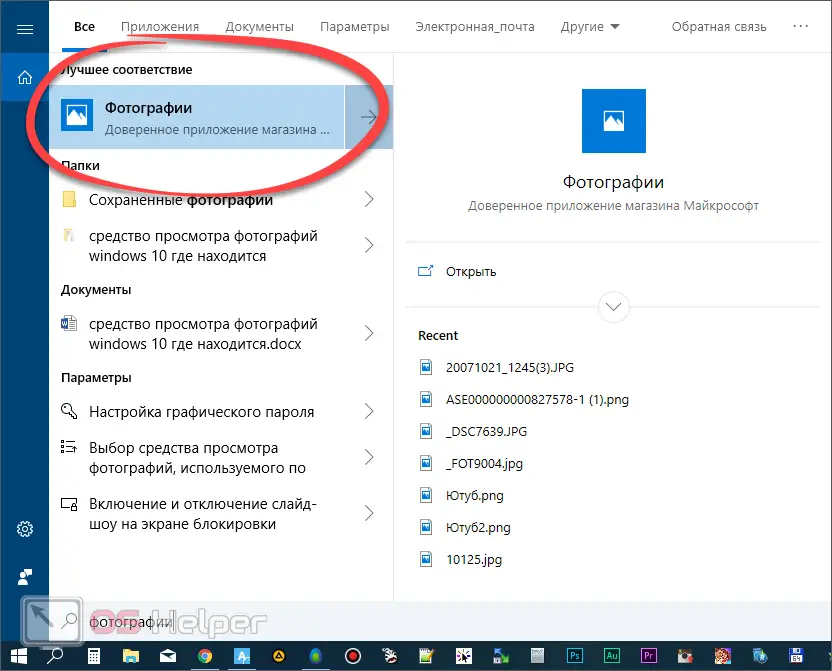
- We launch the search tool by clicking on the search icon located, as we have already said, on the left side of the taskbar.
- We register our search query and select the desired result from the issue.
- We are waiting for the launch of the program and use it.

In Windows 10, the photo viewer is called "Photos", and it "can" much more than the old program.
Main features of the software
Let's take a quick look at what new features the app we're reviewing has over the older photo viewer:
- Organize and manage albums. We can create a number of our own albums in order to properly organize all the available photos.
- Image scaling.
- Menu "Favorites" in which we can add any photo for its subsequent quick search.
- Image rotation.
- Share or print button.
- Edit menu:
- Change. You can crop the picture, apply one of the many filters and effects to it.
- It supports the addition of various artistic elements, which essentially allows us to finish the photo.
- Adding video and music, in order to organize a full-fledged slideshow.
- New in the form of adding 3D effects.
- Editing in paint 3D.

Of course, the list of features of this program is much wider, but you will get acquainted with them on your own.
Video instruction
In order to understand how it all looks in practice, we recommend watching a training video on this topic.
Finally
This concludes our story. If you have any questions, don't hesitate to ask them.
Expert opinion
Basil
Project manager, comment moderation expert.
Also Read: How To Disable Firewall On Windows 10
Ask a Question And we, in turn, undertake to give timely answers in any situations that you, our visitors, may have.