How to remove extra accounts when logging into Windows 10
 The Windows operating system allows you to use your computer under different profiles. If you have created several accounts, then a window with a choice will appear before loading the desktop. If the secondary profiles are no longer needed, you can delete them. Today we will talk about how to remove unnecessary accounts when logging into Windows 10.
Deleting via options
First, let's look at the easiest way to get rid of extra accounts in Windows 10. Follow the presented algorithm of actions:
- First, go to Windows Settings. To do this, open the menu by clicking on the Start button and click the "Settings" option.
- Now open the "Accounts" section.
- Open the Family & Other Users tab.
- Highlight the extra account and click on "Delete". After that, a warning will appear about deleting all data associated with the profile. Confirm the procedure.
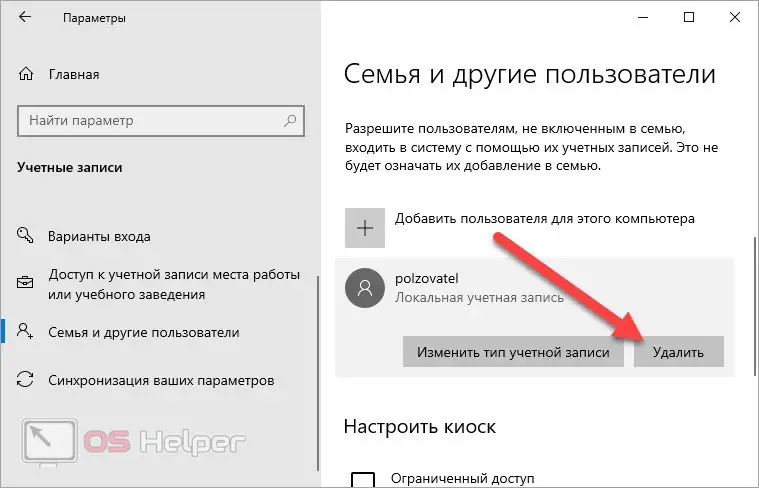
Please note that you can only delete local accounts. Microsoft profiles can be blocked and unlinked from the computer, but they will exist. You will be able to log in from them if necessary in the future, using your email and password.
Account Management
The following method also manages to remove Windows profiles, but you need to perform a slightly different set of operations:
- First, open the Run application by pressing [knopka]Win[/knopka]+[knopka]R[/knopka].
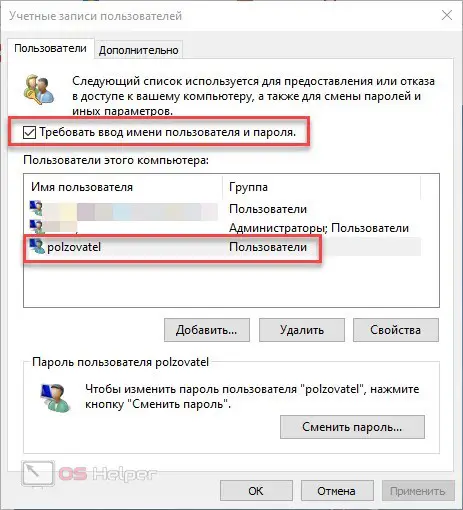
- Enter the command [k]control userpasswords2[/k].
- Find an extra account in the table and select it.
- Click on the "Delete" button. Confirm the action in the notification window that opens.
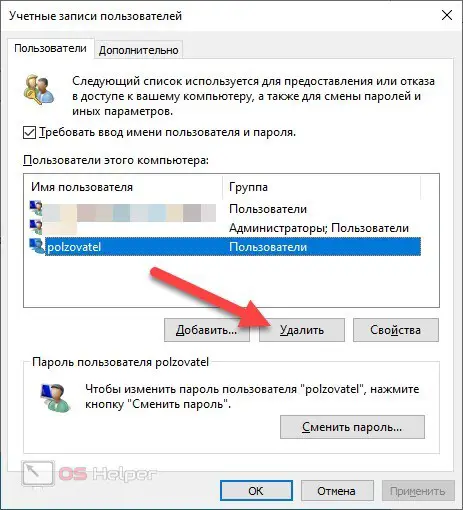
Through the User Accounts application, you can add and change the properties of new accounts, just like using Windows settings.
Uninstall via command line
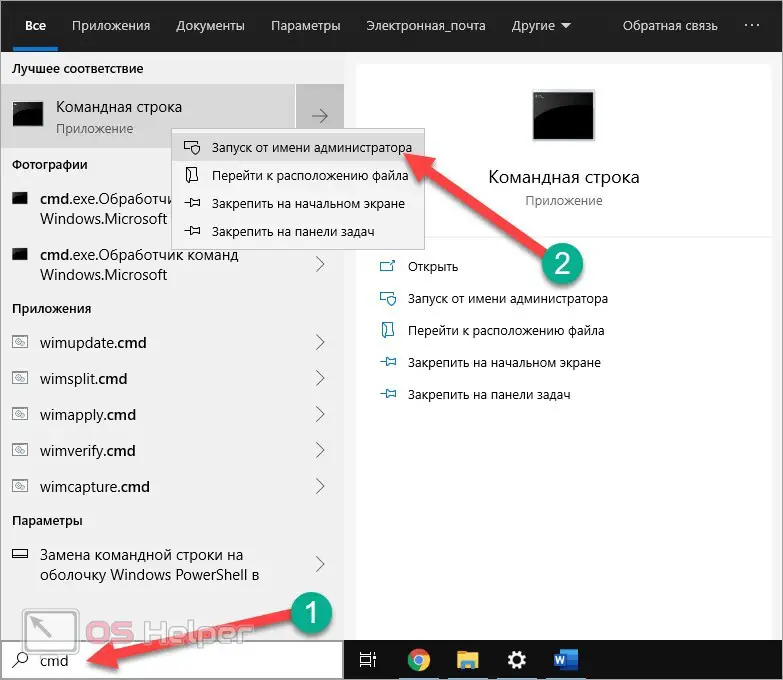
The next method is suitable for more experienced users. You have to delete an unnecessary account through the command line. First you need to run the application with administrator rights. Find the command line in the search using the name or the cmd query, and through the context menu, run as administrator.
See also: "We were unable to complete updates, reverting changes" in Windows 10
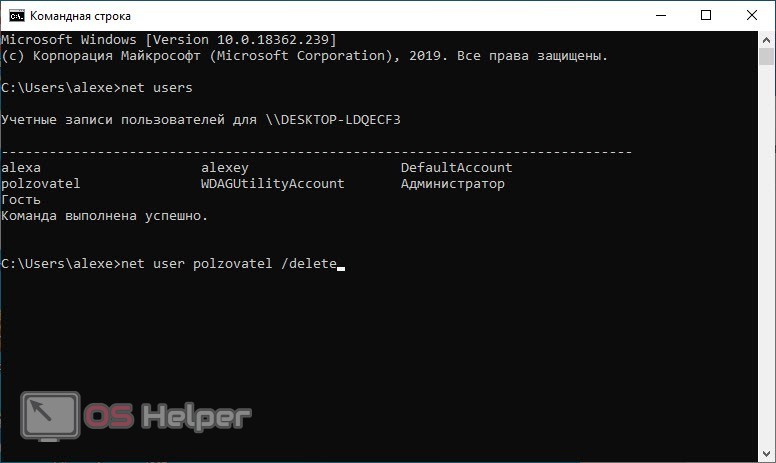
The first command is [k]net users[/k]. With its help, you get access to a list of all accounts on this computer. From the table, you can determine which of the accounts belongs to the administrator, and which profiles are guest. After that, use the command [k]net user polzovatel /delete[/k], where instead of the word polzovatel, insert the name of the extra account. Apply the action with the [knopka]Enter[/knopka] key.
If you want to temporarily disable the built-in administrator or guest account, you need to use another command. Enter the combination [k]net user account_name /active:no[/k].
Local Users and Groups
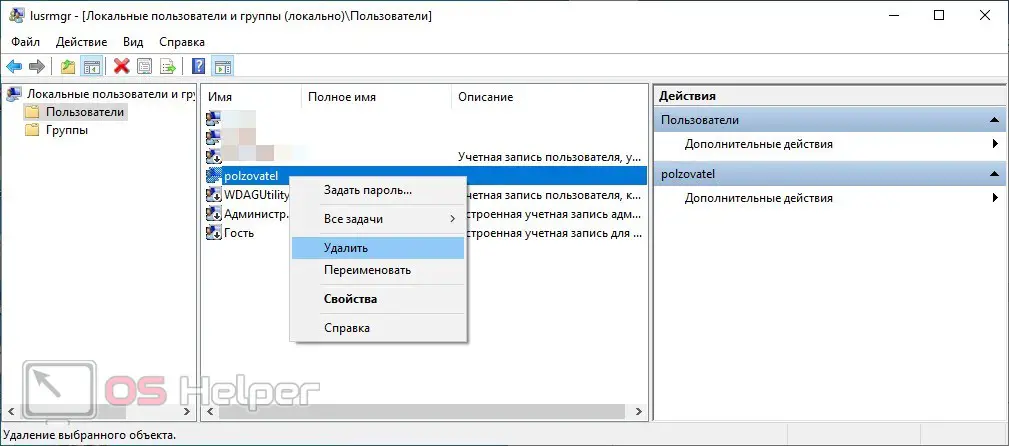
Another method that requires accessing the Run application. You learned how to run the utility from the method above. Now you need to enter the command [k]lusrmrg.msc[/k]. As a result, a window with a list of users and groups will open. Select the "Users" branch to display the list of accounts in the central table of the window. Click on the unnecessary RMB account and select the "Delete" action.
Two identical accounts
A common problem is displaying two identical accounts on the Windows 10 login screen. Since you cannot create two profiles with the same name, this situation is associated with incorrect settings. You need to open the Run application again and type [k]control userpasswords2[/k]. Then select a duplicate of the main account and enable the setting marked in the screenshot. Then restart the PC.
Video instruction
Each method from the article is analyzed in detail and shown in this video instruction. We recommend that you watch it before you start putting the tips into practice.
Conclusion
Now you know how to get rid of extra accounts that appear when you log into Windows 10. If you now use only one profile without a password, you can completely get rid of the start screen - after turning on the PC, the desktop will immediately load.