How to record screen on Mac without programsHow to record full screenModify settings for screen recordingHow to record Mac screen with QuickTime PlayerHow to Play and Edit a Screen Recording
How to record screen on Mac without programs
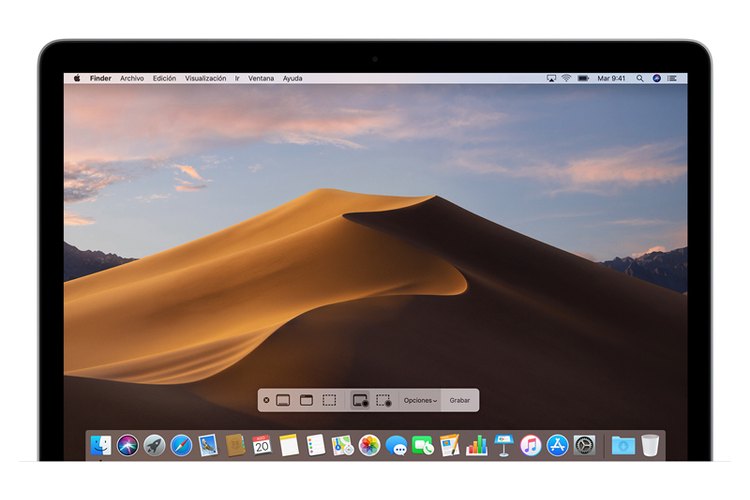
From macOS Mojave onwards, we can record our screen without the need for any extra software. To do this, you must simultaneously press Shift + Command + 5 and a command bar will quickly appear that will allow you to record the entire screen, record only a selected part or simply take a high resolution screenshot .
How to record full screen
To record the full screen of our Mac, we will have to follow a series of steps:
- Press the fourth icon from left to right that will appear in the options bar after accessing it using the previously detailed key combination.
- When clicking, our pointer will turn into a camera symbol that will allow us to record the entire screen simply by clicking on any part of our operating system.
- To stop the recording, we can press the Stop button in the options bar or combine the keys Command + Control + Escape.
- When we finish recording the screen, a thumbnail of our recent recording will appear in the lower right corner. If we do not perform any action, the thumbnail will disappear and the recording will be recorded on our computer; instead, if we click on it, we can cut or share it.
By default, macOS will save our screen recording with the name " Screen recording (date) and (time) .mov ".
Modify settings for screen recording
In the bar that will appear when the keys are combined, we can click on Options to modify the settings when recording the screen. These options are:
-
Save in: choose where the recordings will be saved automatically, for example, on the desktop, in our personal folder or on the clipboard and then paste it wherever we want.
-
Timer: it will allow us to choose whether the recording will start immediately or certain seconds after pressing the recording control.
-
Microphone: we can record our voice or some other audio as long as we select a microphone that is connected to our equipment.
-
Show floating thumbnail: we will choose if the thumbnail of the complete recording is shown or not.
-
Remember last selection: here we will decide if all these modifications will be applied to all the recordings that we make from now on or if the configuration will return to its default form after we stop recording.
-
Show mouse clicks: a black shadow will be displayed around the pointer when clicking anywhere. This option is ideal for recording guides and tutorials.
How to record Mac screen with QuickTime Player
If you have versions prior to macOS Mojave or would like to record your computer's screen in another way, there is also the possibility of doing so through the QuickTime Player application .
- Open the QuickTime Player application from the Applications folder, and then select File> New Screen Recording from the menu bar . Then a small panel will open with different options and tools.
- Start recording your Mac screen by clicking on the red circle in the center of the panel and then clicking anywhere on the screen.
- Stop the recording by clicking on the Stop icon represented as a small black square or with the key combination Command + Control + Escape .
How to Play and Edit a Screen Recording
Once you have recorded the screen of your Mac, it is time to view it to verify that everything has been as we wanted. For this we will also use the QuickTime Player. The process is extremely simple , we just have to go to the folder where our screen recording was saved and open it with this application. Upon entering, we can pause, advance and stop the video to our liking.
The interesting thing comes when editing this content. This player offers us multiple options:
-
Shorten: to shorten the video and eliminate those parts that are not useful to us, such as the beginning and the end, we must go to Edit> Shorten and move and stretch the yellow bar that will appear at will. When we are done, we will have to press the Shorten key and that's it.
-
Divide: the operation is the same as the previous tool, only this time instead of cutting the parts that we select, we will divide them thus creating several sub-videos that can be used later to, for example, create a composition.
-
Cut, copy, paste and delete: this set of tools does not need explanation, as in all applications, they will allow us to modify our video fragments completely.
-
Flip and rotate: as their names indicate, these options will allow us to change the orientation of our videos to suit our needs.
After modifying the recordings, we will only have to save them in the folder that we like the most.