How to enter BIOS on Windows 10: step by step instructions
 With the transition to Windows 10 and the purchase of new motherboards, some users began to experience difficulties due to which they cannot get into the BIOS. The fact is that on modern PCs, the traditional BIOS has been replaced by the UEFI environment. The latter can display much more information than its predecessor. It is important to understand that different devices use different login methods. In this article, we will tell you in detail how and what to do.
Difference between BIOS Legacy and UEFI
In both cases, the software allows you to set certain settings for various devices on your computer. Only in modern versions there are much more opportunities for fine tuning and diagnostics.
In order to understand how large-scale the changes are, just look at the screenshots below.
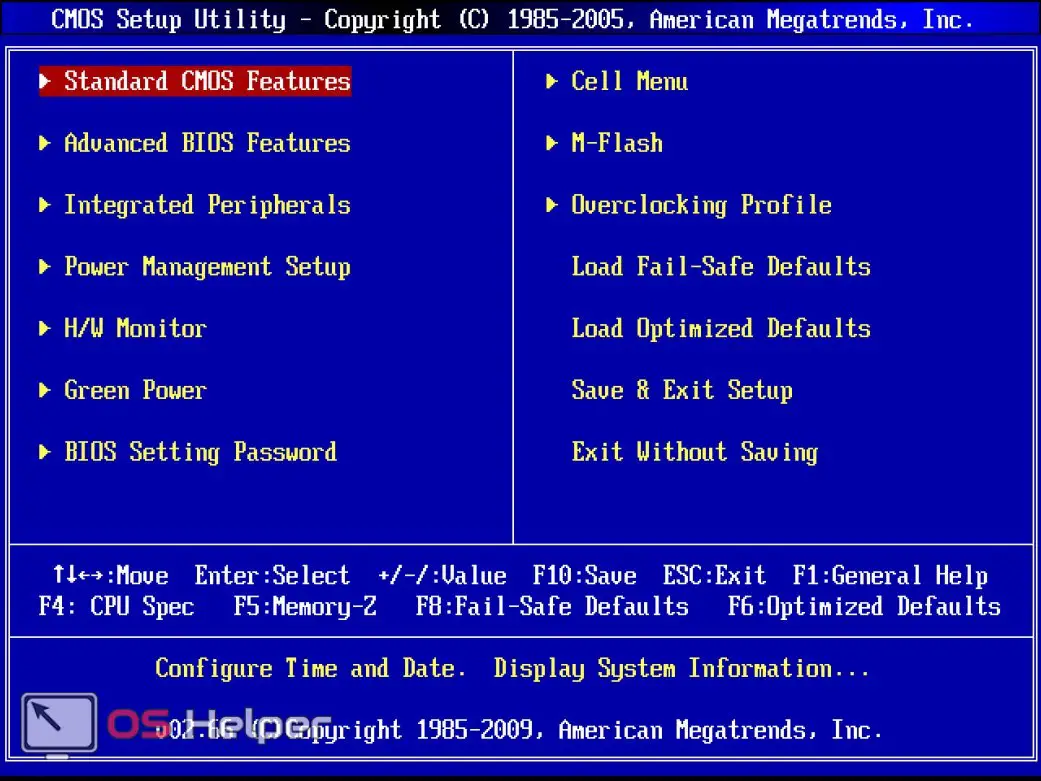
An example of a standard legacy BIOS
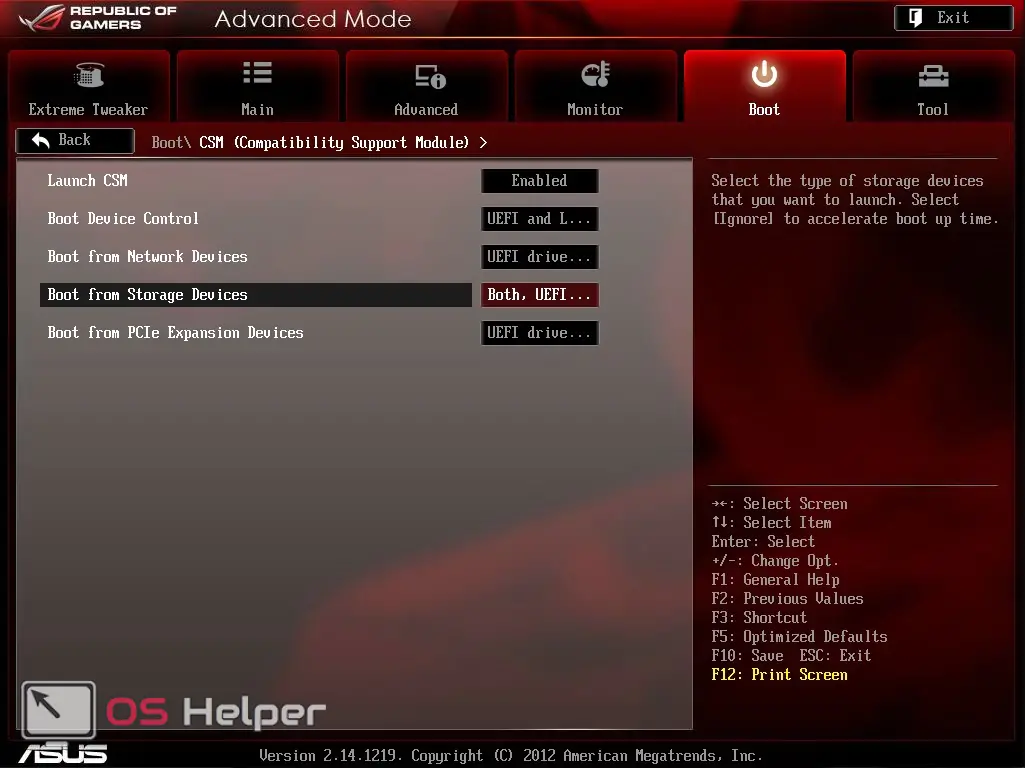
An example of UEFI on ASUS motherboards.
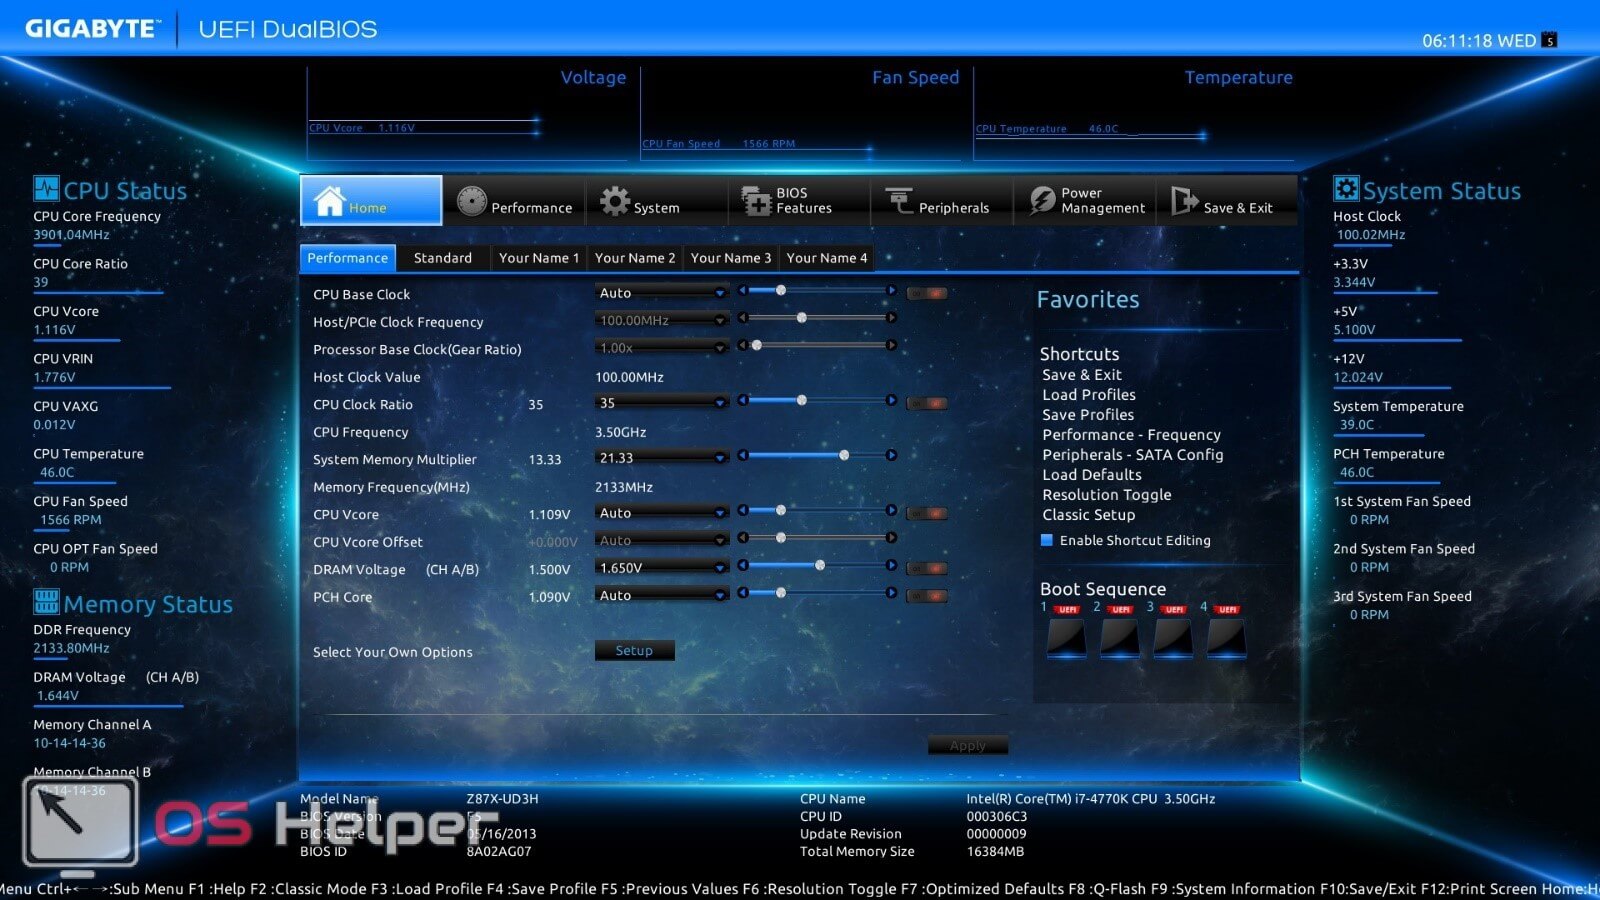
A work of art by GIGABYTE.
What is it needed for?
For example, if you decide to reinstall Windows, then in the BIOS you need to specify information about which device the operating system distribution will be loaded from.
Sometimes portable computers have a missing or broken disk drive. In this case, you can update the OS using a Flash drive. To do this, the PC boot priority must be from the USB-HDD.
In addition, there are many other features that allow you to customize something that is not available in Windows itself.
How to enter?
In order to open this utility on Windows 10 (no matter what bit depth - x64 or x32), you need to follow a few simple steps.
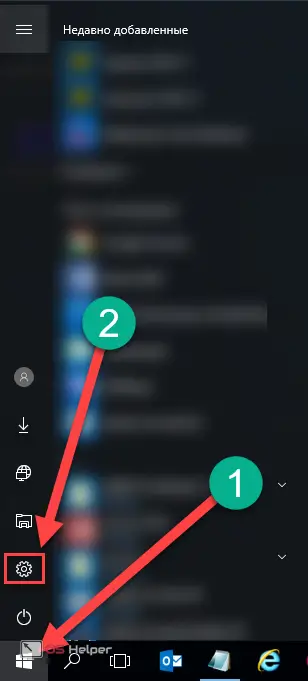
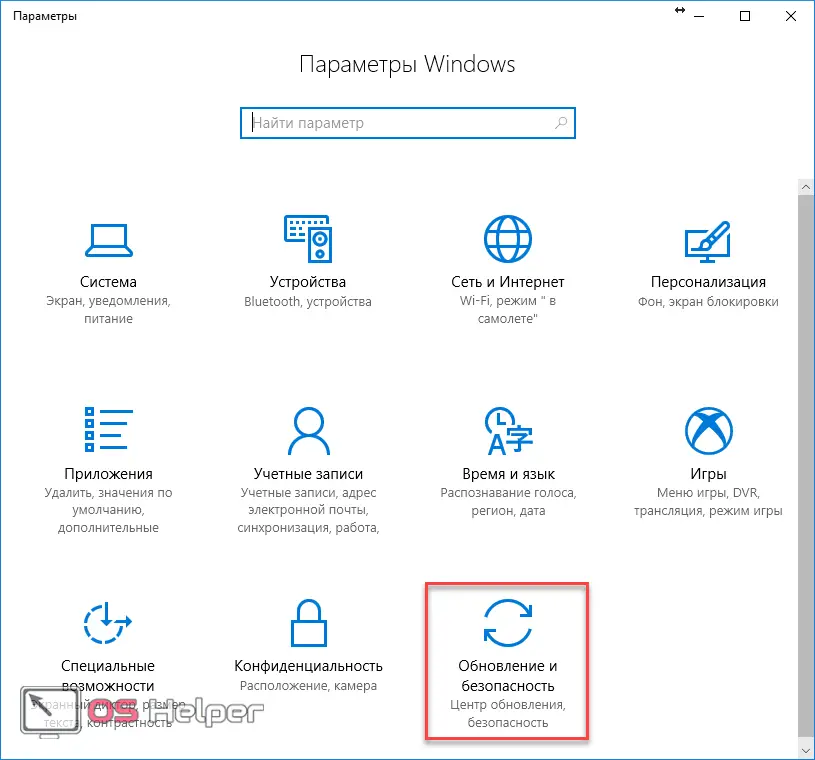
- First you need to turn on the computer and wait until the desktop appears. Click on "Start" and click on the "Settings" icon, which looks like a gear.
Also Read: Can't run this app on your Windows 10 PC
- Next, in the window that opens, go to the "Update and security" section.
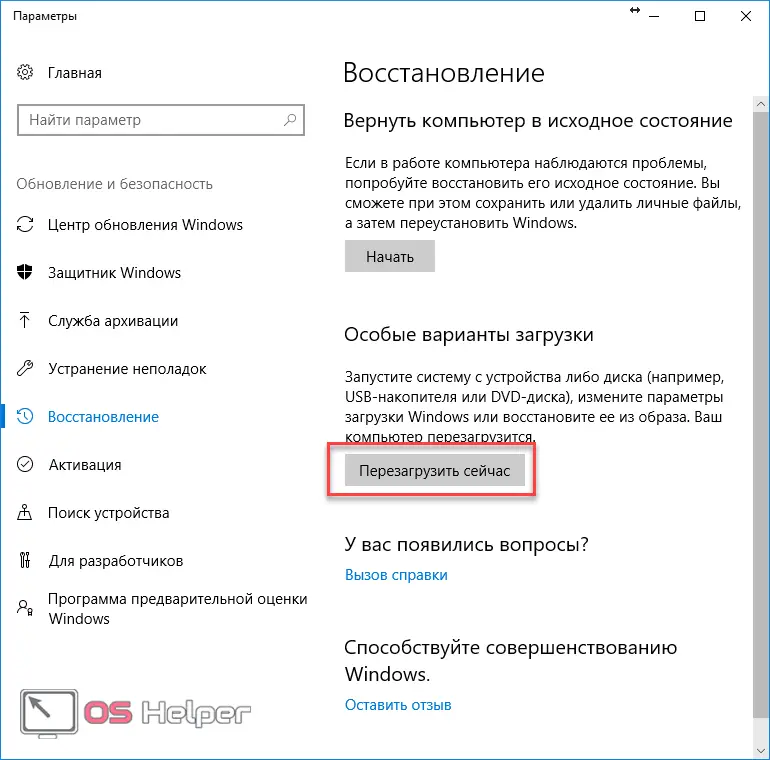
- Then select "Recovery" from the menu on the left.

- Click on the "Restart now" button. In order to start UEFI, it is necessary that the computer boots up in this way, and not through the button on the system unit or the Start menu.
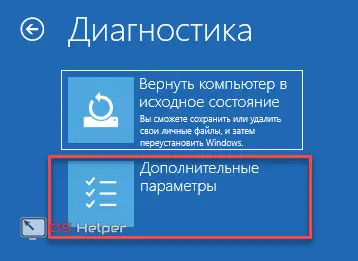
- After that, your PC will restart automatically. You will not be prompted to close all programs and log out. Everything will happen very quickly. You will then be given a choice of action. Select "Troubleshooting".
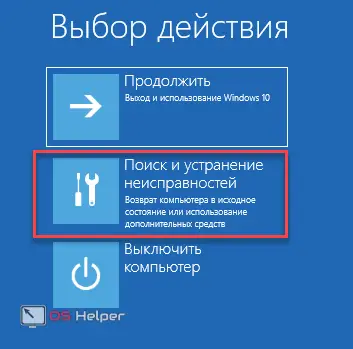
On some builds of Windows, it may say "Diagnostics" instead. It's the same (note the icon and description).
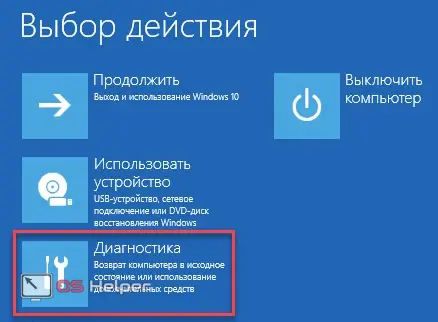
- Next, go to "Advanced Options".
- Immediately after that, a large selection of different options will open.
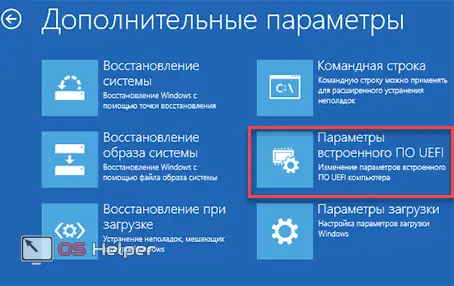
After these steps, the UEFI environment will open. Now you can make any changes in the motherboard settings.
Alternatives
In some cases, login fails. For example:
- if you do not know the user's password;
- your Windows has something wrong.
The main thing is that the download occurs before the user selects it. It's enough. After that, you need to do the following:
- Click on the "Power" button.

- After that, a context menu will open, in which you need to select the "Reboot" item and at the same time hold down the [knopka]Shift[/knopka] button.

These actions will lead to the loading of the same blue screen that was indicated in the screenshots above. Further steps to launch UEFI are exactly the same.
Login during system startup
You can usually enter the BIOS (Legacy or UEFI) before booting into Windows. When you turn on the PC, somewhere below the monitor displays information about which button to press for this.
The most important thing is to understand that this procedure happens differently on different devices. For example, on desktop computers, you can trigger an action by pressing the [knopka]Del[/knopka] key.
In addition, it is possible to select the device from which you want to boot the system. There will be another button for this.
With laptops, things are much more complicated:
- most Lenovo models use the familiar button [knopka] Del [/knopka];
- on Acer and Asus laptops, you can enter the BIOS using the [knopka]F2[/knopka] or [knopka]F10[/knopka] key;
- on some Toshiba models, you need to sequentially press [knopka]Esc[/knopka] and [knopka]F1[/knopka];
- on IBM Lenovo Thinkpad devices, hold down the ThikVantage key for some time;
See also: How to make the taskbar transparent in Windows 10
Most users, without reading the instructions, start clicking on [knopka]Del[/knopka], since this is the most popular way (as mentioned above, it is used on Lenovo laptops and the vast majority of personal computers).
What does this lead to? If, as a result, Windows loads (the BIOS did not enter), then some press the “Reset” button or hold “Power” for 5 seconds to force the device to turn off. In this case, an instant stop of the hard disk in emergency mode occurs. Do not under any circumstances do this.
If you were unable to enter the BIOS, then wait for the system to boot and restart the computer using the standard method.
What to do if you do not have time to read the text
On Windows 10, loading can be very fast. It's easy to slow down. To do this, you need to follow a few simple step-by-step steps.
- Press the [knopka]Win[/knopka]+[knopka]R[/knopka] buttons simultaneously on the keyboard. In the Run utility that appears, enter the word "cmd". Click on the "OK" button to launch the application.
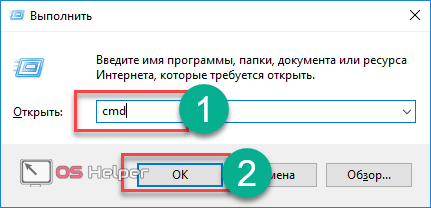
- At the command prompt, type the following command and press the [knopka]Enter[/knopka] key.
[kod]control.exe[/kod]
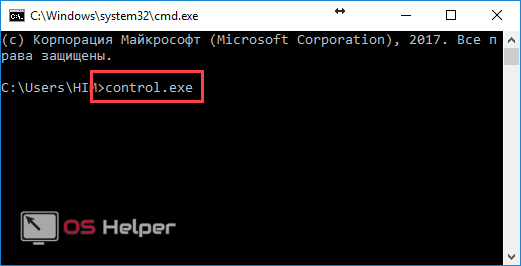
- As a result of these actions, the familiar “Control Panel” will appear. Go to the "System and Security" section.
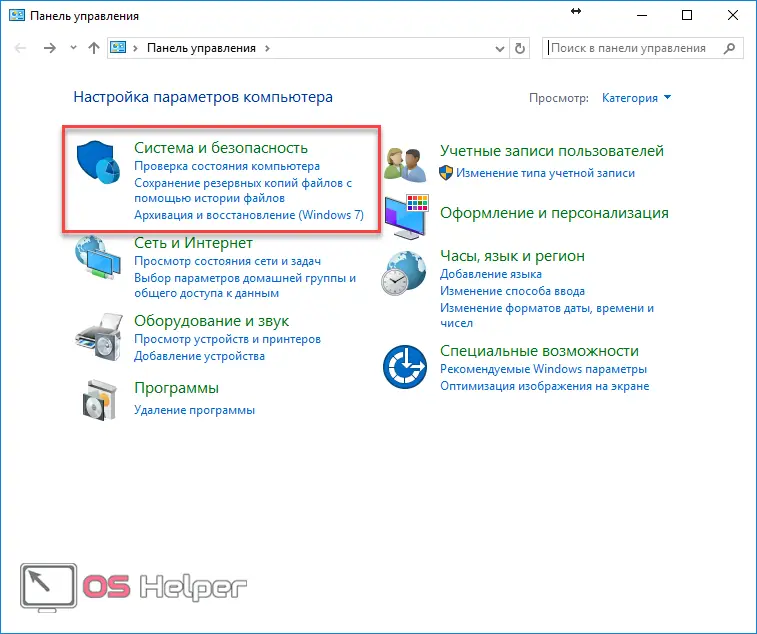
- Next, we head to the “Power” category.
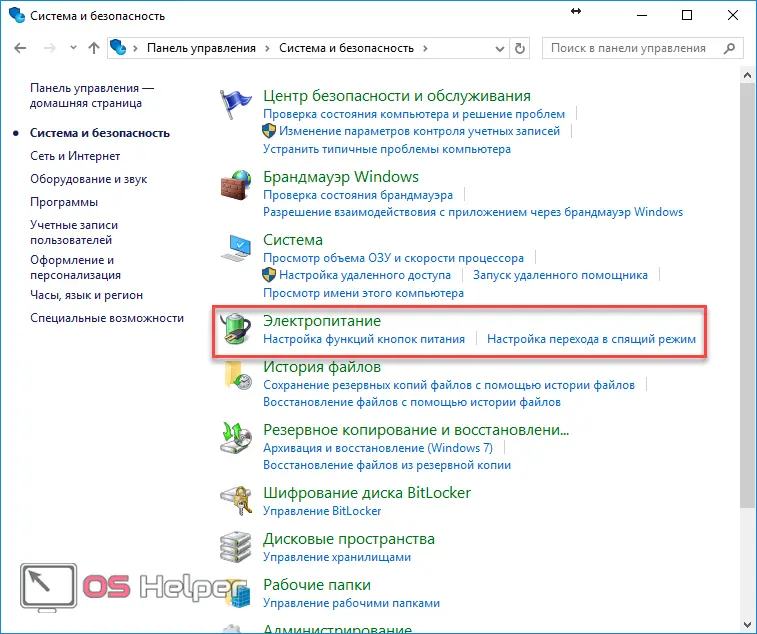
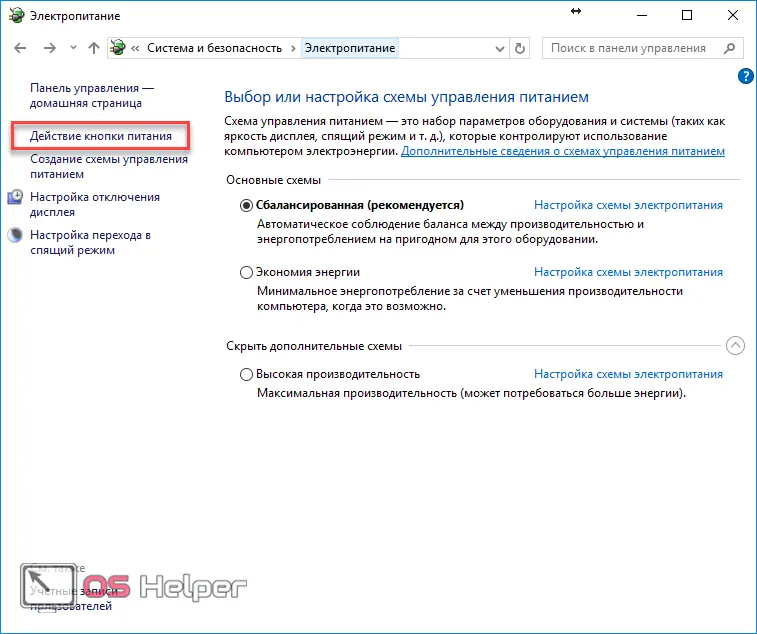
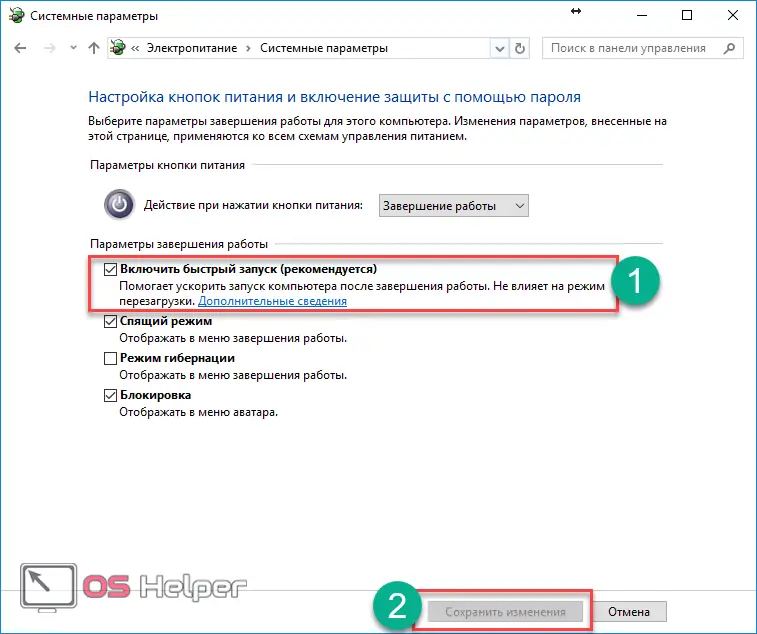
- In the new menu on the left, click on "What the power button does".
- In the window that appears, Shutdown Options will not be editable. To activate these items, click on the highlighted item.
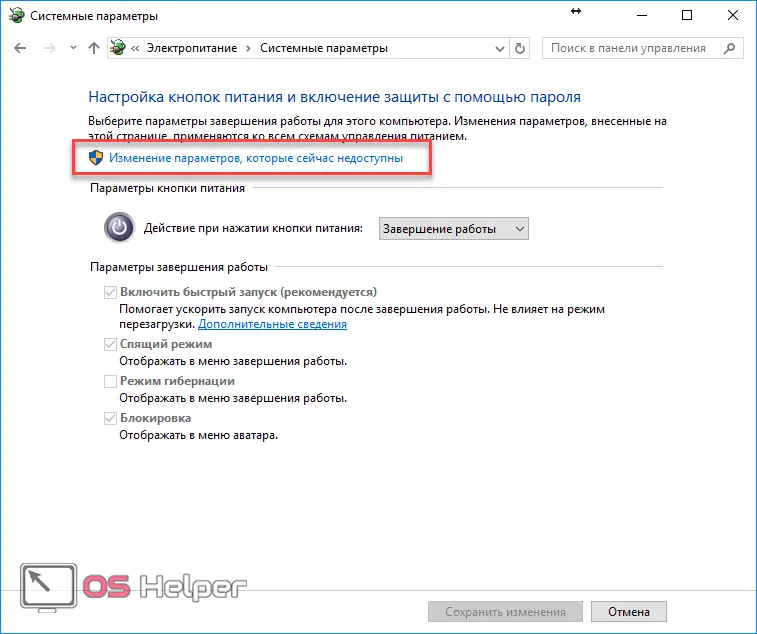
- Immediately after that, you can uncheck the box next to the quick launch. After that, save all your changes.
After that, you will have enough time to read all the information you are interested in.
If a password is required to login
Sometimes, on some motherboards, some key is installed, without which you cannot do anything. It can be reset without much effort on regular PCs. For these purposes, the developers have installed special jumpers. They are usually located near the battery. Near them is written "CCMOS" - short for "Clear CMOS".
Read also: "This app has been blocked for protection" - how to disable it in Windows 10
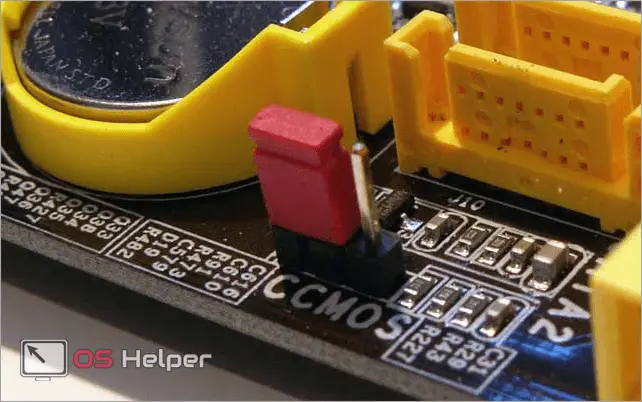
As you can see in the photo, there are three contacts used. At the moment, the jumper is stuck on the two left. Pull it out of there and place it on top of the other two (this time on the right side).
Before opening the cover of your system unit, you must turn off the power of your computer!
After a short wait, return the jumper to its original position. It also does not hurt to remove the battery for a couple of minutes.
These steps will reset the BIOS to factory settings. That is, there will be no password. There is also a high chance that you will run out of time. But this is not a serious problem.
Conclusion
There are many options through which you can enter the BIOS (UEFI). You can use whichever one you like best or seems to be the easiest. If you do not understand this, then it is better not to touch anything superfluous there. Change only those settings that you were interested in before entering the BIOS, and did not like it later
Video instruction
For a more detailed acquaintance, it is recommended to watch a video with all the above methods.