How to make a transparent background in Photoshop
 Our today's article will be a continuation of a series of instructions on the graphics editor from Adobe. Specifically, we'll talk about how to make a transparent background in Photoshop. You will soon see for yourself that this is very easy to implement. So let's get down to business without delay.
Transparent layer background
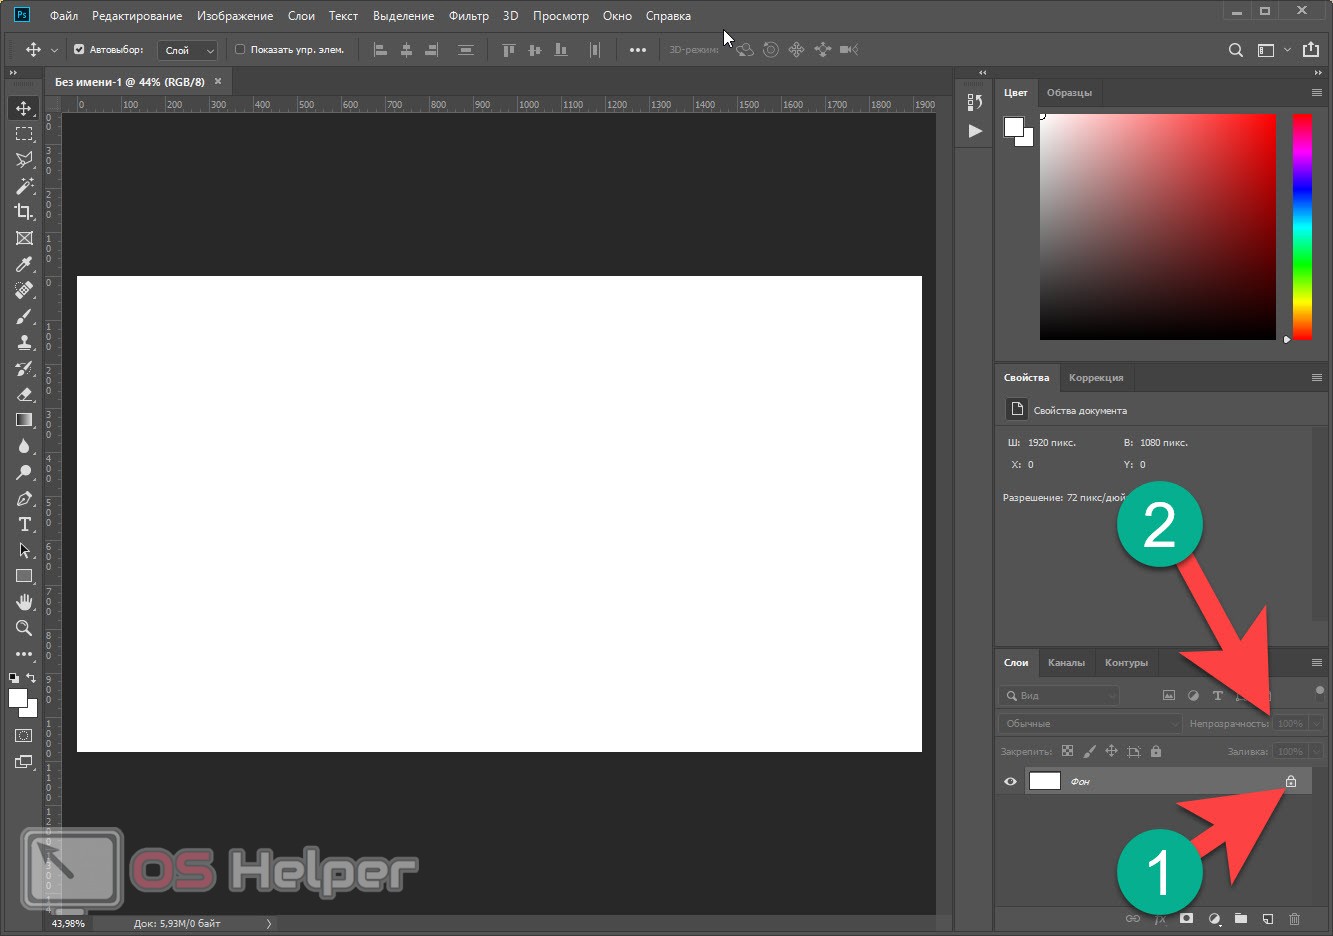
Let's start with the fact that in Photoshop you can make the entire layer transparent. To do this, you first need to remove the lock (indicated in the screenshot below). When the icon shown by the arrow disappears, we will be able to adjust the transparency of the layer using the element indicated by the number "2".

Now let's move on to more complex options, providing for the separation of the fund from any object.
Transparent background around the object
There are several options at once that can help us in making a transparent background in Adobe PhotoShop around any object. For example, we will take a rather complex drawing, in which there are small details, hair and so on.
Initially, we need to add an image to our program:
- Using the main menu, open the "File" section and click on the "Open" item.
- Windows Explorer will start in which we will need to select an image to import.
- If the program asks for confirmation of the automatic color palette, click OK.
Then we can proceed directly to editing.
Magic wand
In our opinion, this is one of the best tools for selecting an object and then removing the background. It is very easy to work with it, as you will see for yourself now:
- Turn on the magic wand tool (marked with the number "1") and click it on the background.
- As a result, the selected area is indicated by a movable border, and here we see that the selection has climbed onto the object itself (number "2" in the screenshot).
Also Read: How to Undo an Action in Photoshop

- This situation is easily resolved by using the tolerance of the magic wand. Experimentally, by changing its value, achieve such a result that the selection line fits the outline of the object as closely as possible. In our case, the number had the value "20".

- Now, with the same magic wand, only while holding down the [knopka]Shift[/knopka] key, select all areas with a background. The selection will be automatically summarized. When the process is completed, using the functionality of the main menu, cut out the selected area. To do this, we can click "Edit" - "Cut", or resort to the hotkey combination [knopka]Ctrl[/knopka]+[knopka]X[/knopka] on your keyboard. Once this is done, the background will disappear from our image.

- As you can see, everything turned out great and the area that the background previously occupied was marked with conventional signs in the form of a chessboard.

Expert opinion
Daria Stupnikova
Specialist in WEB-programming and computer systems. PHP/HTML/CSS editor for os-helper.ru site .
Ask Daria To save an image with a transparent background, you must use an image format that actually supports transparency. It can be .PNG, .GIF and so on.
Lasso Tool
If the background is not uniform, it is difficult to select it with a magic wand. In this case, the lasso will help us:
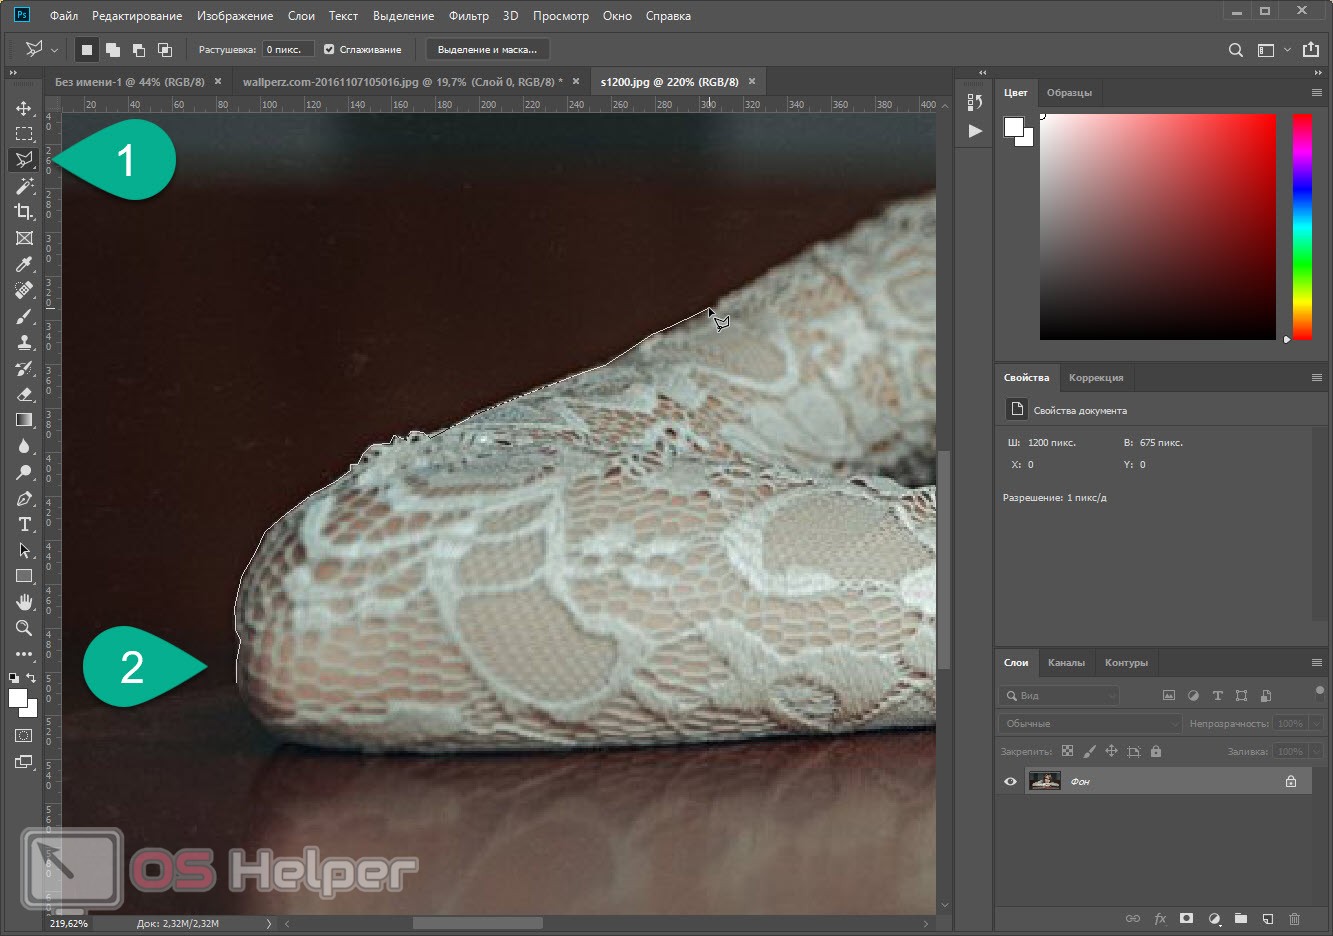
- We zoom in on our image to such an extent that it is convenient to work with small details. We right-click on the tool marked with the number "1" and select the icon that is shown right there.
- Press the left mouse button in the place where we want to start the selection. Next, drag the cursor each time by clicking the left mouse button. Thus we form our line.

- When the selection of the object is completed, and we close our path, we should invert the marked area. To do this, right-click on the selection and select "Invert Selection".
- Then we just cut out our background as it was shown in the previous case.
See also: How to overlay a photo on a photo in Photoshop online
Remember that you need to remove the lock from the working layer. Otherwise, no changes can be made to it.
Video instruction
To make it easier for you to understand how to make a transparent background in Photoshop, we have also attached a tutorial video.
Finally
Ready. Now you understand perfectly how to make a transparent background in Adobe Photoshop. You can go directly to practice and hone your acquired skills on it.
Have questions? Ask them in the comments. One of our experts will respond instantly and help in any situation.