Hiberfil.sys - what is the file and how to delete in Windows 11
 When going to sleep, Windows saves all data about the session that has been completed to a separate file on the hard drive. When the computer is restarted, this information is reloaded into RAM. Therefore, starting a PC from hibernation mode is quite fast. Today we will talk about hiberfil.sys: we will figure out what kind of file it is and how to delete it on Windows 11.
File Purpose
First, let's talk about the purpose for which the operating system creates hiberfil.sys. It takes from 2 GB or more, gradually "growing". It will not work to remove it in the usual way. This file is responsible for the stable operation of hibernation. After the user activates sleep mode, Windows immediately saves all files, settings and current information from RAM to the drive. As a result, the information is placed in hiberfil.sys, and the PC goes into a mode with minimal power maintenance for several elements.

When the user starts the PC, Windows accesses this file and decompresses the information into RAM. As a result, you see all the running windows and applications that you worked with before going into hibernation mode. When this function is activated, you will not be able to get rid of hiberfil.sys in any way. If you are sure that you do not need hibernation, you can disable the option using one of the methods from our article. After that, the extra file will be deleted automatically.
Expert opinion
Daria Stupnikova
Specialist in WEB-programming and computer systems. PHP/HTML/CSS editor for os-helper.ru site .
Ask Daria By default, hiberfil.sys is not visible in Windows 11 Explorer. You need to turn on show hidden files and folders.
Deleting a file
Let's move on to the procedure for deleting the hibernation system file. It will not work to drag it to the trash or delete it through the context menu, so we will analyze all the existing methods in detail.
Also Read: Disable Windows Defender 7
Control Panel
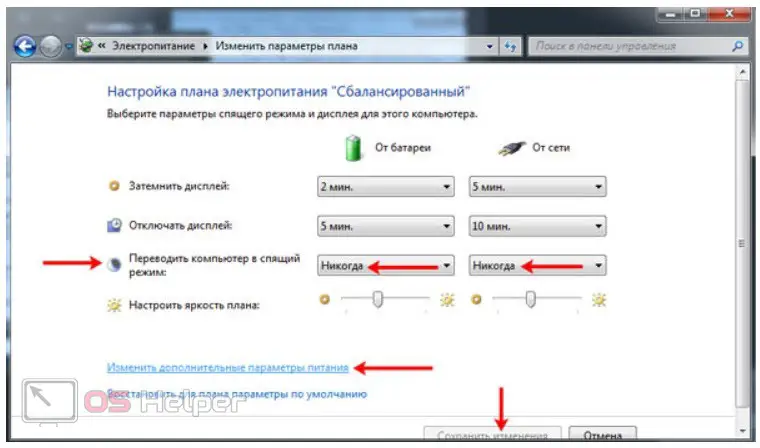
To use this method, you will need the control panel and the Power Options section. In the list on the left, find the link "Setting the transition to sleep mode." In the item marked in the screenshot, set the option to "Never". Do the same for the battery settings if we are talking about a laptop.
Now go to the advanced options and find the item "Sleep" in the list. Expand the branch and in the enable hybrid mode, set the option to "Off". Now go to the subsection "Hibernation after" and set the value to 0 minutes.
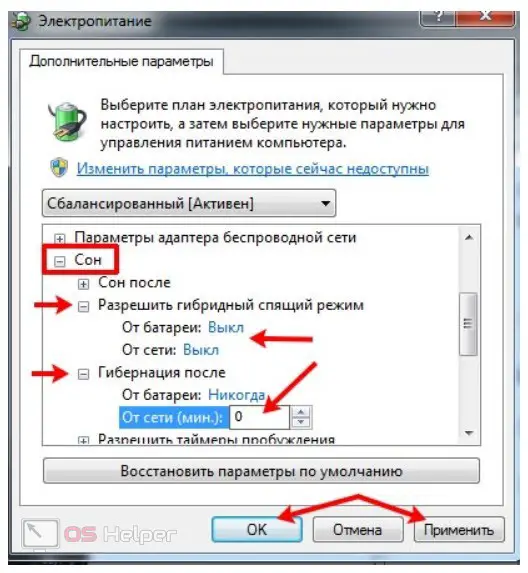
Hibernation is now disabled on the computer, which means that hiberfil.sys is not important to the system. It can be removed using the method described below.
Command line
You can erase the hibernation file using the command line functionality launched with administrator rights. To do this, find the system utility by name through the search and use the item in the context menu to run it as an administrator. Then use the simple command [k]powercfg -h off[/k]. Apply it by pressing the [knopka]Enter[/knopka] button.
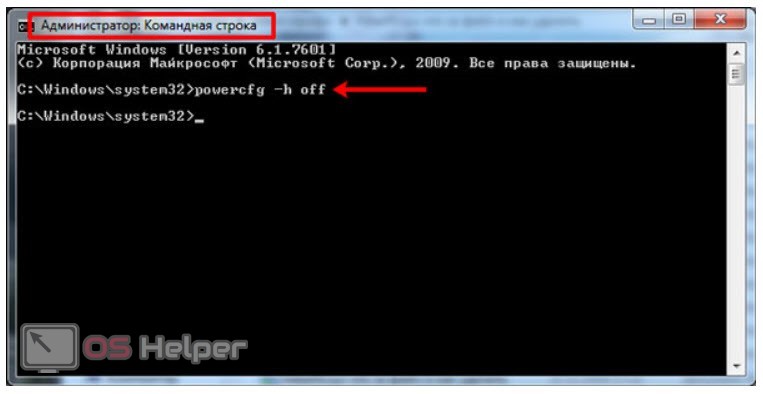
You can check the success of the procedure manually. Hibernate will disappear from the Shut Down list (a section of the Start menu). hiberfil.sys will disappear from the system partition of the hard drive.
Run application
An alternative method for deleting a file is the Run application. Press the keyboard shortcut [knopka]Win[/knopka]+[knopka]R[/knopka]. In the window that appears, enter the line [k]powercfg -h off[/k].
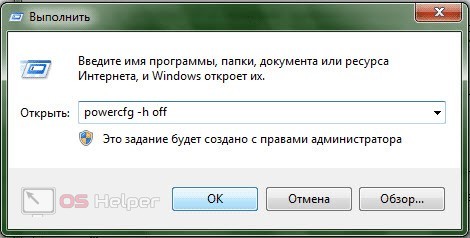
You will get exactly the same result as in the case of using the command line functionality.
To enable hibernation again, you need the command [k]powercfg -h on[/k] in the command line or the Run application.
Video instruction
Be sure to watch the detailed video instruction to understand all the intricacies of the hiberfil.sys file.
Conclusion
So, we told you about what the hiberfil.sys file is for. Now you know about its purpose and can decide whether it is worth freeing up space on the system partition by deleting this file. If you do not use hibernation mode, you can safely disable this option.
See also: Rufus: how to create a bootable USB flash drive for Windows 11
If you have any additional questions on the topic, we will be happy to answer them in detail in the comments!