How to move text to another line in one cell in Excel
 Not all users of Microsoft Office programs are familiar with the intricacies of formatting tables and texts. Using the built-in functionality, you can transform the document so that there are no problem areas left in it. For example, this can be attributed to line breaks in a table. If you enter a long name or a whole sentence in one cell, then the characters will cross the boundaries of the cell, and not be wrapped to the line below. Because of this, the appearance of the table, the readability of the text, as well as the ability to work with neighboring cells deteriorate. Today we will talk about how to move text to another line in one cell in Excel.
Expert opinion
Daria Stupnikova
Specialist in WEB-programming and computer systems. PHP/HTML/CSS editor for os-helper.ru site .
Ask Daria In the guide, you will find a method suitable for any version of the editor from Excel 2003 to Excel 2022.
Text wrap function
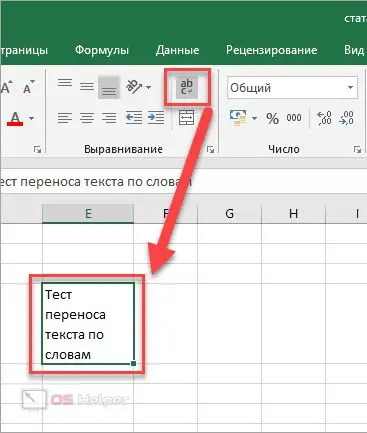
So, you entered some text into a cell, but it got out of bounds and now spoils the look of the document. All versions of Excel since the 2007 release have a dedicated Wrap Text button on the top toolbar. You need to do the following:
- Click LMB once on the cell in which you entered the text. Do not select it and do not enter edit mode!
- Now click on the "Wrap Text" button on the "Home" tab.
- The entered words are automatically formatted. In this case, the cell will increase so as to fit all the entered characters.
In Microsoft Excel 2003, this item is not on the toolbar. But you can use the following method from the instructions - it is suitable for any version of the editor.
Cell Format
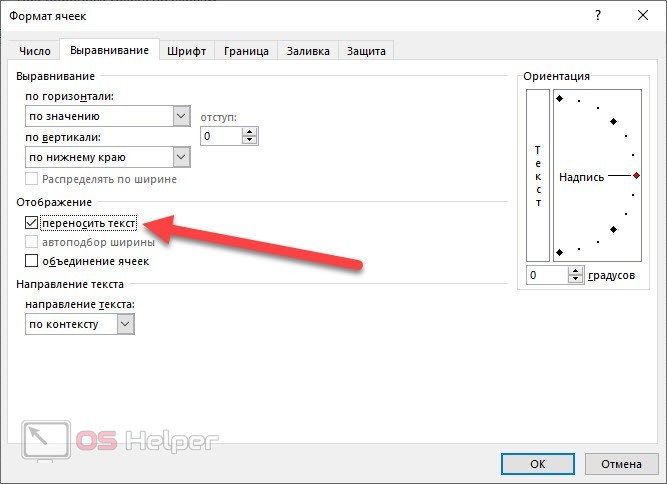
The second method uses the context menu of the program. The procedure is performed in several stages, but it does not become more difficult. See for yourself:
- Right-click on the cell with the entered words.
- Select "Format Cells" from the menu.
- Open the Alignment tab.
- Check the box "Wrap text" and save the settings.
See also: How to remove protection from Excel sheet
Ready! You will find the same result as in the case of the first method from the instructions. Which one is the best - it's up to you!
Both options can be applied to one specific or several cells, or to the entire sheet. When copying a sheet, this setting is saved.
Wrap text manually
The methods described above allow you to wrap text word by word. When a line fills up and the next word doesn't fit, the rest is automatically sent down. But is it possible to determine the number of words that will be on each line? Let's figure it out.
In Microsoft Excel, many operations are performed using hotkeys. Text wrapping is no exception. You can use it with this guide:
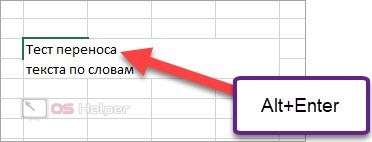
- Enter the cell editing mode by double clicking the mouse.
- Now put the print cursor right after the word that should be the last one on this line.
- Press the key combination [knopka]Alt[/knopka]+[knopka]Enter[/knopka].
With this feature, you can edit the contents of a cell however you like. You can also use keyboard shortcuts while typing.
Cell Formatting
If for some reason, after performing the transfer, the cell did not automatically adjust to the desired size, then you can always do it manually. To do this, follow the instructions:
- Select the cell you want to edit in height or width.
- In the "Home" tab, find the "Cells" settings block. Click the "Format" button.
- In the list, you can find the auto alignment features. When applied, the cell will take the optimal size so that all the text is fully displayed.
- If you want to set a different size, then use the "Row Height" and "Column Width" functions.

Video instruction
The video explains in detail each method from our instructions. The author of the video shows and comments on each step, so we recommend that you do not skip this guide!
See also: How to transfer a table from Excel to Word
Conclusion
We told you about all the methods for wrapping text within a single cell. As you can see, this function is available in all Excel from 2003 to the current version. You can choose the most convenient option for yourself and use it constantly.
If you ask a related question using the comment section below, you will get a quick and detailed answer with help or advice!