There are many young people, and not so young, who, due to the lack of job opportunities, choose to give the world of streaming a chance to find a loyal audience that allows them to make a living from their skills, whether playing, drawing, painting, doing crafts. , playing an instrument or performing any action that you are especially good at.
If we talk about streaming video platforms, after the disappearance of Facebook Gaming and Mixer (Microsoft), there are only Twitch (the purple platform that neither Meta nor Microsoft have been able to handle) and YouTube, a platform that has been adapted to become an alternative to the Twitch platform, the most used in the world to transmit any type of content, although the majority is focused on the world of video games.
What is Twitch
Twitch is a platform that allows anyone to stream the content they want (as long as it is based on the permitted guidelines) completely free of charge, without the need to make any initial investment beyond the equipment necessary to carry it out, such as a computer, one or more webcams, a microphone to speak and a chair where you can be comfortable enough to spend long sessions. If our intention is to stream video games, we can do it with hardly any investment since both the Xbox and the PlayStation allow us to stream our games directly from the console.
How to stream on Twitch
The first thing we must do before, before anything else, if we want to use Twitch to broadcast our games is to create an account and correctly configure all the data that will be displayed on the cover page, link to social networks and so on.
Open an account to start streaming
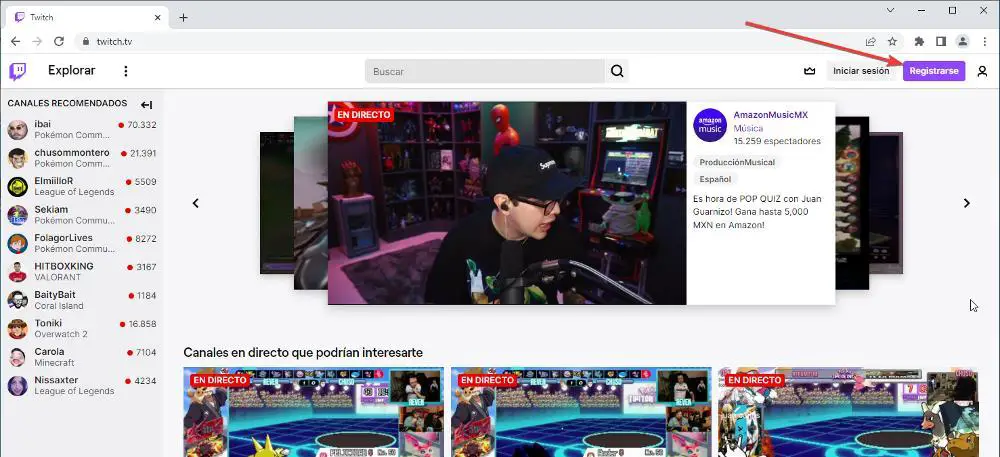
To start being a streamer on Twitch, the first thing we must do is open an account, a completely free account. To do so, the first thing we must do is visit the Twitch main page through the following link . Next, we go to the upper right part of the website and click on the Register button.
Next, a window will appear where we must enter the username that we want to have on the account and which will be part of our Twitch address. In addition, we must also enter the date of birth and a telephone number. If we do not want to use a phone number, we can use an email instead by clicking on Use an email. If we want to be able to quickly recover the account, it is necessary that these data are correct since they will be the ones that the platform will ask us for if we forget the account password.
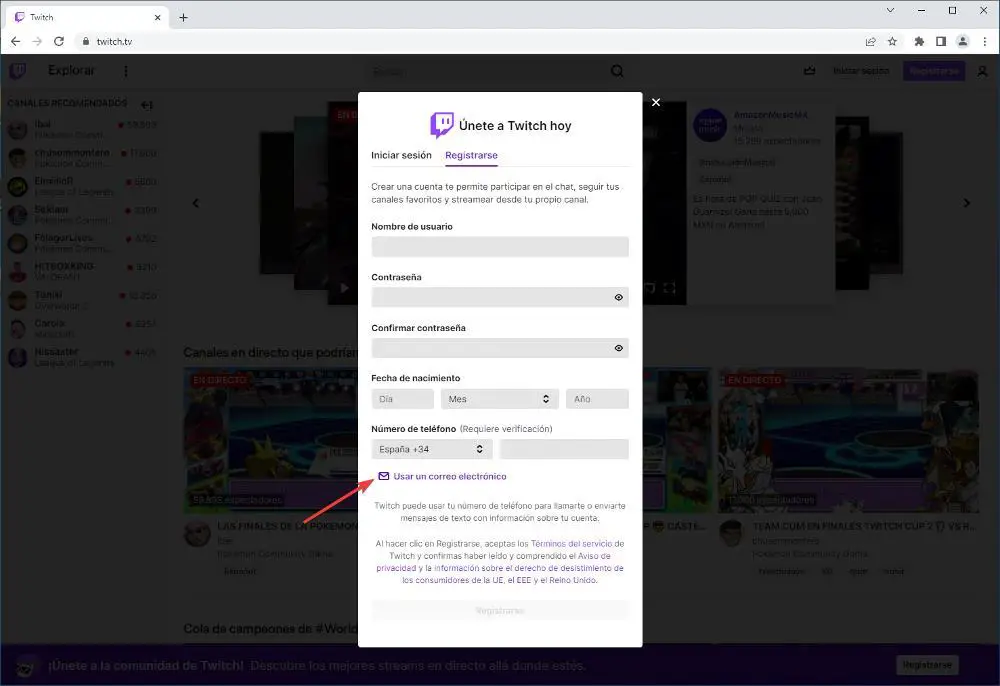
Finally, we click on the Register button and confirm through our phone number or email that we are the legitimate owners of the account. If we do not confirm it, within a maximum period of 24 hours, we will have to create a new account again.
Set up your Twitch account
Once we have created the account on Twitch, we return to the main Twitch page and click on the icon that represents new account to then access the configuration options through the Creator Control Panel option .
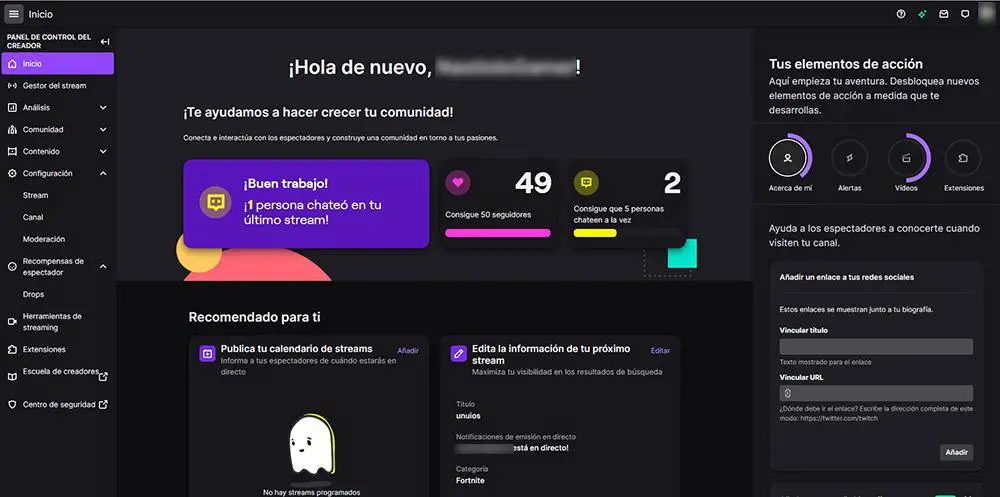
In the left section, we go to the Settings – Channel menu . In this section, we must enter a description of our channel, along with links to social networks where people who want to be aware of our activity on the platform can follow us. In the Brand tab , we must add the image that will represent our channel.
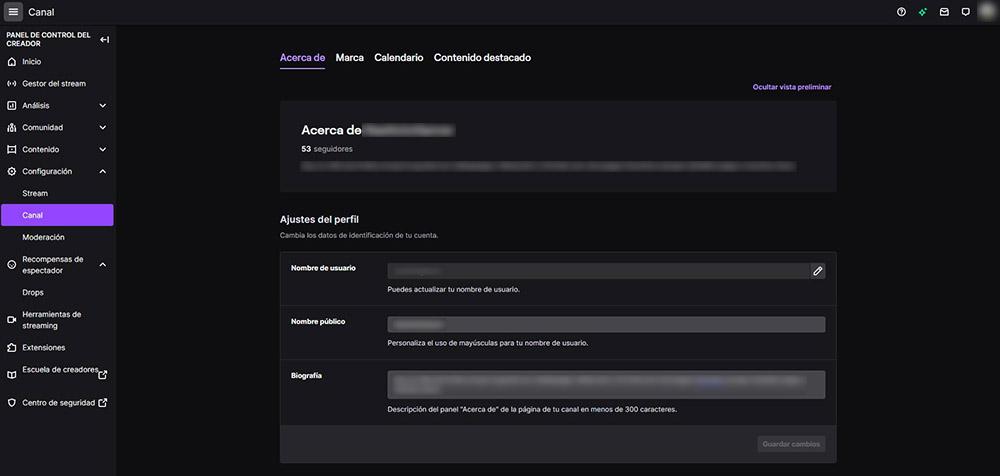
The rest of the available options are related to the transmissions we make, so until we make the first stream we will not be able to use them.
What apps do I need to stream on Twitch
To stream on Twitch we only need a computer or a console. And we say a console or a computer, because we can stream directly from the console, as long as it is a PlayStation 4 or 5 or an Xbox (One, Series S or Series X). We must be clear that, if we use a console, the customization options are minimal since we will only be able to send the signal from the game and the camera if we have one. However, if we use a PC to broadcast the games, we can establish fins and configure the design that we want our broadcast to have through Twitch.
If we talk about applications to broadcast live content through Twitch or YouTube, we must talk about 3 applications : OBS, Streamlabs and Twitch Studio. While it is true that there are other applications, these are the ones used by 99% of streamers, so, after analyzing everything that each of them offers us, we must decide on one or try all three for a while. until we find which one best suits our needs.
OBS
OBS is the most complete application of all and the easiest to use since from the application itself we can also manage the chat and notifications of the platform. It is a completely free application that we can also use to record our computer screen, an additional function that allows streamers to record games and then upload them to YouTube and thus further monetize the content they create.
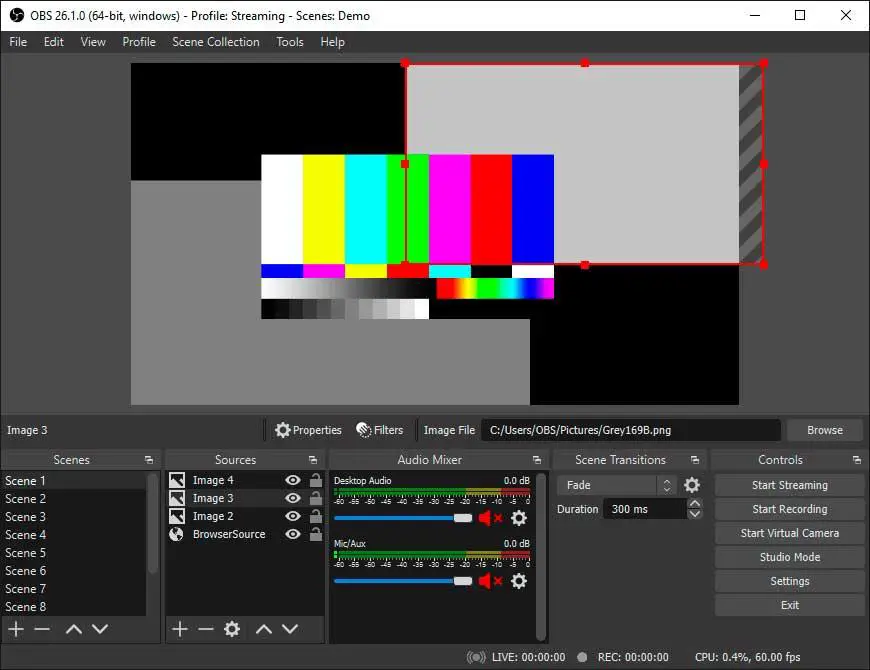
If you want to know how to start streaming on Twitch using OBS, in the following sections we show you all the steps to follow to configure the application and start streaming.
Streamlabs
Another interesting application that we have at our disposal when streaming through Twitch is Streamlabs Desktop based on OBS. Streamlabs Desktop is an open source application, like OBS Studio, and is intended for users who have no experience or knowledge in these areas. It allows you to record everything that is shown on the screen, includes support for Twitch chat, is compatible with widgets, is optimized to work in combination with demanding games and also offers us a large number of overlays to personalize our transmission.
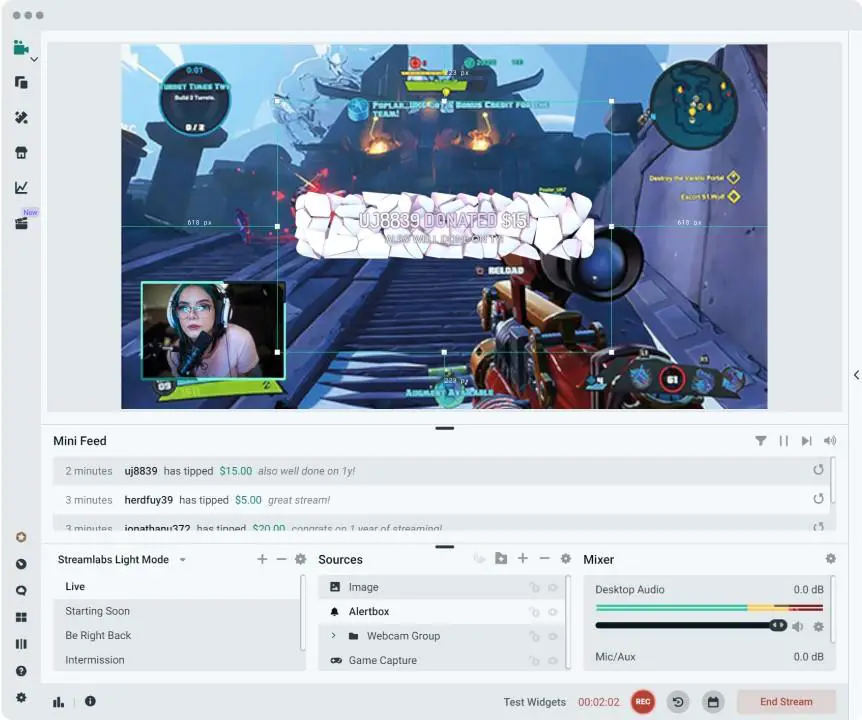
By displaying our channel's chat information, it allows us to gather all the information we may need about our streams on one screen, as we also have access to the moderation tools available on Twitch. This application is completely translated into Spanish and through its website, we have access to a large number of tutorials to correctly configure the application to transmit on any platform. Downloading this application is free and available through this link . It is also available for macOS.
Twitch Studio
Twitch also makes available to streamers on its platform an application designed specifically to broadcast through the purple platform through the Twitch Studio application , an application that is currently still in beta phase, although it is quite stable and is a perfect application. to start transmitting since it offers us access to all the information we may need at any time.
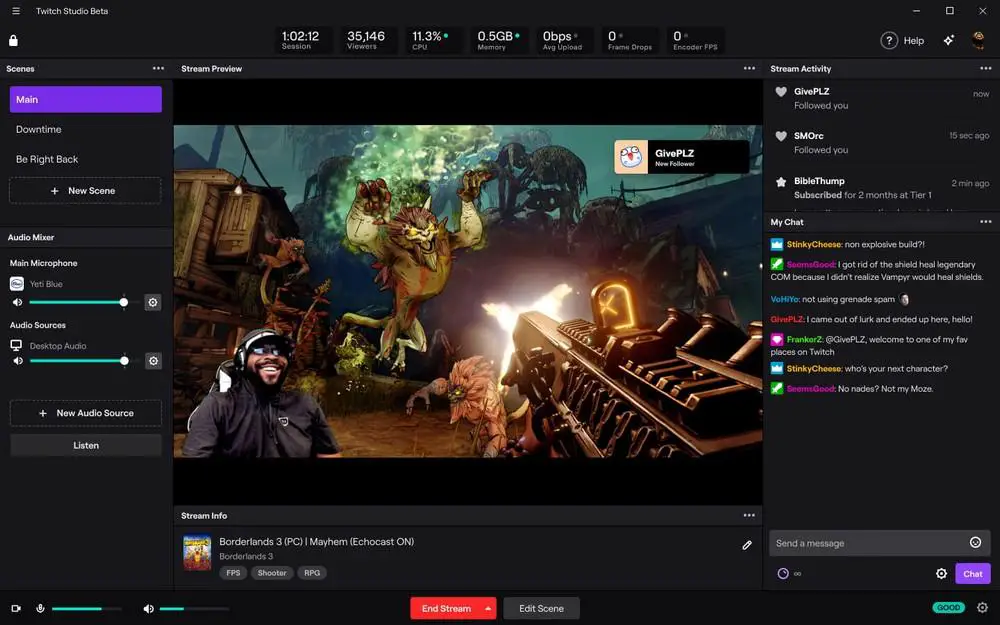
However, being an application in beta phase, we may face some performance problems during our broadcasts, although it is unlikely, since the application is in a very advanced beta phase, so most of the initial problems of performance were fixed a long time ago. This application is available for download from its website which we can access through the following link .
Stream on Twitch from a PlayStation
Both the PlayStation 4 and the PlayStation 5 integrate into the operating system the possibility of broadcasting our games through Twitch and YouTube. To configure this option, the first thing we must do is open the game we want to stream and press the Share button . Next, from the different options shown, click on Transmit and then select the platform through which we want to start sharing our games. In the next window, we must enter our account information, in this case Twitch.
In the next window, we must add the title that we want the broadcast to have, which should not be the title of the game we are going to play since Twitch automatically detects what title it is and adds it in another section that we can only modify if We transmit from a computer. Next, we select if we want to include the sound of our microphone and, if we have the official PlayStation camera, we can include the signal. We can also add a column so that, on the right side, a column is displayed with the comments of the people who see us so, in this way, we do not have to use another device to keep an eye on the chat.
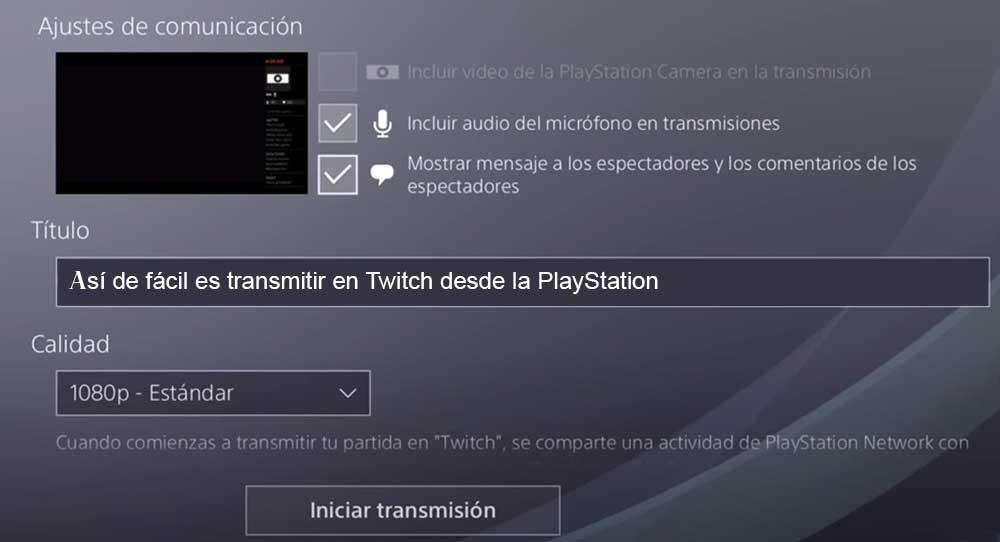
Once we have configured all the aspects of the transmission, click on Start transmission . Depending on the PlayStation model we have, the signal quality will be different. If we use a PlayStation 4, the Twitch video broadcast signal will be 720p at 60 fps. Both the PlayStation 4 Pro and the PlayStation 5 allow us to stream the games in a maximum of 1080p at 60 fps, both through Twitch and YouTube.
Broadcast from an Xbox on Twitch
The process to broadcast from an Xbox One onwards through Twitch is very similar to that of the PlayStation, but, unlike the Sony console, the option to broadcast is not available directly from the control controller, but we must Access the Xbox options menu and click on the Capture and share option . Within this menu, since what we want is to make a live broadcast, we must select the option Go live now .
In the next step, we must select whether we want to broadcast through YouTube or Twitch and then enter our account information. Once we have configured the Twitch account we want to use, we click on the Go live now option. The next step is to establish the name of the broadcast, a name that should not be the name of the game that we are going to broadcast, since, just like if we broadcast from a PC or PlayStation, it is Twitch that is in charge of detecting and adding the name of the title we are transmitting.
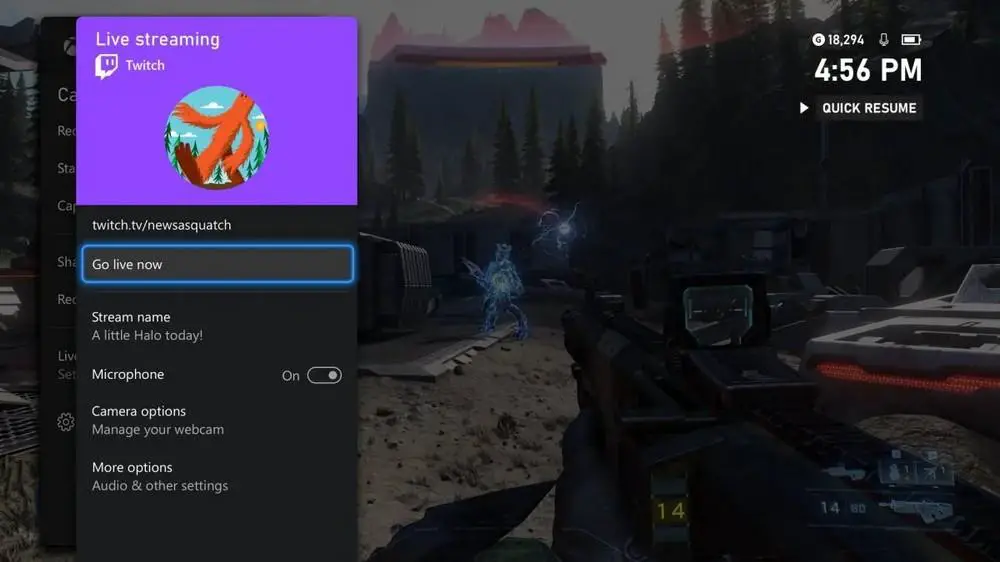
Next, we enable the Microphone box if we want our voice to be shown along with the sound of the game and, if we have a webcam, we can also activate it so that our image is also shown in the broadcast. An interesting option that is not available on PlayStation, but on Xbox we find it in More options . Within this section, we can modify the volume level of both the game and our microphone and from where we can also modify the output video resolution. The Xbox One allows you to stream through Twitch at a maximum of 720p at 60 fps while the Series S and Series X allow us a maximum output resolution of 1080p at 60 fps.
We can also use the Twitch application available in the Xbox application store, however, with the native option integrated into the system it is more than enough since it does not offer us any option that is really worthwhile.
Stream on Twitch from a PC with OBS
Basically we only need one application, an application that works as a hub where we must gather all the elements that we want to be part of the stream, such as the video signal, the audio track of our headphones, the overlays that we want to use to personalize the aesthetics of our transmission and the video signal that the webcam mainly collects. In addition, we can also create different scenes, scenes that will allow us to quickly modify the design of our broadcast to appear in full screen with a thumbnail of the game while it loads or we enter the game, a presentation scene minutes before starting the stream to give it time users to respond to the transmission start notification among others.
OBS is an open source and completely free application with which we can not only broadcast live through Twitch and YouTube, but it also allows us to record our games. This application is available in Spanish, is compatible with Windows 10 and Windows 11 and has a large community behind it, so if we have any questions about how to configure any parameter of the application, we will quickly obtain the solution.
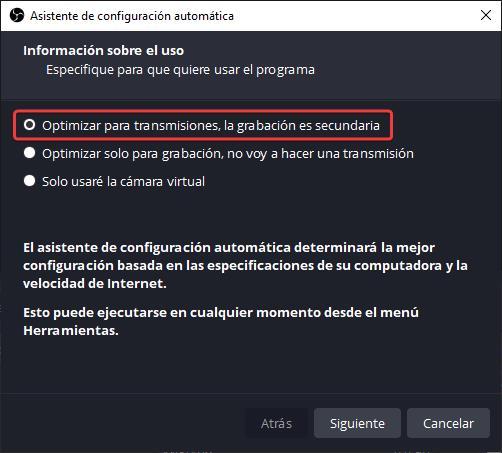
The first time we run the application, it will allow us to configure the operation of the application depending on what we want to do with it: transmit via streaming or record our PC screen. In this case, we select the first option and click on Next.
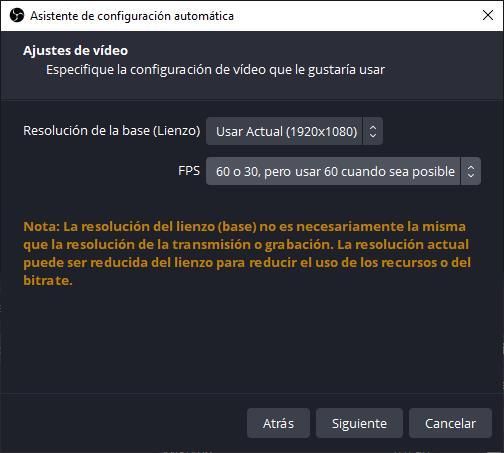
Next, we must select the resolution with which we want to stream and the number of frames per second. If our computer is powerful enough to run games with query, we must select the first 1920×1080 option, but if it is short on resources, we can choose the 1280×720 option. Regarding the number of frames, we find the same thing, if the equipment is powerful, we select the first option, otherwise we set the limit at 30 fps. We click on Next.
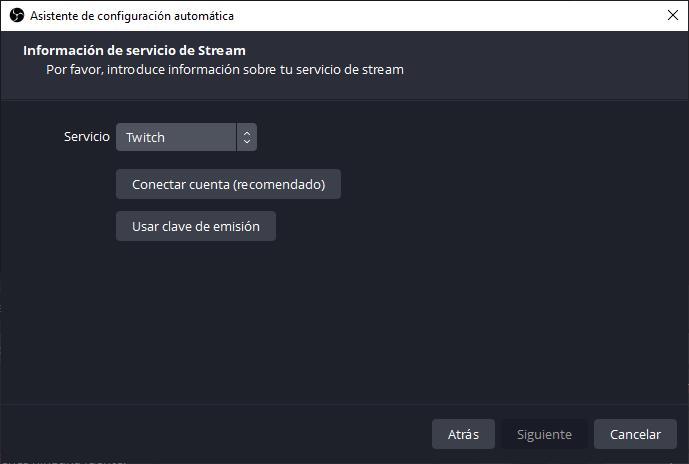
In the next window, we select which platform we want to transmit through. By default, the first one displayed is Twitch. Next, click on Connect with account (recommended) to link the Twitch account with the application and be able to transmit through our account.
Once we have linked the account, we leave the Prefer hardware encoding boxes checked (uses the computer's hardware to carry out the process instead of software which is much slower) and Estimate bitrate with a bandwidth test , so that the application Check the maximum quality at which you can broadcast depending on our internet connection.
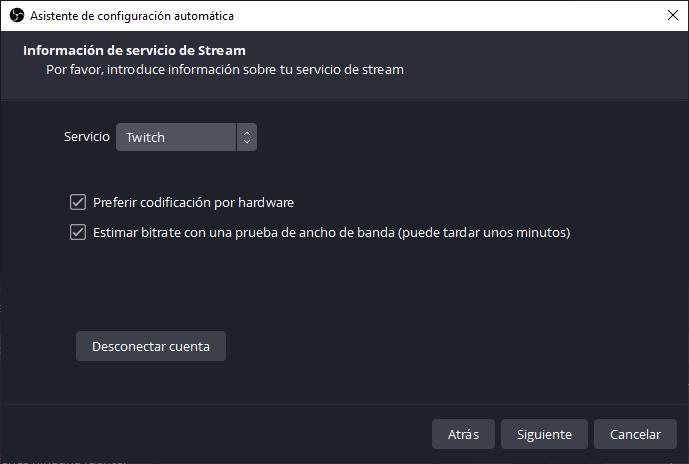
When you click Next, the application will take a few minutes to carry out this process. When finished, click on Apply settings.
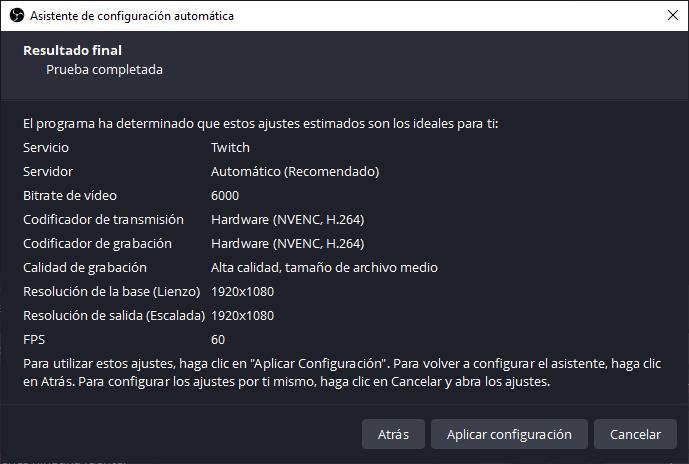
Once the settings that the app uses to stream via Twitch have been applied, the app interface will be displayed.
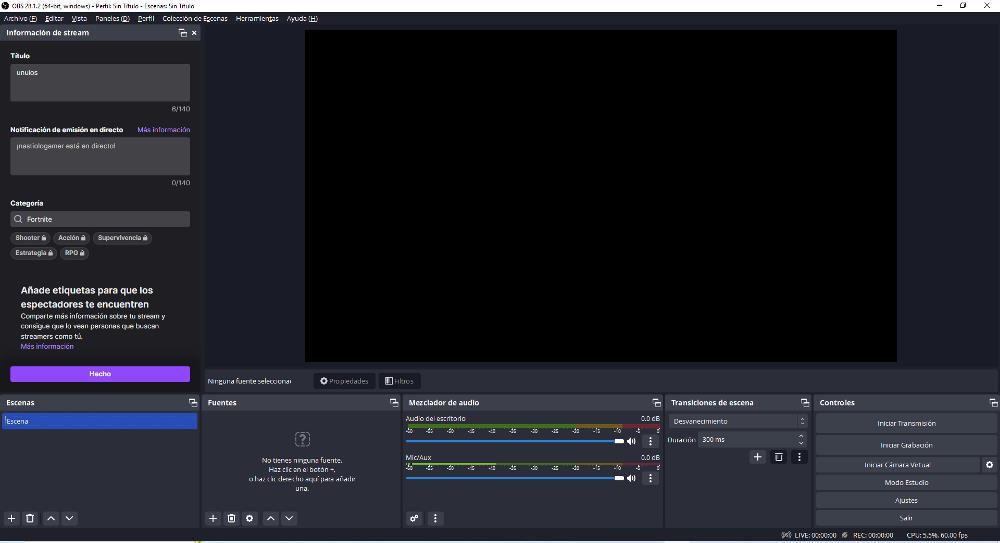
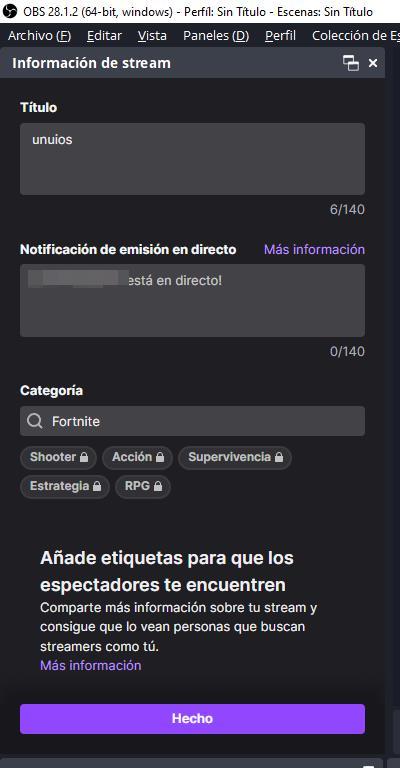
In the Stream Information panel, we must establish the title that the broadcast will have, not to be confused with the name of the game we want to broadcast, since that information is automatically recognized by Twitch, although we can change it whenever we want. We must also configure the text that we want the notification of the users who follow us to show when we are going to start the transmission. Finally, we select the category or categories where we want to appear listed on Twitch (which is independent of the game category) and click on Done.
Next, we need to create scenes. Scenes work like layers in Photoshop. Each scene can show a certain number of elements and they can be shown or hidden depending on what we want to show on the screen. For example, we can create a scene where the image that is shown in full screen is the one captured by the webcam and another scene, where the game and the image from our webcam will be shown in small size.
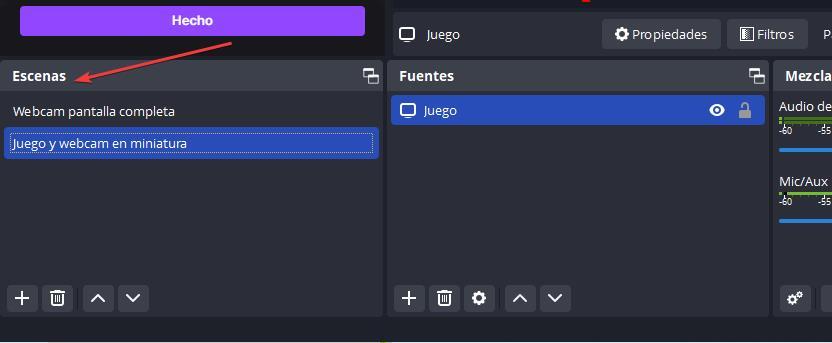
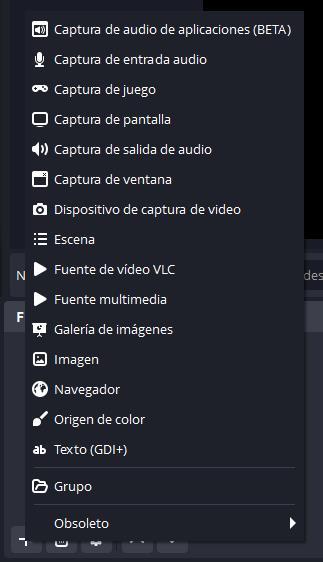
Next, we go to the sources section, but not before selecting which scene we want to add the sources to. Within this section, we must select the video and audio sources that we are going to use to transmit. Each of the fonts that we are going to use are added independently and to do so, we just have to click on the + sign and select the type of font from the different options displayed. To transmit the game shown on the screen, we select the Screenshot option and to show the webcam, if we have it, we select the Video capture device option . We will obtain the audio signal with the Audio Input Capture account .
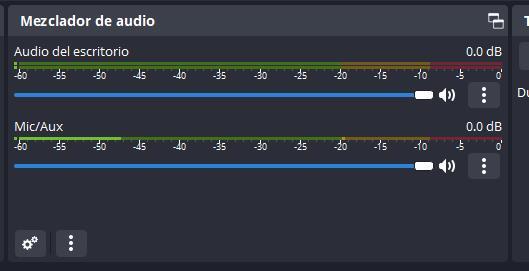
To the right of the sources, there is the Audio Mixer that allows us to modify the sound level of both the game and our microphone.
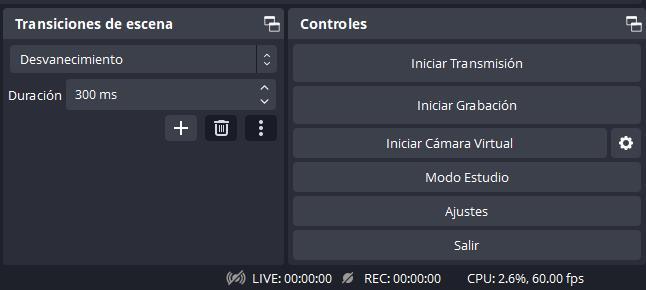
Finally, we select the type of transition we want to display every time we change scenes and the duration of the transition. To start the transmission, to the right of the application, click on the Start transmission button .
OBS Studio is available, in addition to Windows, for macOS and Linux. Its source code is available on GitHub and we can download it directly from its website, which we can access by clicking on the following link . The configuration for Windows, macOS and Linux is exactly the same as what we have shown you.
How much do you earn on Twitch
As I mentioned in the previous section, to start streaming on Twitch, it is not necessary to pay a monthly fee or anything similar, the only investment necessary is the equipment necessary to transmit the content we want, either using a computer with a webcam and microphone. or a console. At first glance, the idea seems great, and in fact it is. However, Twitch is not an NGO . Twitch allows us to reach millions of people around the world thanks to the own server infrastructure it uses (Amazon Cloud, everything stays at home), an infrastructure that is not free.
When we exceed the minimum requirements necessary to monetize our channel, which we will talk about later, we can start receiving subscriptions. The price of subscriptions in each country is different, so we cannot talk about quantities but rather percentages. The amount of subscriptions that users pay to support a streamer is divided 50% between the platform and the streamer . In Spain, a Level 1 subscription to Twitch costs 3.99 euros. Of those 3.99 euros, Twitch keeps half, while the other half goes to the streamer. The distribution is the same with both Level 2 and Level 3 subscriptions. That amount is gross, since we must then deduct the corresponding taxes.
Another method that we have at our disposal to earn money on Twitch is through bits. Bits are the currency of the platform and are equivalent to one euro cent. That is, if we receive a donation of 1 bit, we are receiving one euro cent. The distribution of income obtained through Twitch is 80% for the channel creator and 20% for Twitch.
In recent years, Twitch has implemented new functionality that allows content creators to display Twitch-managed advertising on the channel. Depending on the number of minutes of advertising shown each hour and based on the average number of viewers, we can earn more or less money.
Control over ad minutes is always in the hands of the content creator, not the platform. Taking into account that not everyone can subscribe, but if they actively collaborate on the channel, it is not advisable to abuse the ads since we can cause the followers that we have worked so hard to get to go to another channel where advertising is not so high.
The only way for users to avoid any type of advertisement is to subscribe to the channel, either using the subscription available every month that Prime users have or using one of the 3 available subscription levels that we have mentioned previously.
If we are lucky and little by little we have been growing, we also have the opportunity to earn money through sponsorships, whether by showing a game, using a manufacturer's products or promoting any other type of content. The good thing about sponsorships is that they do not go through Twitch, so we do not have to share these income with the purple platform.
Another method that we can use to monetize our content on this platform is through donations . Donations, whether through a Patreon or PayPal account, allow us to generate additional income that is not supervised by Twitch, so all the money donated to us will go into our pockets, except for the corresponding commission charged by these platforms, commission much lower than that charged by Twitch.
As soon as we open an account on Twitch, we cannot start earning money if we are not previously part of the affiliate program . Once we are affiliates, we must continue progressing on the platform to be able to become a partner .
Minimum requirements to be a Twitch affiliate
In order to start receiving money through Twitch, we must be part of the affiliate program. To be part of this program, we need to meet 3 requirements :
- Transmit a minimum of 8 hours in a month, hours that can be spread over a minimum of 7 days. Transmitting one hour each day is more than enough.
- Have a minimum of 50 followers. Followers are the people who like our content and want to continue supporting us by watching our content. This requirement is not so easy to meet, but with perseverance we can achieve it.
- Get an average of 3 viewers. For those initiated into this platform, this is the requirement that may initially cost more to meet, since we must meet that average number of viewers for at least a week.
Once we have met these requirements, subscriptions (level 1 only) and bit donations will automatically be activated, so we can start monetizing our channel. However, the affiliate program will not allow us to earn advertising revenue.
How to be a partner on Twitch
The next step, once we have entered the Twitch affiliate program, is to become a partner. The main advantage of being a partner is that we can obtain income from the advertising displayed on our channel and control how much we want to be displayed.
Unlike the affiliate program that is unlocked automatically, to enter this program, we must first meet the following requirements and then submit a request to Twitch to be approved for entry into this program.
The requirements to be a partner on Twitch are the following:
- Have transmitted a minimum of 25 hours during the last 30 days spread over 12 different days.
- Have a daily average of 75 spectators.
One we find in the Twitch partner program, we will have the possibility of offering level 2 and 3 subscriptions on our channel. In addition to another series of additional advantages such as requesting to be ported for a month on the platform so that any user who accesses can find us without doing any type of search.
View broadcast statistics
Once the stream ends, we can access all the data related to the transmission directly from the control panel of our account, where we can see the number of new followers we have obtained, as well as new subscribers, the maximum number of views and the average number of viewers among others.
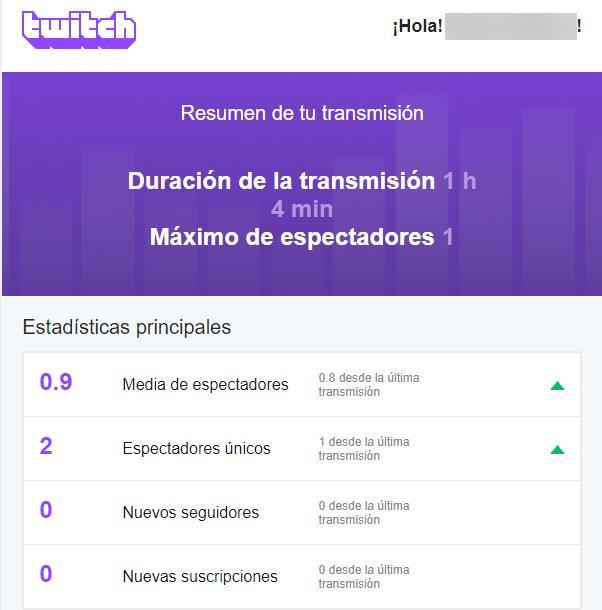
With this data, we can get an idea of whether or not we are meeting the minimum requirements to be able to enter both the Twitch affiliate program and the partner program. It also allows us to get an idea of whether the type of content is to the liking of our viewers, since we can also access the number of people who have interacted in the chat among other data that will give us an idea of how we are doing and If we should improve or stay the same.