How a LiveCD and Flash Drive Saved My Computer!
 In my article today we will talk about one very important topic. Specifically, it will be told how I encountered the fall of the Windows operating system and how I saved my data with the help of LiveCD. If one of you has the same problem, he can easily use my recipe and return seemingly forever lost files. So let's, without delay, immediately get down to business - let's go!
Choosing a LiveCD
Although this bootable media is called LiveCD, no CDs or even DVDs have been used to create it for a long time. The fact is that such media are obsolete and modern computers do not even have a DVD drive. We will use a flash drive.

 So, regarding the choice of LiveCD: there are a huge number of options, but we will consider the simplest one. It is assumed that we have a computer whose operating system no longer boots. Accordingly, we need to somehow get to the hard drive of the machine and save the data that is there.
Someone will say: but you can simply rearrange the hard drive of a non-working PC or laptop to another machine and copy all the files to it. But think for yourself, because not every home has a second computer. Therefore, let's still stick to the option I proposed, and work with Linux Ubuntu LiveCD.
The algorithm given in the article can also be used to burn LiveCDs from other manufacturers. For example, with wider functionality.
Cooking a flash drive
All we need to know about our flash drive is that it must have more than 2 GB of disk space. The speed of the device is not so important, if you choose a slow drive, you just have to wait a little longer when writing the image. Accordingly, the operating system in LiveCD mode will also run slower. But in order to save your data once, this is quite suitable.
See also: Why the laptop does not see Wi-Fi

In the meantime, we proceed directly to burning our LiveCD.
Burning the image to a flash drive
So, in order to create our LiveCD based on the Linux Ubuntu operating system, you need to follow a few simple steps:
- Initially, we go to the official Linux Ubuntu website and download the latest version of the operating system from there for free. In our case, the image weighed 1.9 GB, so, as we already said, a 2 GB flash drive is enough.
- Download the UNetbootin application from our website and run the resulting file as an administrator. We insert the USB flash drive into the USB port of the computer and switch the program flag to the position indicated in the screenshot. After that, using the button marked with the number "2", we select the previously downloaded image and in the list marked with the number "3", we indicate our flash drive.
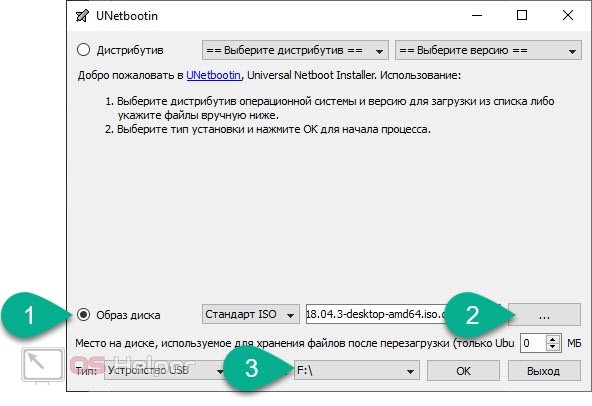
- When everything is done, click the "OK" button. As a result, the recording will start, the completion of which we will need to wait.
Attention: before you start working with our flash drive, be sure to save all the data on it. The fact is that writing an operating system image to a removable drive involves the complete removal of all files present there.
How to use LiveCD
Well, now let's look at how to use the boot drive we created to start a personal computer and save the data we need. This is done very simply:
- Initially, we start our computer from a USB flash drive. To do this, we can go to the BIOS and change the device boot priority. You can also try to launch the boot menu and use it to select our drive as the first bootable media.
- Next, the Linux Ubuntu operating system will start automatically. On the initial screen, two options will be waiting for us: try Ubuntu and install. We choose the first one. As a result, the desktop will start, with which we will save the data.
See also: How to connect a microphone to a PC
- When everything is ready, do the following:
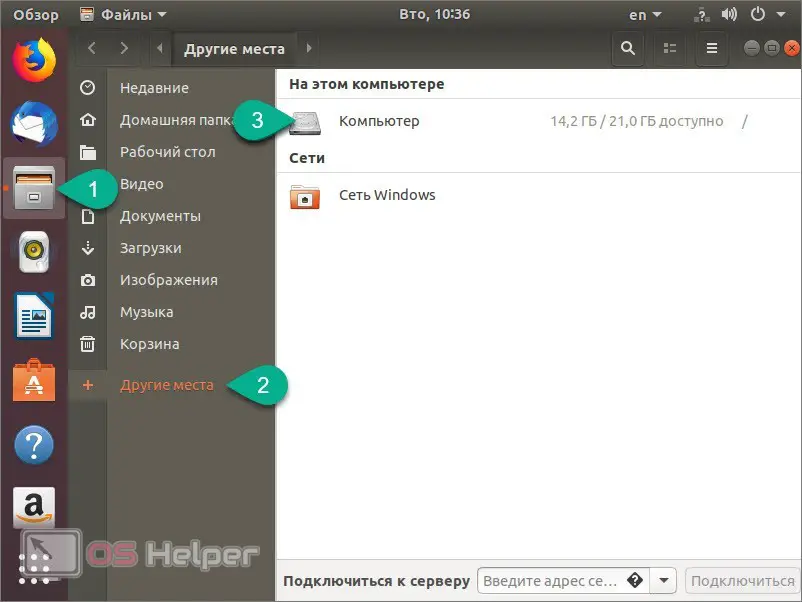
- Launch the Linux Ubuntu file manager.
- We pass to the section "Other places" (marked with the number "2").
- Open the disk with our data. Now we need to connect the removable drive to the USB port of our computer and use the same file manager to move valuable objects to it.
Expert opinion
Daria Stupnikova
Specialist in WEB-programming and computer systems. PHP/HTML/CSS editor for os-helper.ru site .
Ask Daria As a result, our data will be saved, and we will be able to start reinstalling the operating system, and then recovering files from our flash drive.
Summing up
That's all. I showed a simple recipe that allows you to save data even when the computer fails to start. As already mentioned, you can use not only the Linux Ubuntu LiveCD, but any other rescue disk as well. I hope the life hack shown in the article will help you save those files that seem to be irretrievably lost!