How to change the file system on a flash drive from FAT32 to NTFS
 Sometimes a user, trying to dump some large file on his flash drive, encounters an error when the latter does not want to be copied. This is due to the fact that the maximum object that the FAT32 file system supports is just over 4GB. At the same time, modern films can be 80 GB or more. And precisely in order to get around this inconvenience, the drive must be formatted into another file system, more modern. Therefore, in our today's step-by-step instructions, we will talk about how to change the file system on a flash drive from FAT32 to NTFS.
Standard Windows functionality
Unlike other sites where copywriters try to stuff the user with many different options, both useful and not quite, we will give only effective solutions. First, the simplest method will be described, for which you do not need to install anything. Two other options also take place, however, they are needed a little in other situations. One way or another, now you yourself will understand everything.
So, in order to change the file system from FAT32 to NTFS on any flash drive using standard operating system tools from Microsoft, we need:
- We launch Windows Explorer, for example, using the icon on the taskbar.
- We insert our drive into the USB port of a computer or laptop.
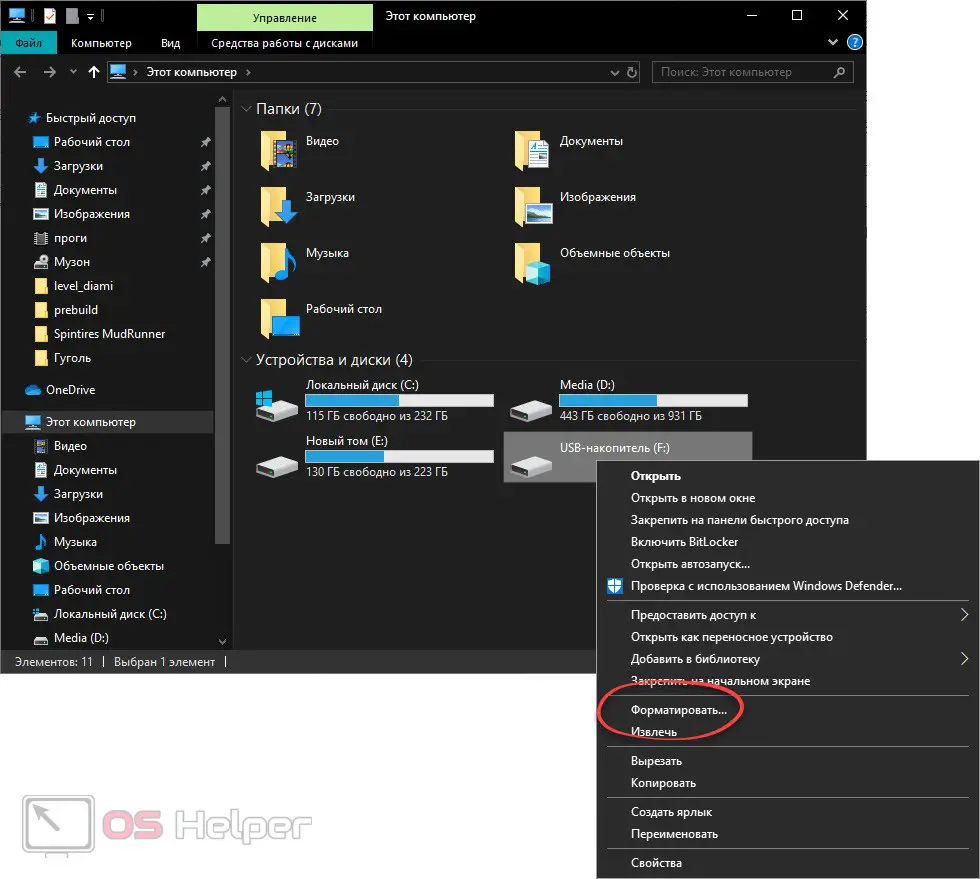
- I got into the file manager, do a right click on our flash drive. From the context menu, select the item indicated in the screenshot below.
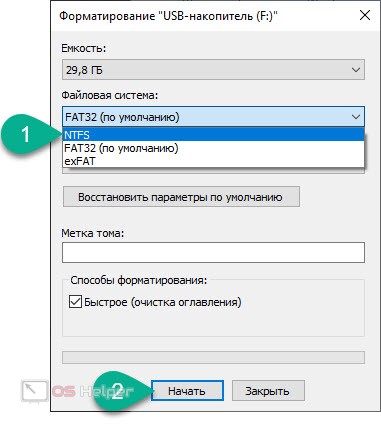
- As a result, another small window will open, in which, in fact, we will change our file system. Initially, select NTFS in the drop-down list, then press the button marked with the number "2".
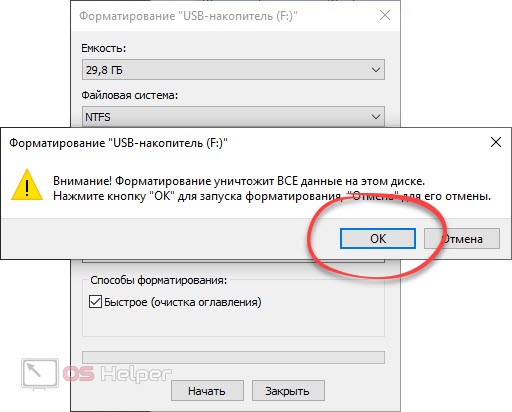
- As a result, the operating system will give us a warning that all data on the drive will be lost. That's why:
Before proceeding with the process, be sure to save the important files that are on the USB flash drive. Naturally, if any.
- When everything is ready, we confirm our intention by pressing the button marked in the screenshot.
See also: How to transfer photos from computer to computer
As a result, the formatting process will begin, the completion of which we need to wait. As soon as the replacement of the file system from FAT32 to NTFS is completed, we will be able to put a file of any size on our flash drive. The limitation will be related only to the volume of the drive itself.
Disk Management
Sometimes it happens that a regular tool for formatting drives does not cope with its task. In operating systems from Microsoft, this happens quite often. Therefore, when you encounter such a situation, we need to re-create the partition on our flash drive. And it's done like this:
- Using the search for the Windows operating system, we find a tool called "Administrative Tools".
- Next, launch the computer management functions and in the left part of the window that appears, select the disk management item. In the right half we find our flash drive.
Expert opinion
Daria Stupnikova
Specialist in WEB-programming and computer systems. PHP/HTML/CSS editor for os-helper.ru site .
Ask Daria Attention: identify the drive clearly. If you select the wrong volume, you can easily erase all important data, for example, from drive D!
- Right-click on the drive and select "Delete Volume". After that, we confirm our intention.
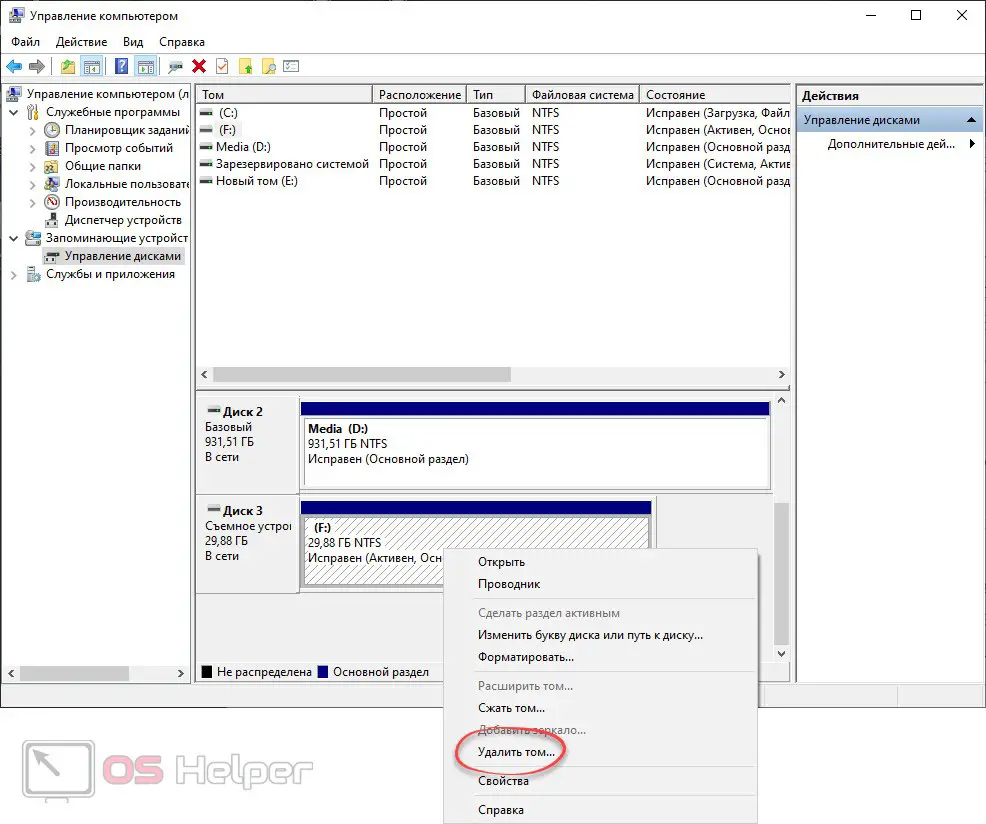
- As a result, unallocated space will appear in our workspace. Again, right-click on it and select the item to create a simple volume from the context menu that opens.
- Following the prompts of a simple step-by-step wizard, we complete the procedure. At the last stage, do not forget to select the NTFS file system. Also, in order for all errors on the flash drive to be corrected, you must disable the quick format mode. To do this, simply uncheck the box below.
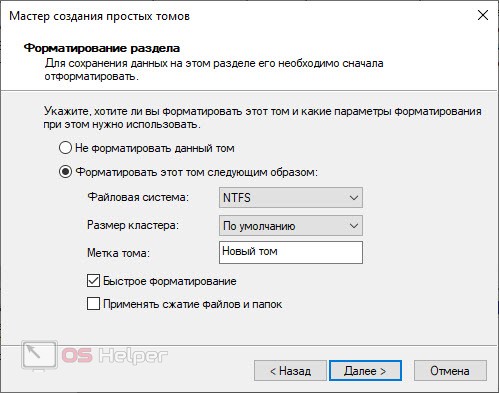
After clicking the "Finish" button, a new volume will be created on our flash drive, and the entire file system will be re-partitioned. Naturally, this will be an NTFS drive.
Third party software
Sometimes, in the most neglected cases, it is not possible to format a USB flash drive even in the second way. If so, you can use the services of a special utility for low-level formatting. For more information on how to work with it, we wrote in this article. Clearly follow our detailed step-by-step instructions and a positive result will not keep you waiting.
See also: How to turn on Wi-Fi on a laptop
Video instruction
For more clarity, we have attached a training video.
Finally
We can only add that if you have any questions, you can always ask them using the comment form.