How to completely remove root rights from Android: all the ways
 Not everyone likes root rights, as they have several drawbacks. If someone asks: what will happen if they are removed, we will answer. Firstly, you lose the warranty, secondly, you violate your own security, making the device vulnerable to viruses, and, thirdly, you yourself can ruin the gadget with inaccurate actions. Nevertheless, today we will tell you how to completely remove root rights from Android.
Including we will talk about the phone Xiaomi Redmi Note 4X. It will not work to touch on the instructions for all models, since in each case the approach and the software used are completely different. For example, on different OS versions: 4.4.2, 5.0, 6.0.1, etc., the procedure may vary. In the same way, it is different depending on the model: Samsung Galaxy, Meizu, etc.
Checking availability
Before proceeding with the removal of administrator rights, let's check their presence on the smartphone. To do this, we will use the utility of the same name called Root Checker. Let's get started.
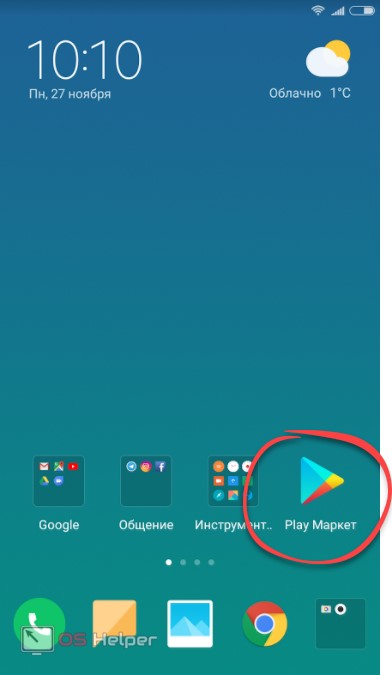
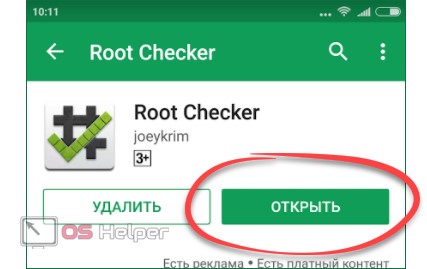
- First, launch the store from Google. Usually its shortcut is somewhere on the Android home screen.
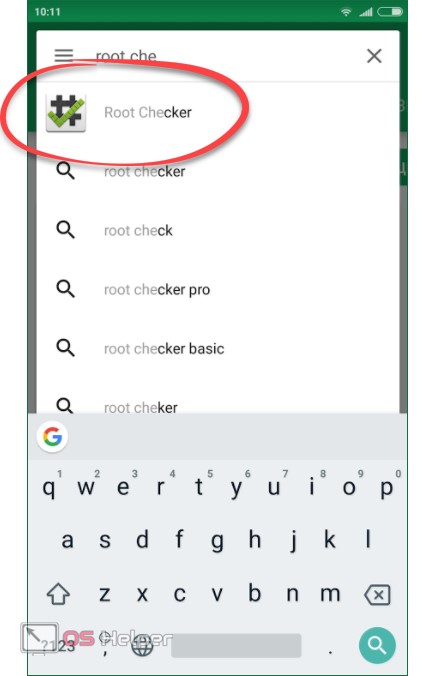
- We write the name of the program in the search bar and in the output that appears, click on the icon that we marked in the screenshot.
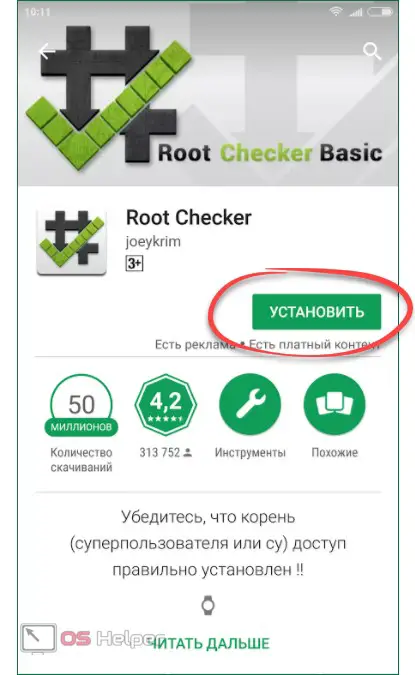
- Then, of course, we install the program. There is a button for this.
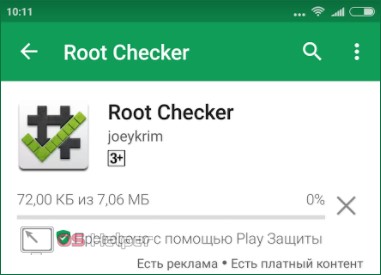
- We are waiting for the download of Root Checker to complete.
- Ready. Now you can open the utility and proceed to use it.
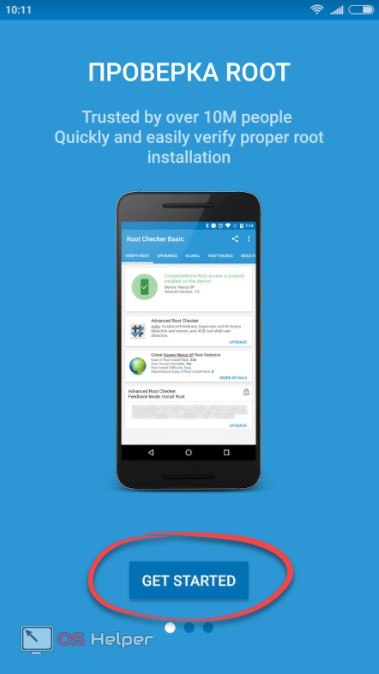
- At the first start, we will be warned that the application should not equip the device with Root rights, but only to check their presence. In any case, click "Accept".
Also Read: How to Root Rights in Android

- At the next stage, we are interested in the only button labeled "GET STARTED".
- Finally, we got to the right toolkit. Click the button marked in the screenshot.
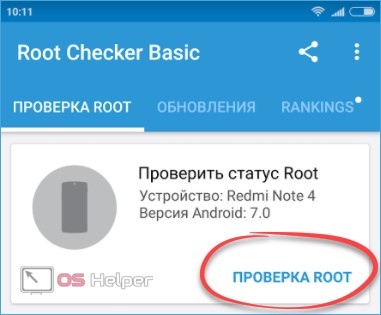
- You will also need to grant access to check for modifications to system files.

As a result, we see that the superuser rights on the device are present. So much the better, because now you can show what interests you - their removal.

How to remove only Root (for Xiaomi Redmi Note 4x)
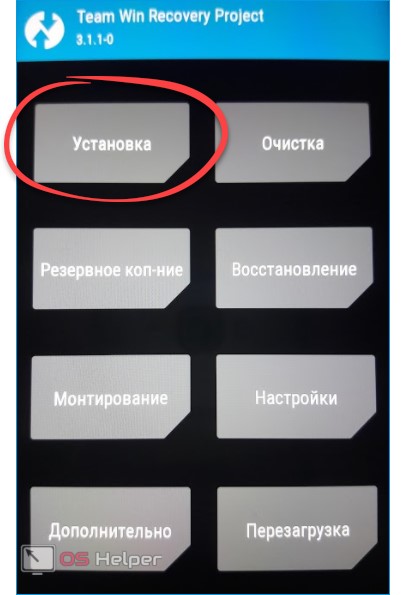
Naturally, if you have a root, then there is a recovery through which it was installed.
- We reboot the smartphone into it and select the installation item.
In order for Xiaomi Redmi Note 4X to reboot into TWRP, you need to turn off the device and hold down the volume up and power buttons at the same time. You should also charge the battery to at least half.
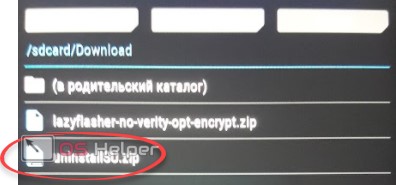
- Select the "uninstallSU" file (you can download it here, the password for the archive is os-helper).
Attention! Use exactly the "ununstallSU.zip" file, which is in the download archive.
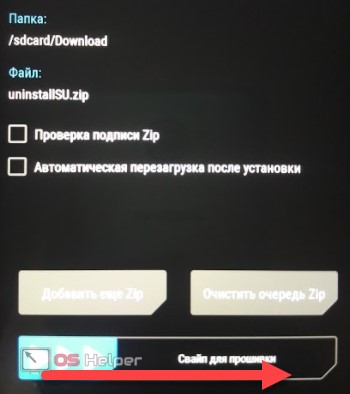
- To flash the archive, pull the slider to the right.
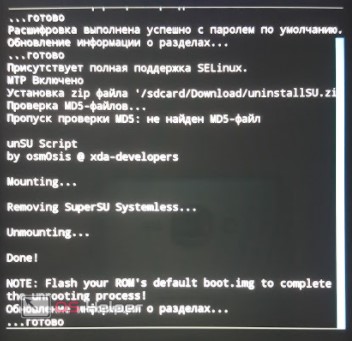
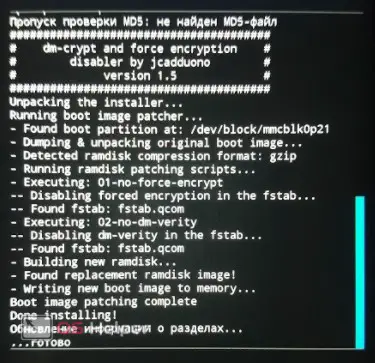
- As a result, the firmware log will appear in front of us and if it is successful, you will see the following:
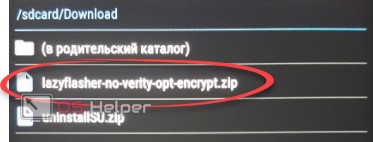
Important! If you did not use custom firmware and remove Root from the standard version, you also need to flash the MIUI unprotect file. This is done in exactly the same way as in the previous case.
The correct unprotect log looks like this:
When everything is ready, reboot your device. Remember - its first launch can take up to 10 minutes. After that, superuser privileges will be revoked.
Revoke rights and install stock firmware (Xiaomi Redmi Note 4X)
In our opinion, a complete flashing to the factory version will be a much more correct option and, accordingly, Root-rights will disappear on their own. Let's see how it's done.
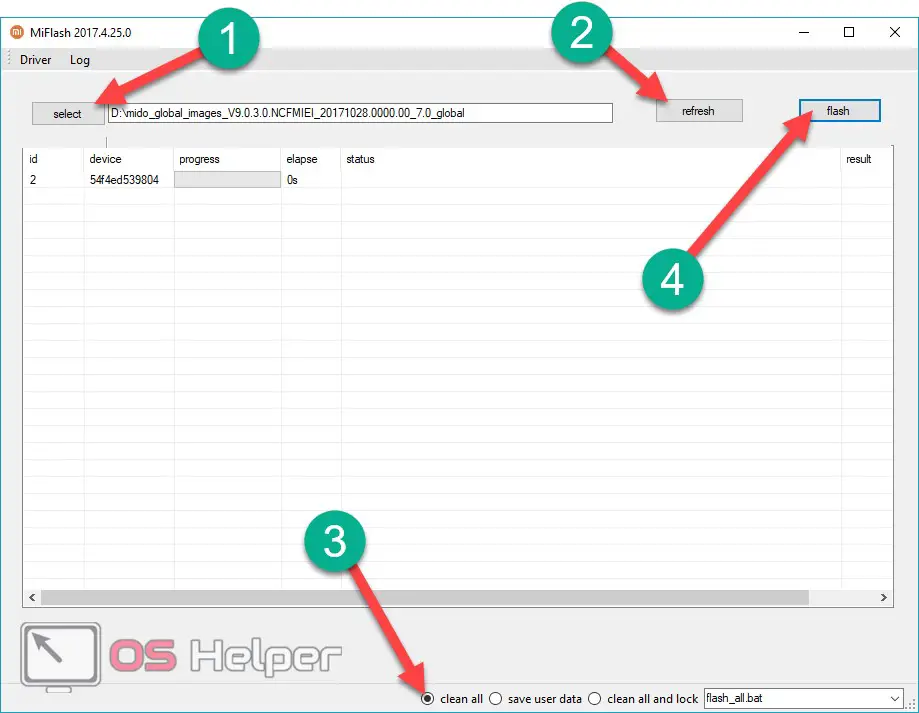
- First we need the MIFlash program. You can download it on our website. You also need the latest stable version of the firmware itself. Install and launch MIFlash, then put your phone in FASTBOOT mode by holding down the volume down and the power button at the same time.
Also Read: How to Clear Cache on Android

- Next, run the flash driver, unzip the firmware to any directory on your PC and specify the path to it in the program. Refresh the list of devices for the appearance of our "patient" with the "refresh" button and select the firmware mode:
- clean all. Complete cleaning of all data, including the user folder.
- save userdata. Surface flashing without deleting your files.
- clean all and lock. Full firmware with bootloader lock.
When everything is ready, press "flash".
Do not forget that for the normal process to go through, you must install the drivers to connect your phone to the computer.
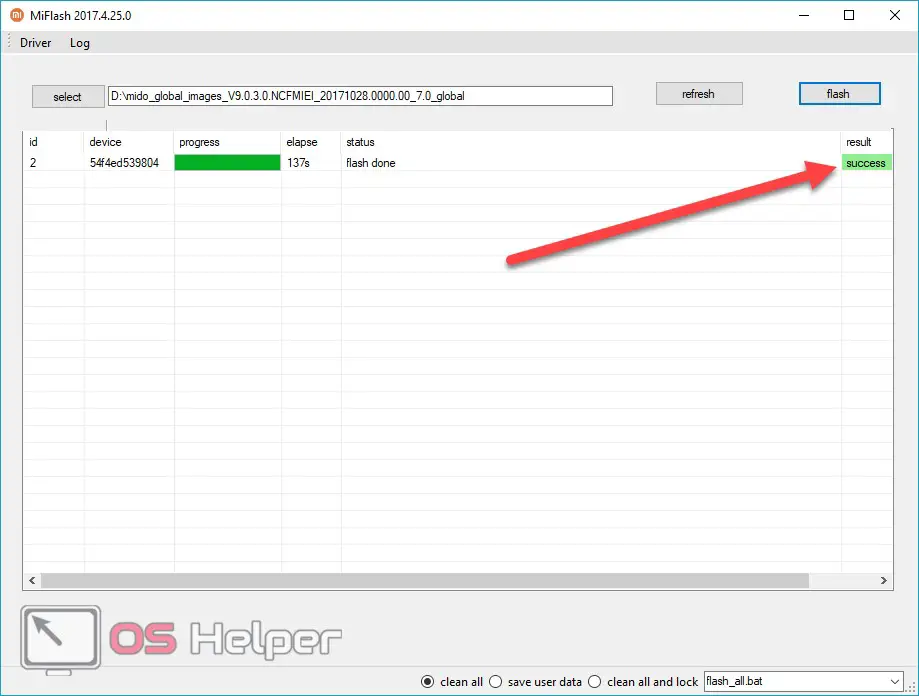
- The firmware process will begin, which usually lasts about 3-5 minutes.

- After successful completion, the device will reboot itself. The program will notify you of the correct completion of the process.
Manual removal (all platforms)
Sometimes you can try to remove the ill-fated root yourself. For this we need ES File Explorer. You can download it from the Play Store.
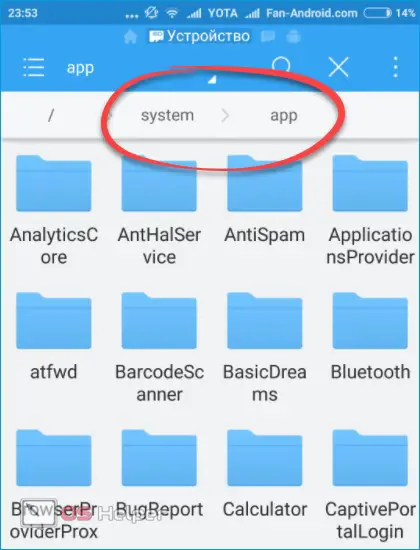
- Run the program and go to the "/system/bin/" directory and delete the "su" file.
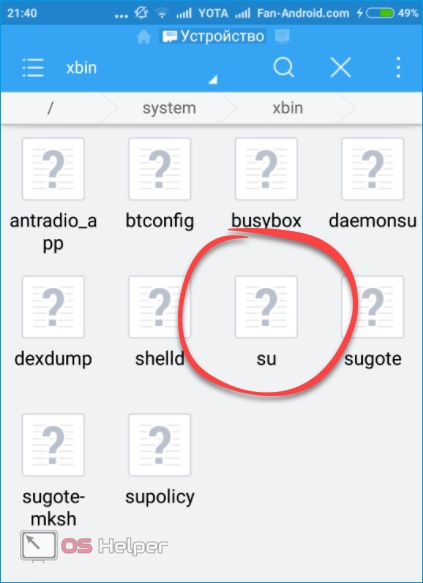
- Now go to "/system/app/" and demolish "Superuser.apk" there.
After that, the device can be rebooted and checked using Root Checker. We have shown how this is done earlier.
Uninstall using SuperSU (all platforms)
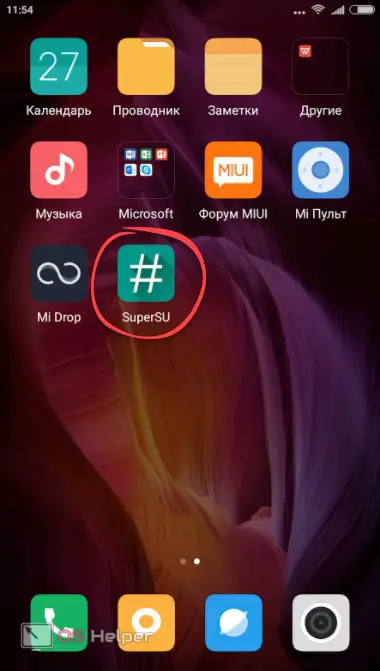
You can also opt out of using this feature through this program. Usually it comes with root rights (sometimes it's SuperUser).
- We launch the application by finding its shortcut.
- If you are logged in for the first time, you will be prompted to select an account type. Since we want to thoroughly demolish Root and everything connected with them, we press the second option. We marked it in the screenshot.

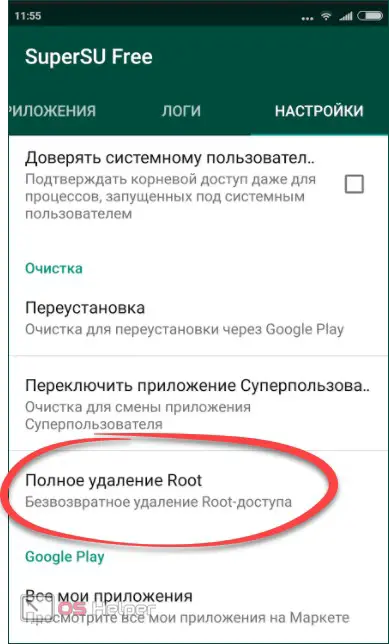
- Go to the program settings (the last tab at the top of the window) and scroll through them until we get to the item marked in the screenshot. We tap on it.
Read also: How to use Android Pay
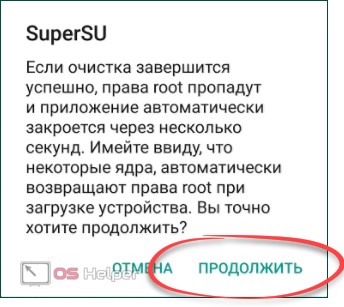
- Next, we will be offered the opportunity to change our mind and warn that errors may occur during the removal process when the rights themselves return after the system is rebooted. Click the button marked in the screenshot.
We’ll add on our own: everything you do, modifying the phone’s file system, you do at your own peril and risk: even in the most proven cases, errors can occur that lead to the “bricking” of the device.
- The next warning prompts us to allow an attempt to restore the bootloader. The fact is that if this is not done, most often automatic OS updates “over the air” will no longer be able to come to your smartphone. We recommend clicking "YES".
- We can also try to restore the recovery. This will remove TWRP or another version and the factory version will be “sewn up”. But again, not the fact that the operation will be successful. So we click "YES".

After that, your smartphone will reboot and, if everything goes well, it will no longer be rooted.
Results and comments
That's all, if you want, you can take a closer look at the topic: how to flash Xiaomi Redmi Note 4X. We will finish and just remind you that any questions on the topic under consideration can be asked in the comments.
Video
We have also prepared a video related to the topic for you.