How to restart Android: instructions for beginners
 Today we will talk about rebooting devices running the Android operating system. These can be phones, tablets, SmartTVs, e-readers, smartwatches, etc. The simplest methods (using the power button) and more advanced options (for example, Recovery or scheduled reboot) will be considered. In any case, the question of how to restart Android will be fully disclosed. Let's get started.
Why do you need a reboot at all
Let's look at a few reasons why a reboot is a must. These include:
- Scheduled restart. Any operating system, including Android, accumulates a lot of temporary files over time and slows down. In order to lighten the OS and return it to its original state, you just need to restart the gadget.
- System failure. Sometimes, and this is not a secret for anyone, one of the applications or firmware elements in general freezes and takes the smartphone out of a working state. To fix such a bug often only a reboot helps;
- Access to additional features. You may also need to reboot, for example, to access the recovery. About what it is and what it is for, we will talk a little lower.
So, after a few lines of theory, we suggest getting down to business, namely, considering ways to reboot the phone.
Reboot Android
So, let's get to our instructions. Below you will find several ways to restart Android. Choose the most suitable one and try to implement it. For a better understanding, we will briefly describe where this or that option is more suitable.
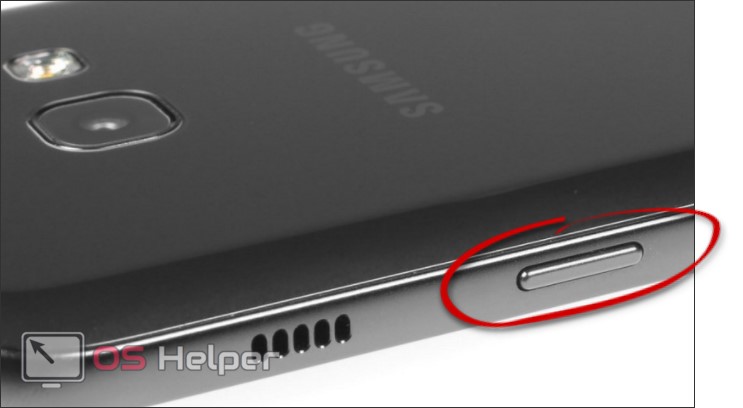
Using the power button
Using the power button, in most cases, you can immediately implement 2 options for resetting your device. It should be understood that such a reset is not a so-called hard or Hard Reset - it simply reboots the phone with or without shutting down the operating system.
Normal restart
This option can help when you just want to reboot the device. This will help clear the RAM. The operation is performed as follows:
- Press and hold the power button on the unlocked device. Otherwise, no reaction will follow or a completely different function is activated. For example, in a Xiaomi phone, after holding the power button and the screen is off, the camera starts.
- From the menu that appears on your screen, select the desired item. Ours looks like this.
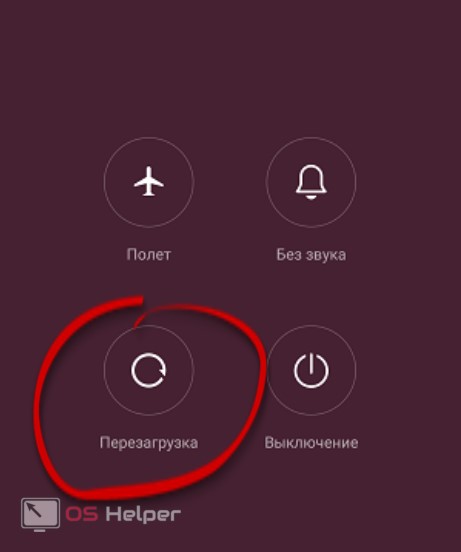
Please note that there are several additional functions here: flight mode, shutdown and silent mode.
Hard Reset
The next option does not work on all devices (Lenovo, Fly, etc.), but on a good half for sure. It consists in the fact that when your device freezes and does not react to anything, you reset it forcibly. To do this, you just need to hold down the power button and hold until the device is reset. Very handy on gadgets with a non-removable battery.
Be careful: using this method may result in the loss of unsaved data. For example, if you were working with some program and in the process reset the gadget, the project and all related materials will be permanently deleted.
Using Settings
Next, consider an even more radical method, which involves returning the device to factory settings. Moreover, it can be produced both with full memory formatting and without it. However, first things first.
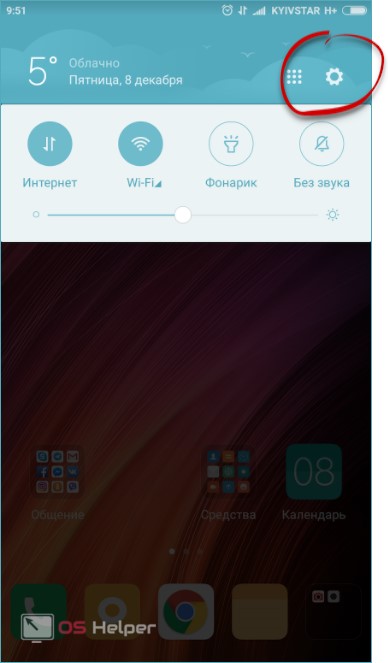
- All the steps below will be shown on the example of a smartphone based on Android7 and a proprietary add-on for it MIUI 9. To begin with, by lowering the notification line, go to the device settings.
See also: Yandex.Browser for Android - APK Download
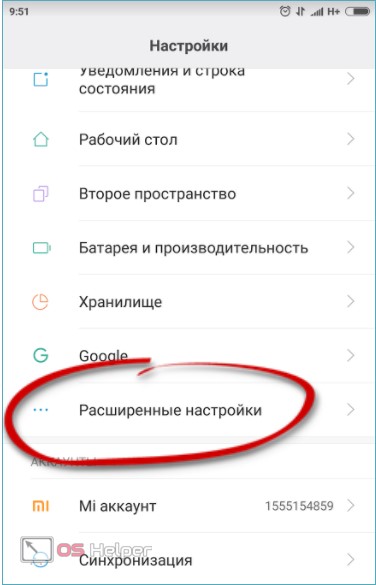
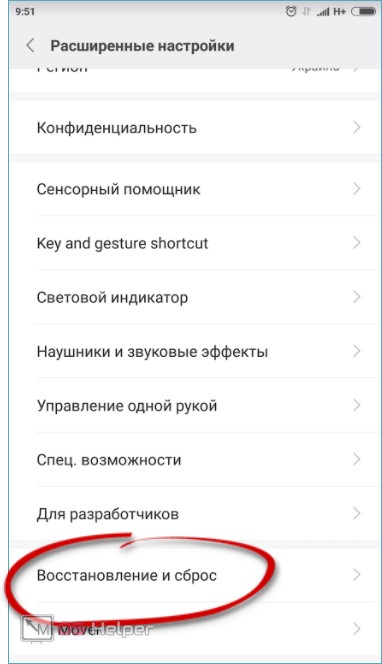
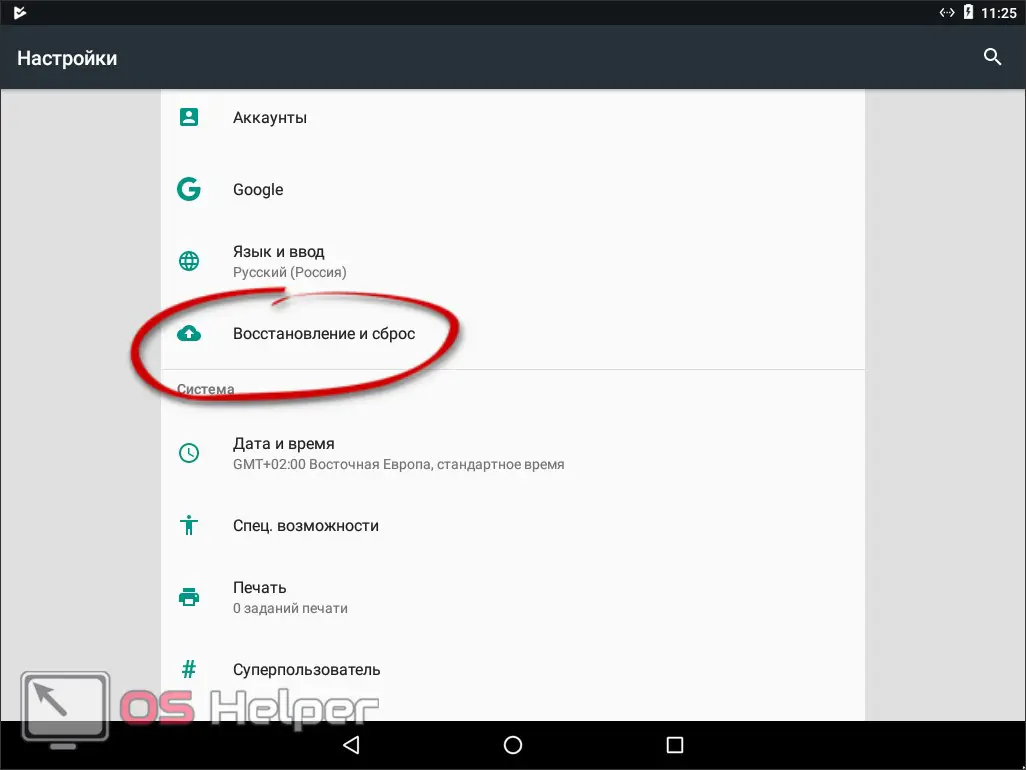
- Next, we need to scroll down a little the contents of the window and select the item called "Advanced Settings".
- The next step is to go to the "Backup and Reset" menu item.
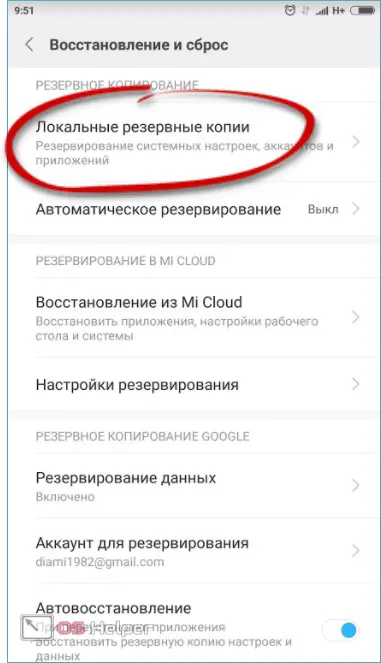
- Before performing operations with the software installed on the phone and the user's personal data, it is imperative to make a backup of the system. Below we will tell you how to do the same through Recovery, but for now, tap on the "Local backups" item.
A local backup is an archive into which all the data needed to restore the current state of our firmware is packed. It is stored in the internal memory of your phone, but for greater security, it is better to move it to a PC or to the cloud.
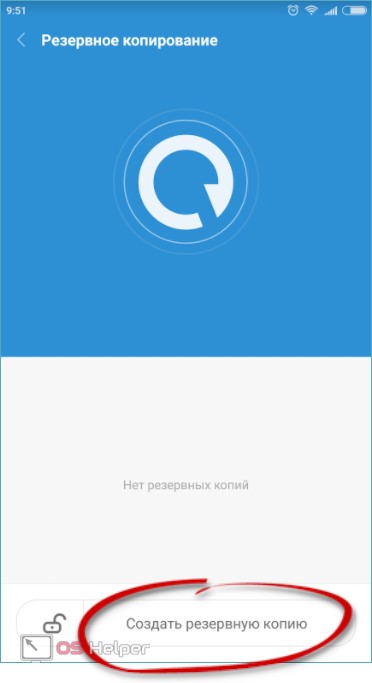
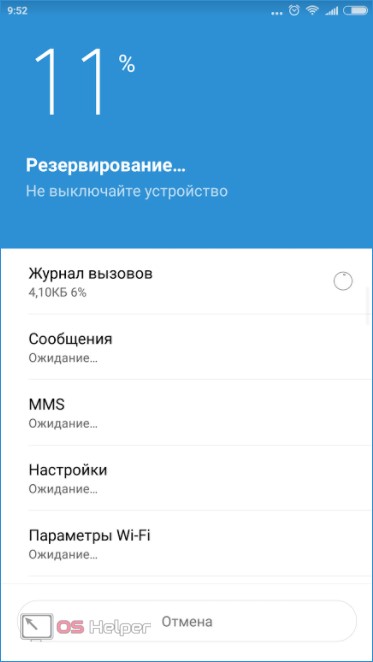
- In order to start creating a copy, press the button indicated in the screenshot.
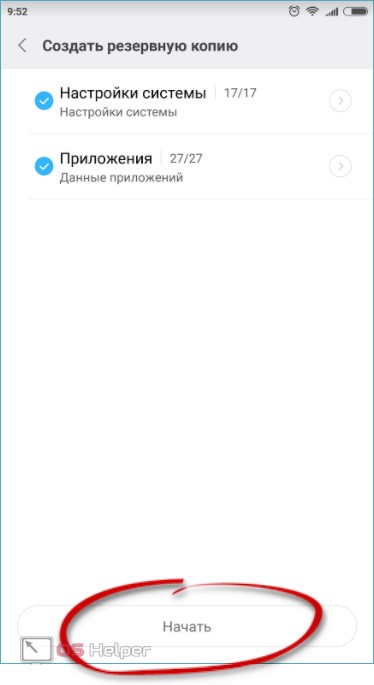
- Tap on "Start" again.
- We are waiting until all the elements are packed and stored in the device's memory.
- Ready. The operation was successful. We just have to click the "Finish" button.
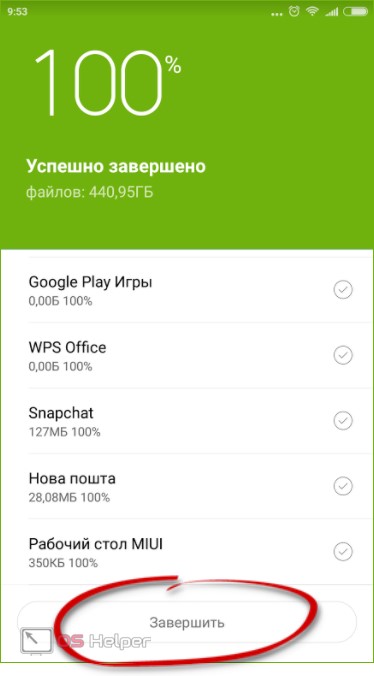
As a result, the archive with all the recovery files has been saved and, as we have already said, it is better for you to move it to your computer.
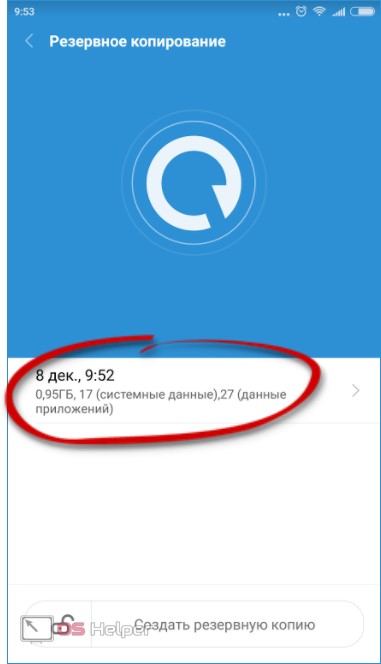
If we click on the name of the backup, the restore menu will open. Here you can activate either a separate recovery of system settings or programs. There is also a general mode: to start it, set both checkboxes to active positions. As soon as the "Restore" button is pressed, the backup will unpack and overwrite the existing data.
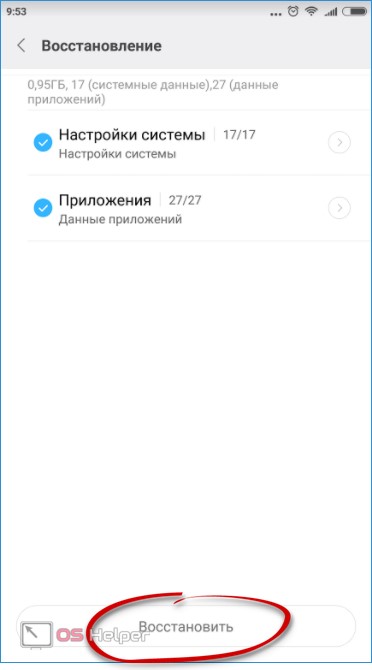
Be careful: those software settings that already exist will be irretrievably overwritten.
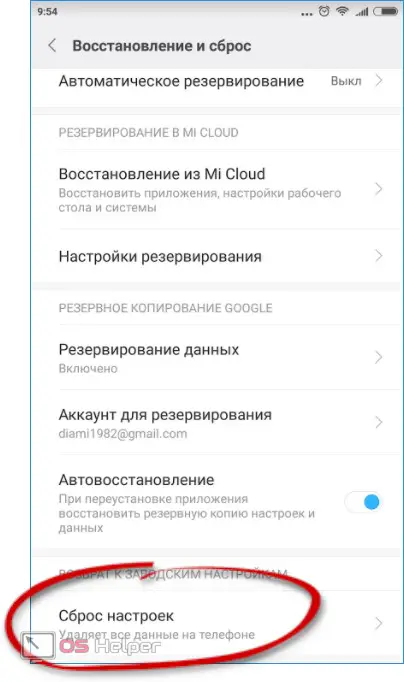
After we have finished with the backup, you can proceed directly to resetting the settings. To do this, we do the following:
- Again we go to the recovery and reset settings, scroll the contents of the window to the very bottom and click the last item called "Reset settings".
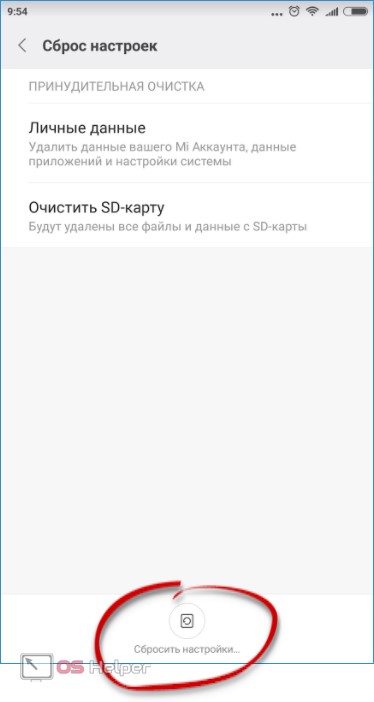
- Then you can choose one of the modes.
Here is their explanation:
- personal data: the device is reset to the factory state, however, the user's personal data is not affected;
- clear SD card: deletes everything, including user files.
When your option is highlighted, press the button marked in the screenshot below.
The cleaning process will take some time, but upon completion, you will receive the device as it was when you bought it.
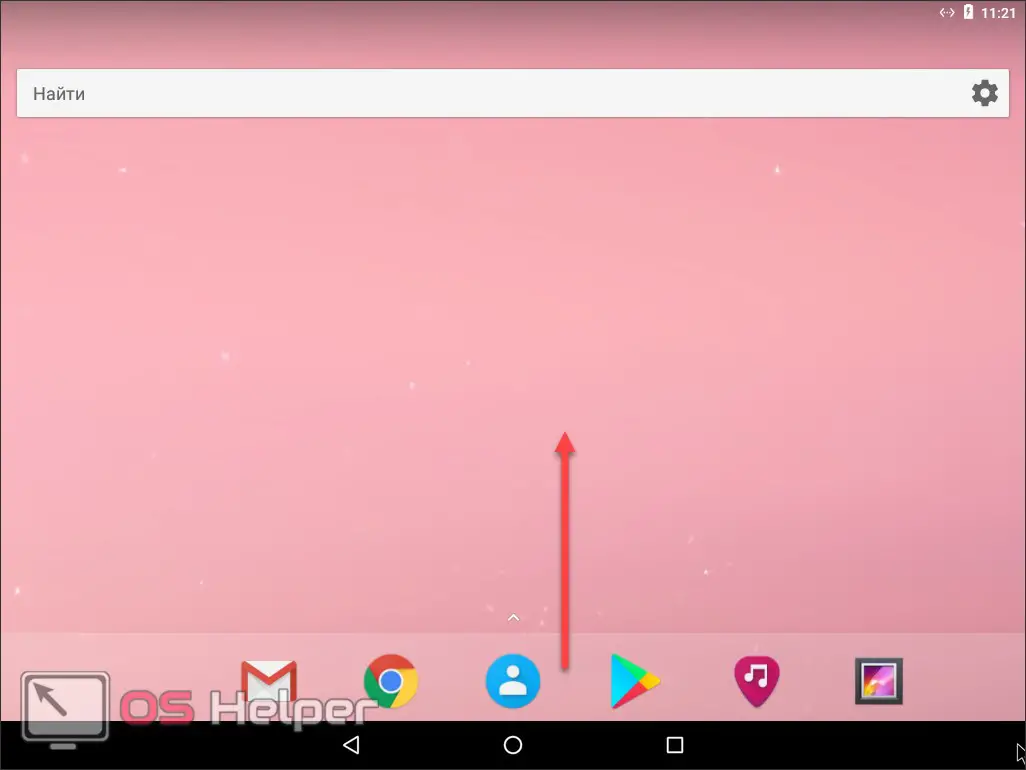
In pure Android, without various shells and launchers, the process looks like this:
- Open the device menu. In the 7th Android, this is done by raising the bottom line up.
- Tap on the gear icon.
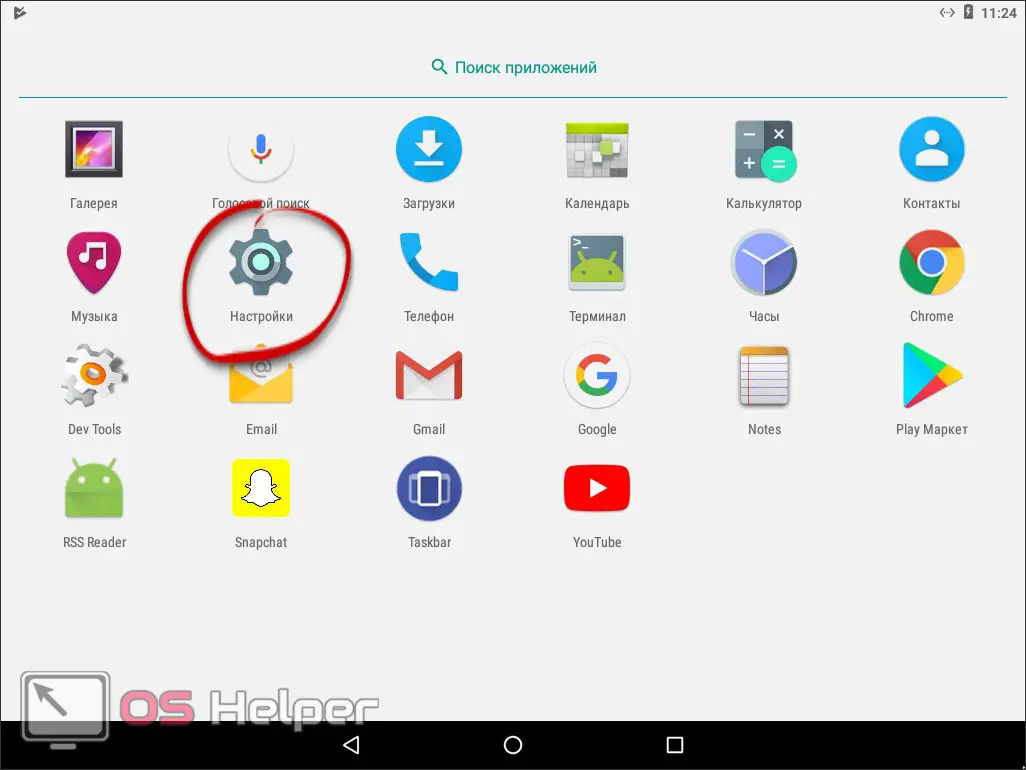
- Scroll down the list and select the item indicated on the screen.
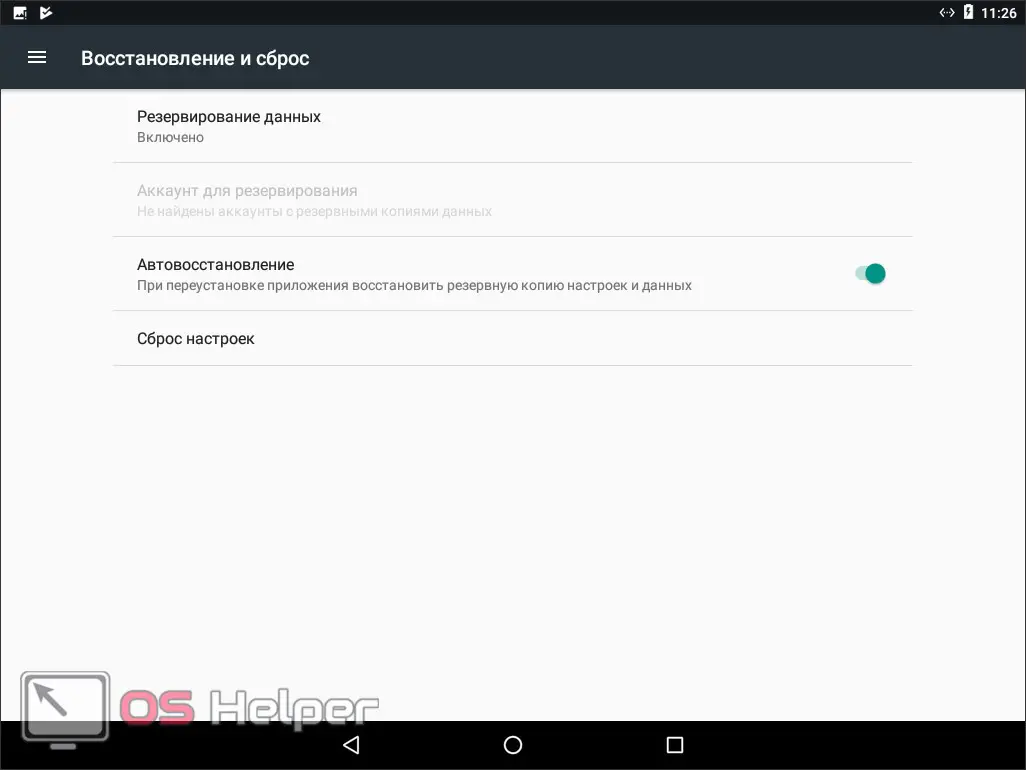
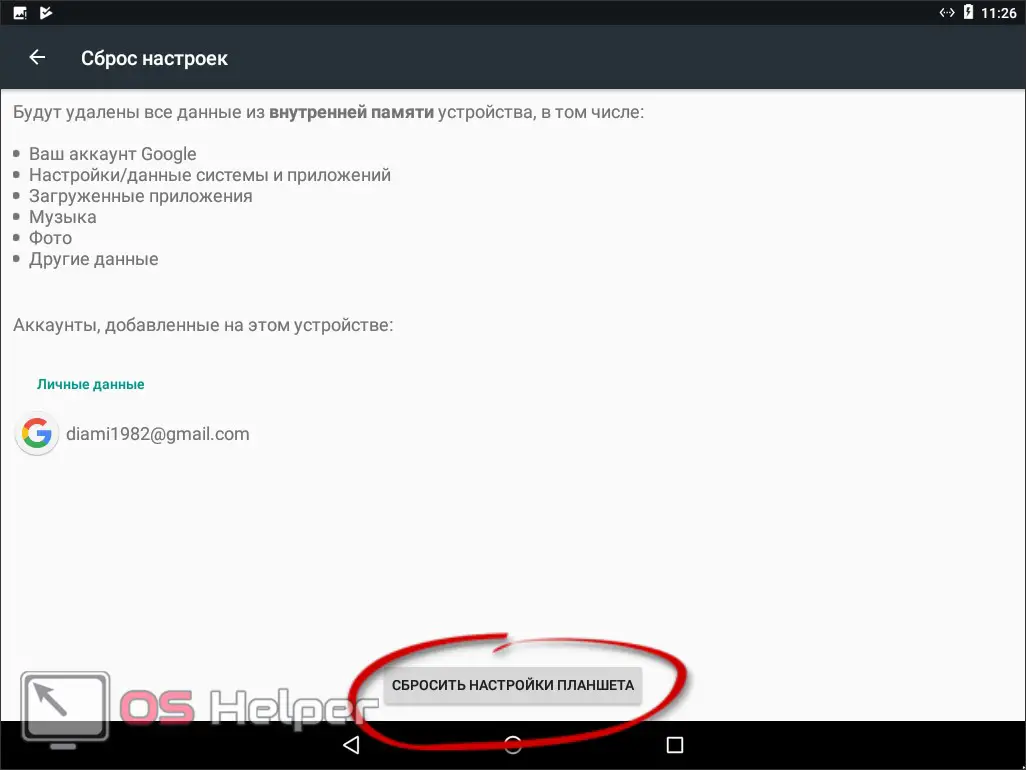
- Data is backed up automatically. You need to set it up in the first paragraph. You can also enable auto-recovery here. The main thing is to have a working Google account and connect it to the phone. When the preparation is completed, click on the line labeled "Reset".
- A new screen will open with a single button. Information about the attached account is immediately displayed and a warning that all data will be lost. If you have already saved them, you can proceed with the reset.
So, we saw the dignity of Xiaomi phones: unlike the “bare” Android, here you can do a general reset without deleting user data.
Using third party software
We smoothly approached another issue - automatic reboot by time and reboot into a special mode. They can be implemented using third-party software. Let's look at how this is done.
Also Read: How to Install Apps on SD Card in Android
Scheduled reboot
Let's set up our smartphone in such a way that it reboots itself at night and frees up memory.
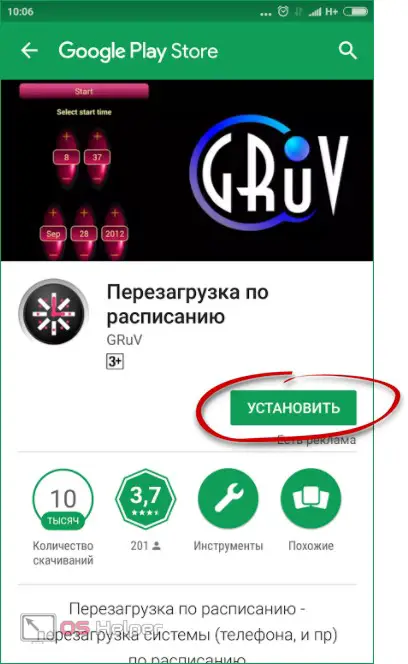
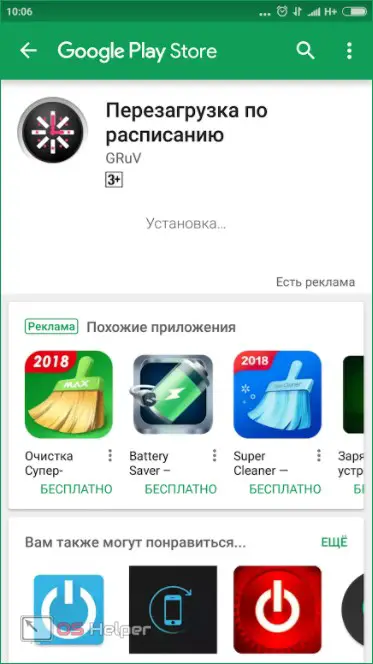
- We go to the Google Play store and find there an application called Scheduled Reboot. When this is done, click on the button labeled "Install".
- We wait until the installation of the program comes to an end.
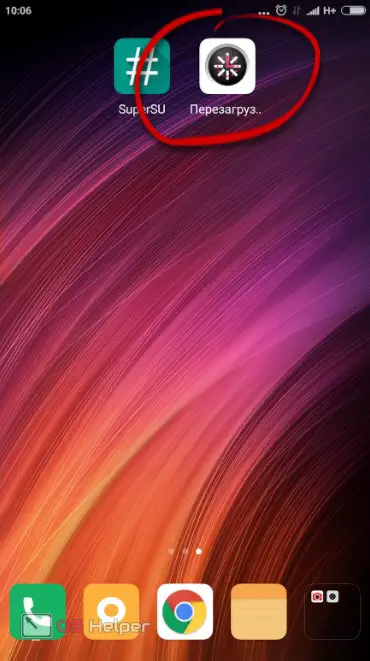
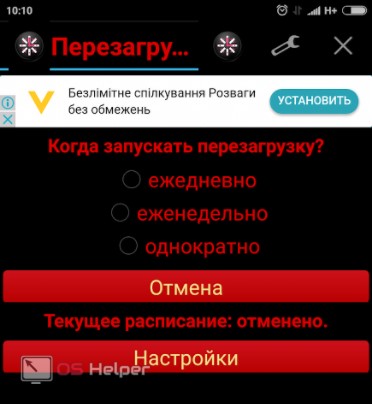
- Ready. The program has been added to the main screen of our gadget. Let's not waste time and launch it.
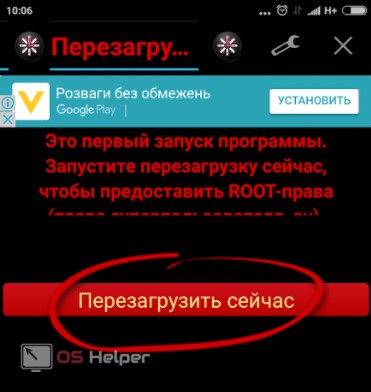
- This is what the utility looks like, although its appearance can be customized by changing the preinstalled themes. You can find them in the settings. In order for everything to work, you need to perform the first manual reboot. The fact is that by default, in new versions of Android, you can only execute it as an administrator, respectively, you, or rather the program, will need Root rights. That is why we placed this method towards the end of the article, because not everyone has such an opportunity.
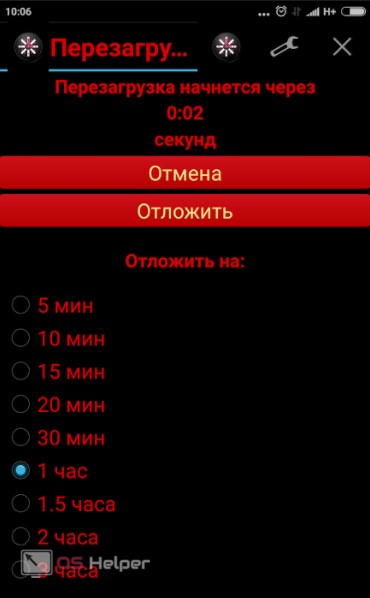
- A countdown of 5 seconds will begin so that we can cancel the operation if necessary.
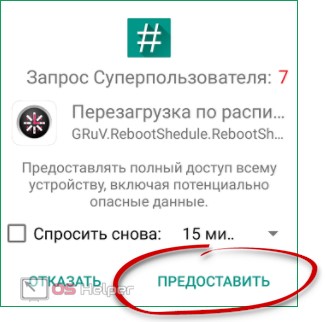
- When the timer counts down to the last second, you will be prompted to grant administrator permissions. If you do not have Root, then an error will simply appear. The action must be allowed. Be careful: after that, the device will immediately reboot.
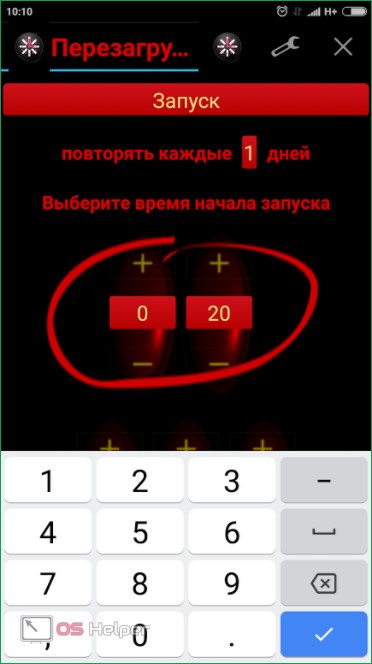
- After restarting the device, open the program again and select the reboot frequency. We recommend that you specify a daily mode.
- Next, you need to set the time when the phone turns off and on again. It is important to choose exactly the period of the day or night when you do not use the device or do it the least intensively. In our case, this is deep night. Use the plus and minus to set the desired value. It can also be entered from the keyboard.
That's all. Now your Android will automatically reboot every day and work much more stable.
Attention! It happens that after a while the right to access the administrator account from the program is automatically withdrawn. If this happens, add it to your root manager's whitelist.
Reboot to special mode
Consider another option using third-party software. This time we are pursuing a slightly different goal, namely, a reboot into a special mode. But let's be consistent and take everything in order.
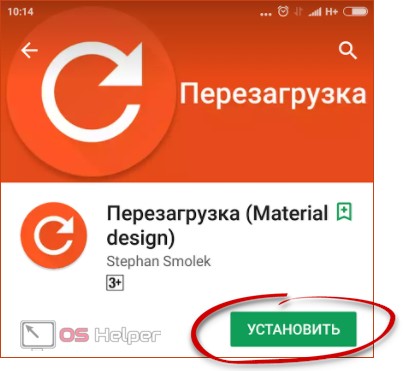
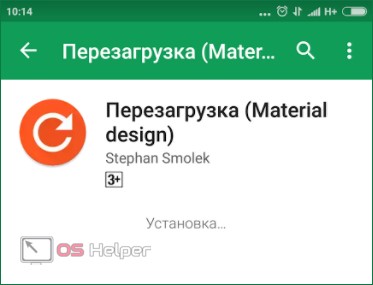
- First, let's download the utility itself called "Reboot (Material design)". You can do this in the Play Store. Like the previous one, this application requires Root access.
- As usual, we are waiting for the end of the APK download and its subsequent installation.
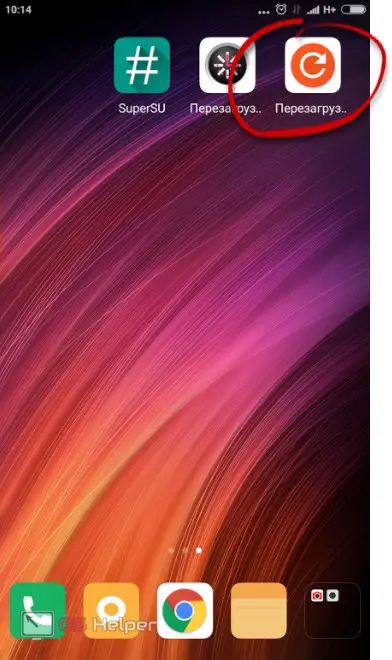
- When the program is ready to go, just run it. The shortcut should automatically be added to the home screen.
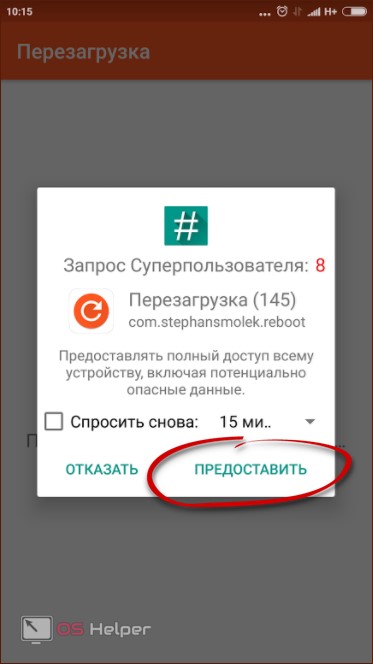
- Immediately we will be asked to provide administrator privileges. We do this by tapping on the item indicated in the screenshot.
- Here is the main menu of the program. There are several familiar modes and not quite. Let's consider them in more detail.
Reboot modes:
- normal reboot;
- recovery. Reboot to a special mode, which must be set separately. At the same time, it can be of two types, official (present by default) and modified. The latter has a wider functionality (similar to BIOS on a PC). Needed, for example, for gadgets without a power button;
- bootloader. A mode that prepares it to accept new firmware via cable;
- download;
- fast reboot;
- safe mode.
See also: The evolutionary history of the Android operating system
All modes are in front of you:

Attention! Some of these modes may not be available and may not work on individual devices.
Through Recovery
Below we will consider 2 options for working with this function at once. Custom and standard recovery will be described. Let's get started.
Standard Recovery
Standard recovery can be launched either using the program discussed above, or by holding down a combination of buttons when turning on the device. In both cases, the result will be the same. All stock Recovery is different and depends on the phone model. Also different are the combinations of buttons to launch them.
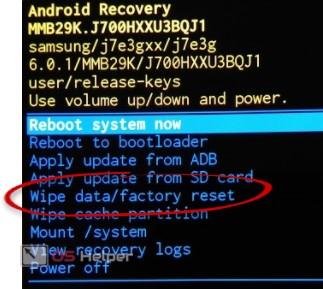
Here is a Samsung phone recovery. As you can see, here you can restart into firmware mode, apply updates via ADB or from a memory card, reset to factory settings, remount system partitions, view the operation log or turn off the device.
Working with custom TWRP
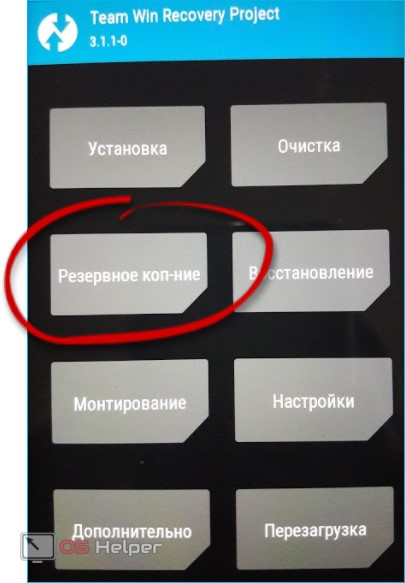
Custom recovery has gained immense popularity among advanced users. In addition, it is constantly updated. In order for such a menu to appear on your phone, you need to flash it, and this is a topic for a separate article. We'll just look at how to reset.
- In any convenient way, we reboot into Recovery. Next, in order to secure your data, tap on the "Backup" tile.
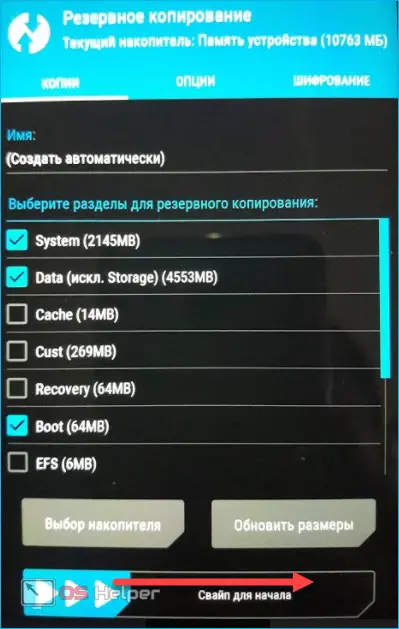
- Select the objects to be saved. We recommend installing them as we did in the picture below. Move the slider all the way to the right to start copying.
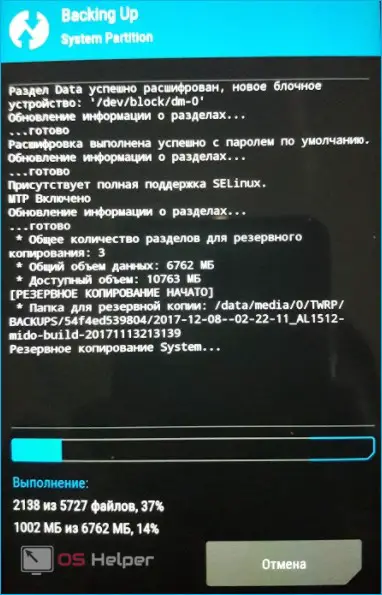
- The copying process has begun, its log is displayed in the same window.
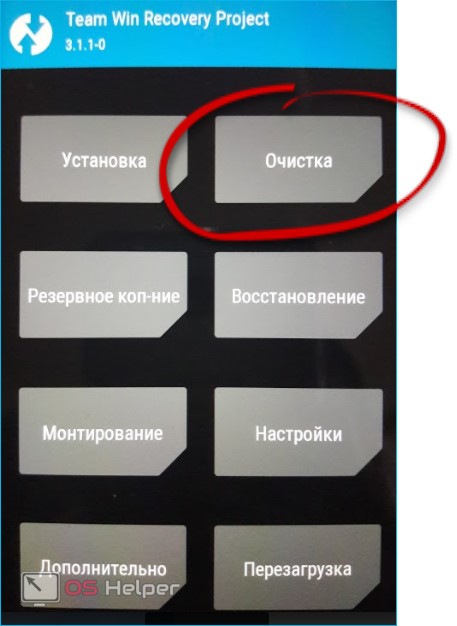
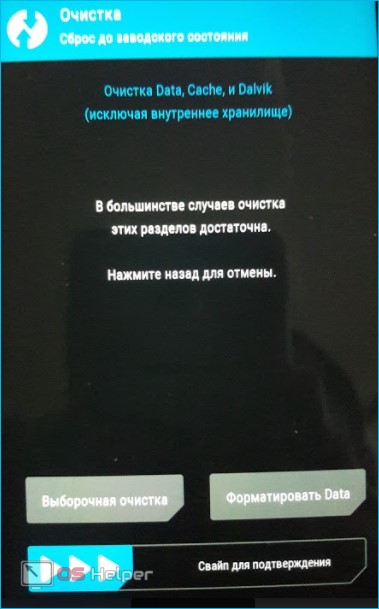
- After the backup has been created and stored in the phone's memory, you can proceed directly to resetting it. To do this, return to the main TWRP menu and click on "Cleanup".
- There are several controls here. First, it is a user data formatting button. Be careful, it will delete all your photos, music, videos and even the backup you recently created. It is better to move it to a PC or laptop first. Secondly, there is a selective cleaning mode, we will talk about it later. And thirdly, standard cleaning - to start it, move the slider to the right.
- Now about selective cleaning. We tick the areas of memory that we want to format and drag the slider to the right.
Here we have to explain something:
- Dalvik/ART cache. System cache of applications. Recommended for cleaning first;
- System. firmware area. If you format the partition, the device will not start (needed to install a new firmware).
- data. Application data;
- Device memory.
- cache. System cache;
- microSD. Memory card;
- USB OTG. Flash drive connected via OTG.
This is how it all looks.
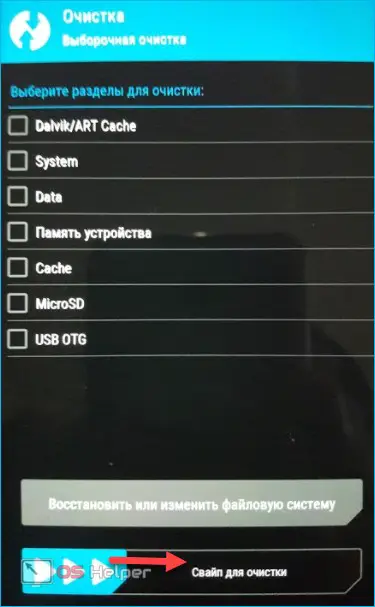
Since the control interface here is touch-sensitive, if the latter does not work, you will not be able to use the mode.
Results and comments
That's all. We have fully covered all the ways to reset and reboot an Android smartphone. We hope our article was useful to you. If you still have questions, feel free to ask them in the comments. We will help each of our readers as much as possible.
Important! Before you start resetting or otherwise manipulating system files, user data or applications, be sure to back them up!
Video instruction
To complete the picture, we suggest you watch a training video on a similar topic.