How to reset Android to factory settings
 None of us can be one hundred percent sure of the reliability of our Android smartphone or its operating system in particular. Glitches, freezes, and sometimes a complete failure to work are quite common among Googlephone users.
The good news is that in 95% of all cases we can fix the situation ourselves without violating the warranty and going to a service center. The way out will be a factory reset, which we will discuss in this article. For clarity, each item of our step-by-step instructions will be accompanied by a screenshot.
What is a general reset for?
Resetting to factory settings may be needed not only when our phone is buggy. It is also necessary in a number of other cases, for example, sales. Imagine that you decide to upgrade your Android or switch to iOS altogether. Naturally, before handing over the old smartphone to the buyer, it needs to be cleaned. This ensures that neither your personal data nor payment information will fall into the wrong hands.

What will be removed?
If you reset your Android to factory settings, you will get the phone the way it was when you bought it. Even the initial setup process will have to go through again. SMS, gallery data, any user files, phone numbers, settings, etc. will be deleted.
It is important to understand that before proceeding with the reset, you will need to create a backup in order to recover from it later. We will discuss how this is done below. Take this moment seriously, otherwise all your photos, music and videos will be lost forever.
When working with recovery, the memory is completely formatted, absolutely everything is deleted. But there are some nuances that you should also be aware of. For example, if you use custom Recovery, then its functionality will allow you to erase the firmware itself or its separate section.
Be extremely careful and follow each step of our instructions exactly. Otherwise, your Android smartphone may simply not turn on at one “perfect” moment.
Backup: save data before reset
In this section, we will save data that will be deleted after a factory reset. When the process completes, the media will be restored from the backup. So let's get started.
Copying to a memory card or computer
This method works specifically with media: photos, videos or music. Other files are also copied, such as APK. Data such as SMS or phonebook are backed up in a different way.
So, in order to copy our content, we do this.
To memory card
If you still have a memory card, you can copy data to it. This is done as follows:
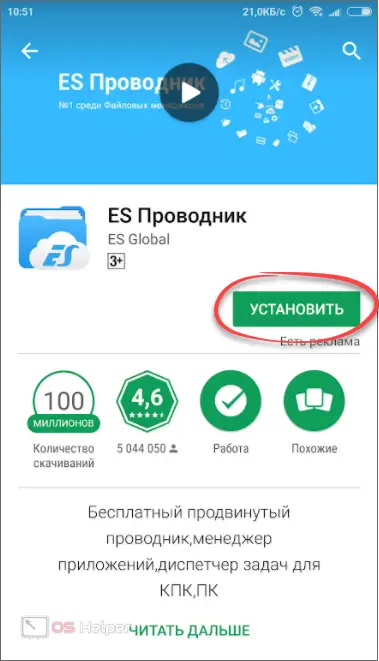
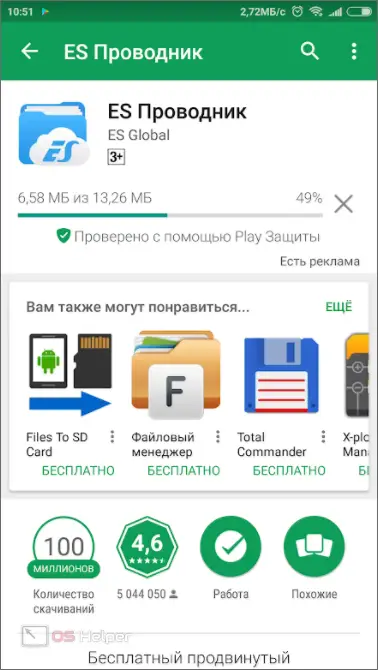
- Go to Google Play and write "eu" in the search bar. These two letters will be enough for you to be shown ES File Explorer. We use this particular application, as it makes our instructions universal for any Android. Although you can copy data to a USB flash drive using the regular file manager.

- Click the green button labeled "Install".
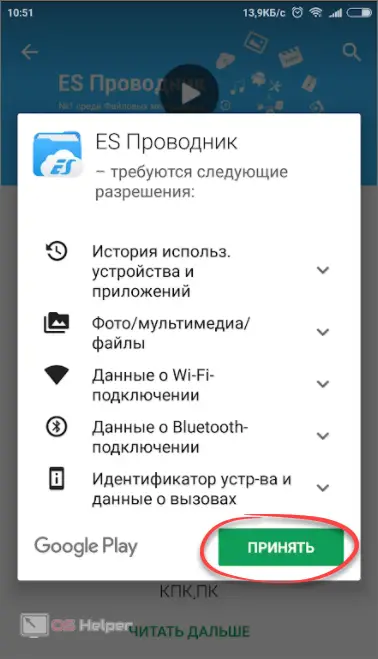
- We accept an application request for access to the file system and other system services.
- We are waiting for the download to finish, the speed of which will directly depend on the speed of your connection to the network. As soon as the APK is downloaded, it will be automatically installed.
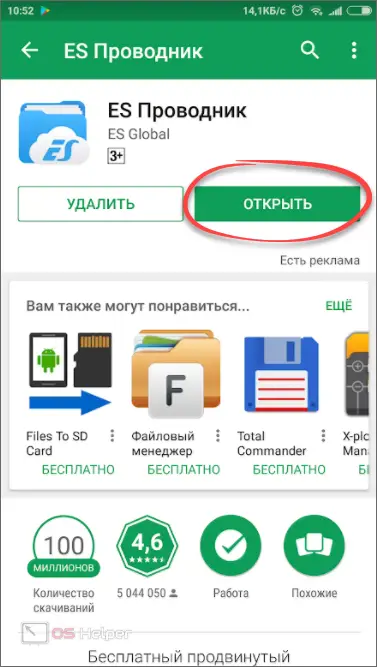
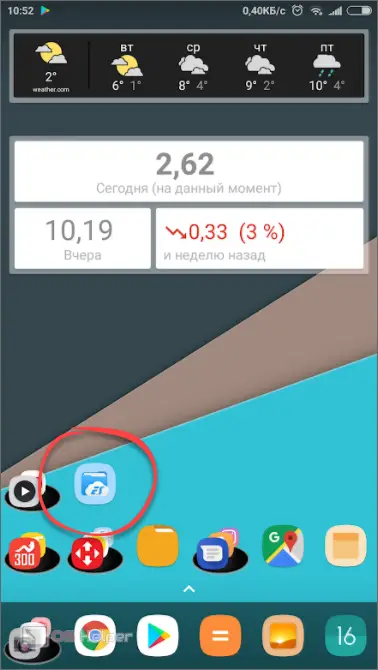
- Done - our explorer can be opened directly from here or launched by tapping on a shortcut on the desktop.
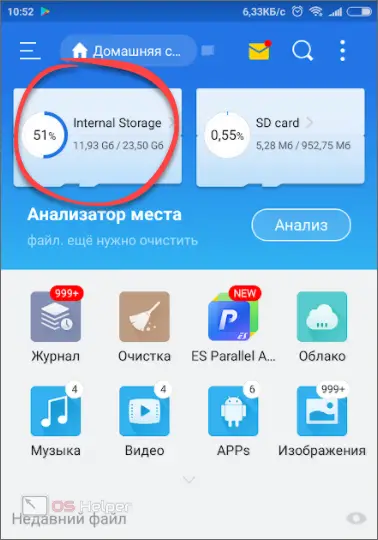
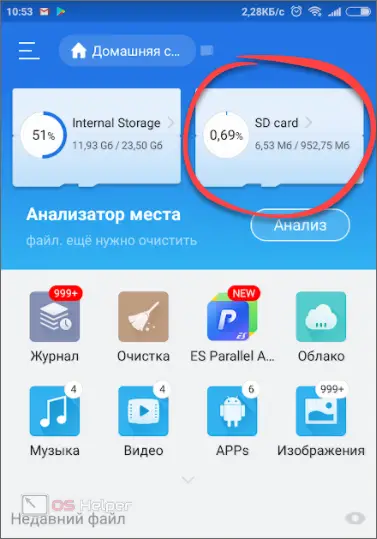
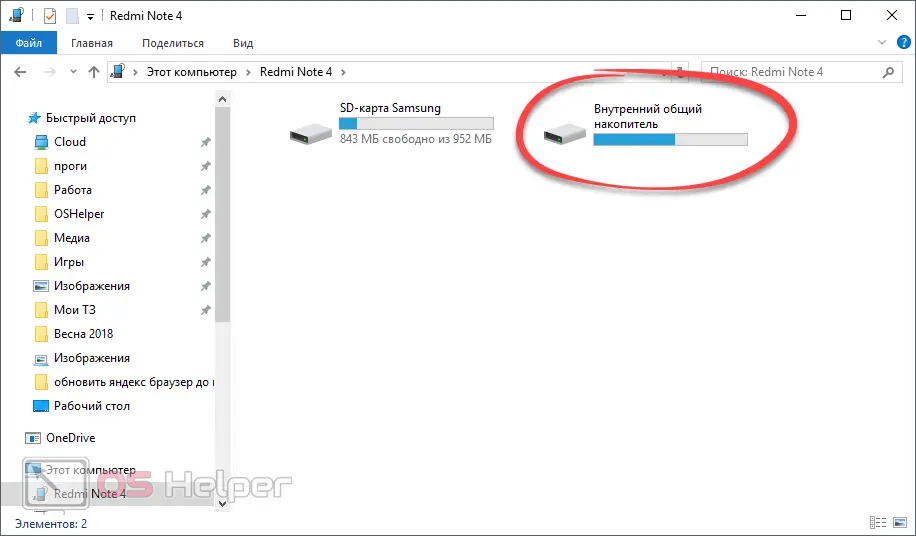
- When the program is launched, we will see 2 main tiles (unless, of course, you have a memory card installed). The first is the internal memory of Android, the second is the external drive. Logically, we need to go to the first one, copy the data from there and place it on the second one. So we do.
Also Read: How to Save Contacts from Android to PC
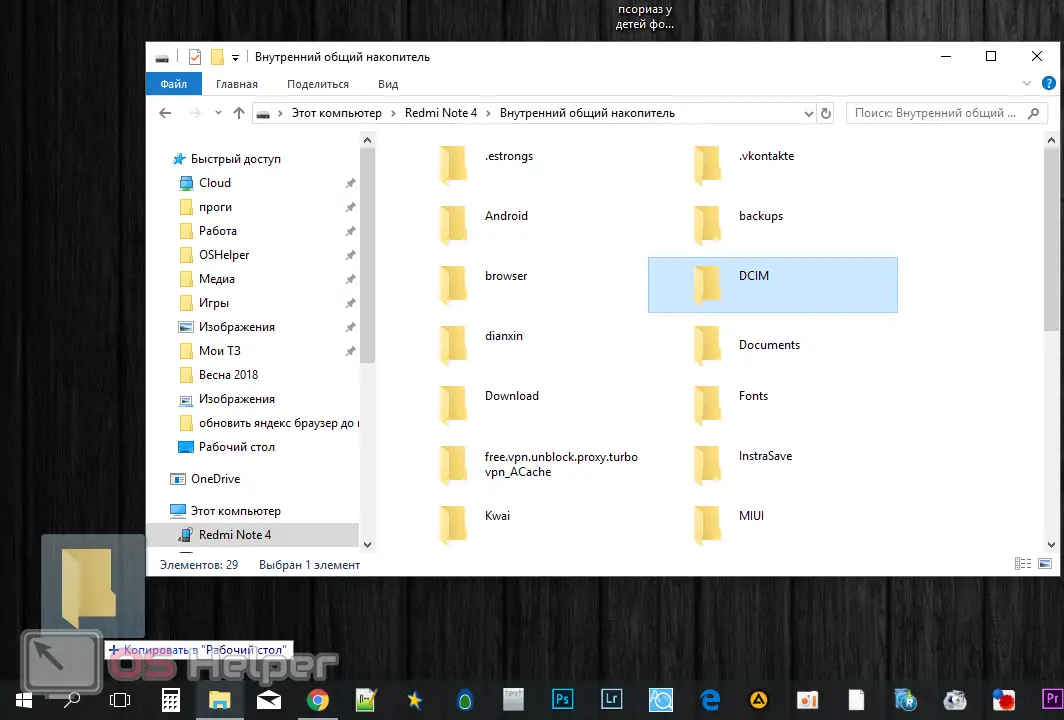
- All photos in Android are stored in "DCIM" by default. We open the catalog.
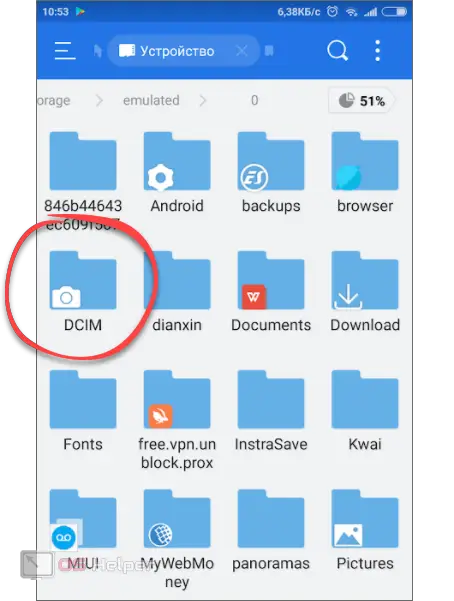
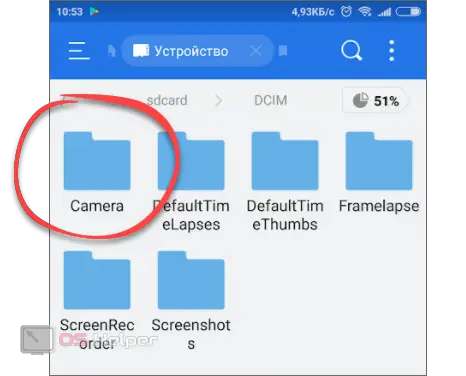
- Next, we need the “Camera” directory - yours may have a different name.
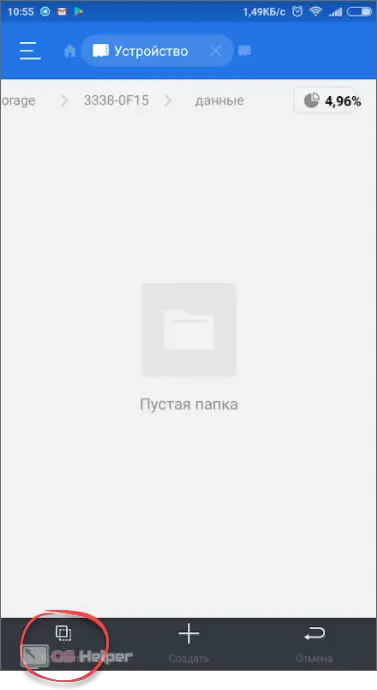
- We pinch one of the photos with our finger and wait until a green checkmark appears on it. When this is done, click "Select All".
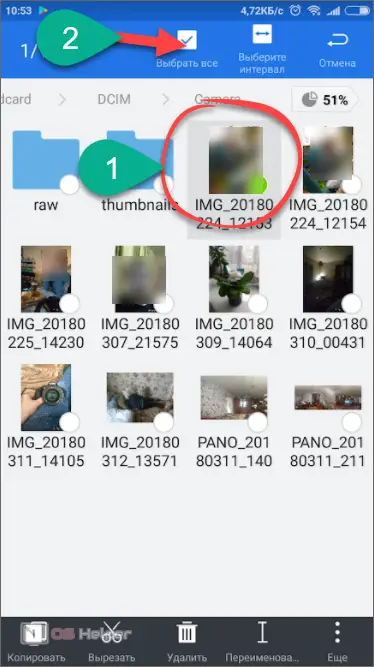
- Now all our files are selected, so it remains to tap on the button marked in the picture.
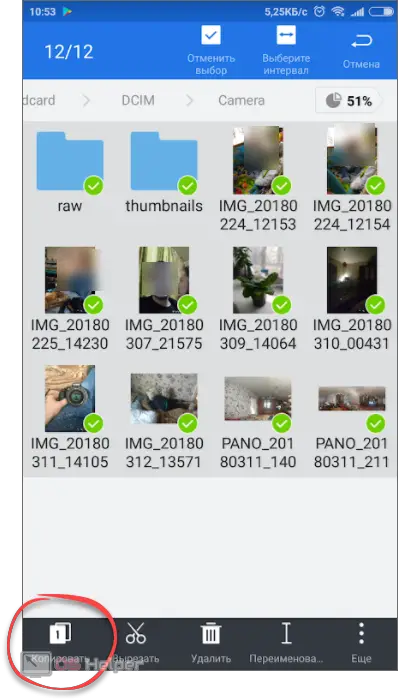
- We return to the "root" of our FS by clicking on the cross in the path line.
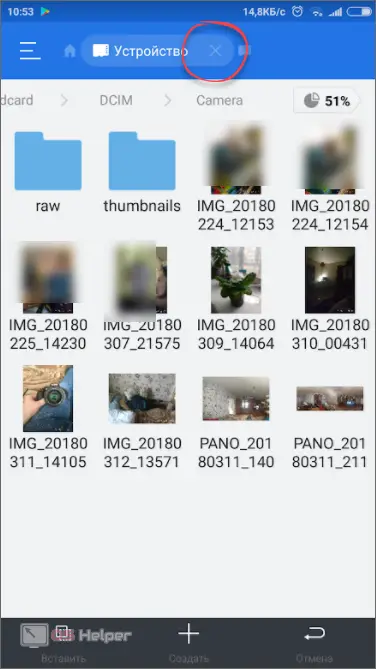
- Let's move on to the SD card.
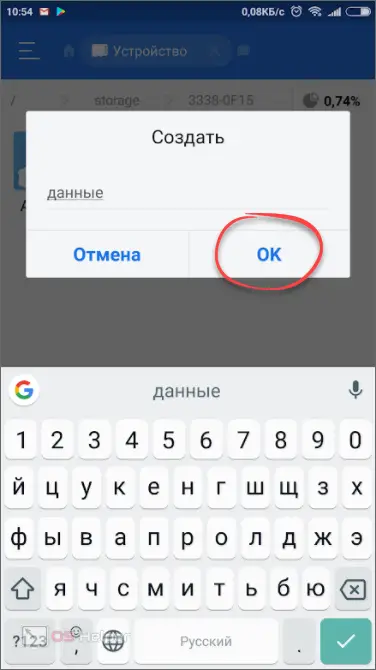
- In order not to confuse our data with other folders already here, let's create another one. To do this, click the plus icon.

- Enter a directory name and click OK.
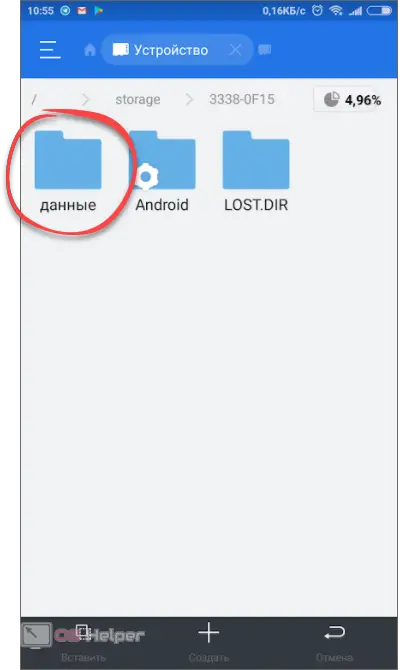
- Select the created folder by tapping on its silhouette.
 Catalog Data
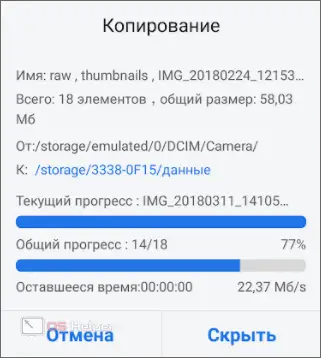
 - Let's move on to data copying. There is another button for this.
- Depending on the amount of data being backed up, the speed of the drive, and the performance of a specific device, the copy speed can vary greatly. In any case, we are waiting for the completion of the process.
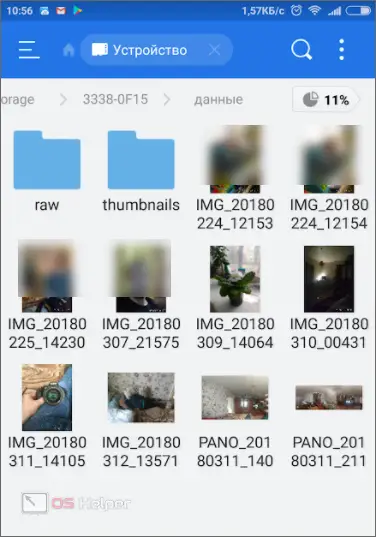
Ready. Now all our photos and videos are in a safe place. You don't have to worry about their safety.
Attention, before you start resetting the gadget, remove the memory card from it.
Important! In order to copy other data, such as APK files or music, you need to visit other directories in the internal memory of the phone. The path to them is different on each Android phone and depends on where you copied the data when downloading from a PC or the Internet. Most often, the music "lies" in the "Downloads" folder.
On PC
Copying your personal data to a computer is even easier. To do this, we do the following:
- Install the driver for your phone (you can find it on the official website).
- Connect the device in any available way (USB, Bluetooth, Wi-Fi, etc.).
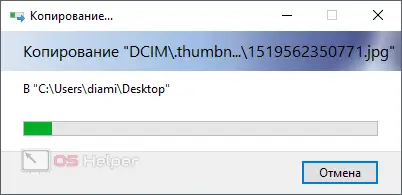
- Open Android in Windows Explorer.
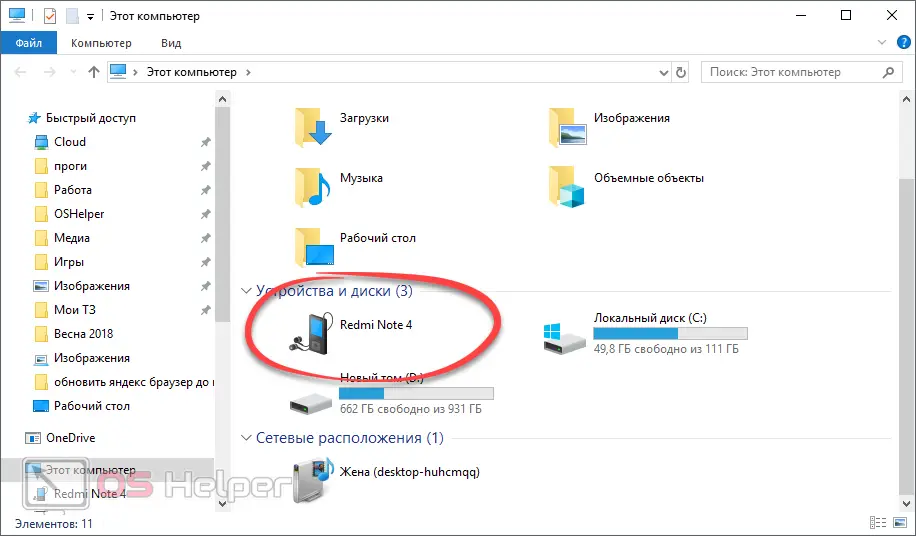
- Select internal memory.
- Just drag the directory to your desktop or another drive.
The copying process will begin, after which the data will be securely protected.
Attention, in some cases, to activate the data transfer mode, you need to enable the corresponding item on Android. You can find it in the "curtain" of notifications.
We use cloud storage
In order to back up our photos, videos, games or music, you can also use the so-called cloud. This is a dedicated disk space that one of the providers reserved for us. For example, let's work with Google Drive.
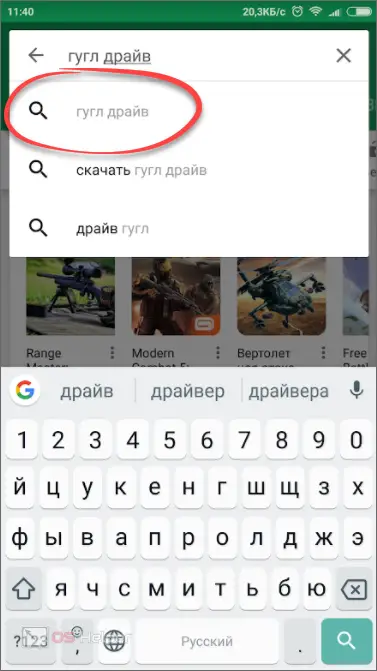
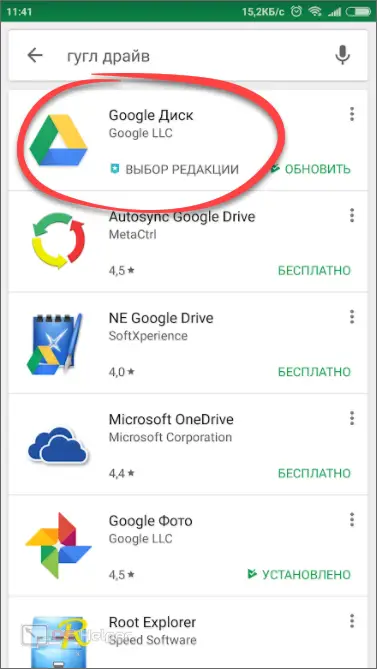
- Most often, Google Cloud is already installed on the system, but if you don’t have it, download the program from the Play Market. To do this, you just need to register a query in the search bar.
- Then select the desired result from the search results. In our case, Google Drive is a system application and does not need to be installed.
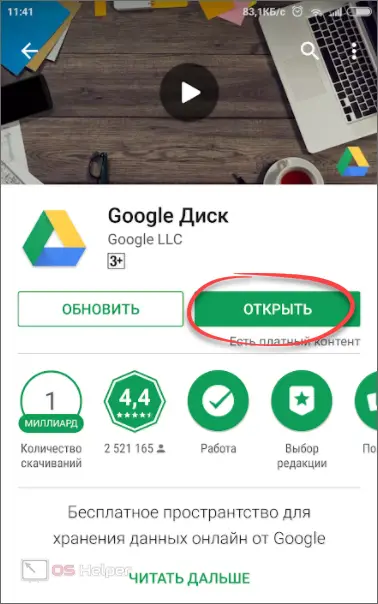
- Install the program and open it.
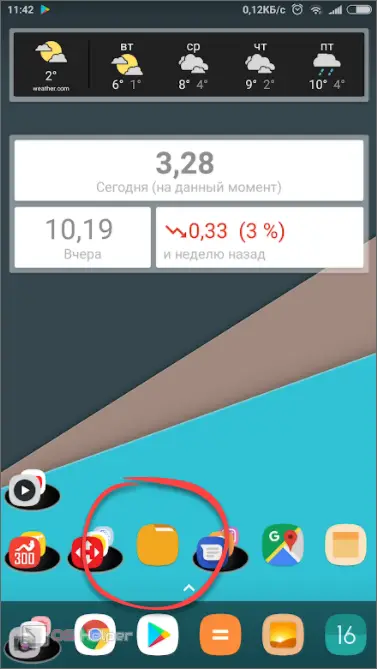
- For a change, we will not use ES Explorer, but the regular file manager of the Xiaomi Remi Note 4x smartphone. We start the utility.
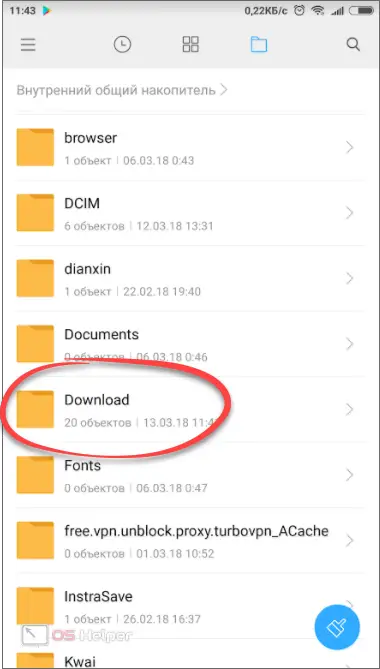
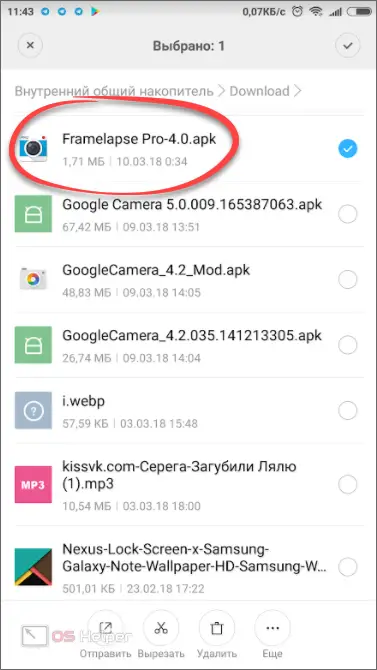
- Select the directory that we want to copy to the "Cloud". We, for example, will show "Downloads", but you copy all the important data.
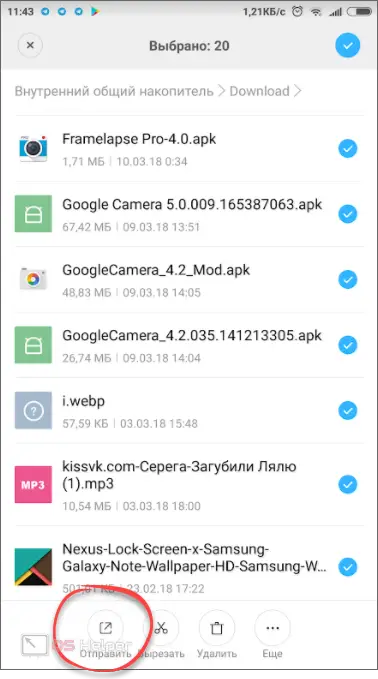
- Hold your finger on the file until an icon appears on it. Then select everything by tapping on the little bird at the top right of the screen.
- Tap on "Submit" to start the copy process.
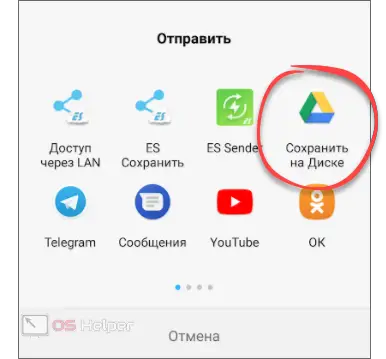
- We choose our Google Drive. As you can see, you can move data anywhere.
- Select a folder in the cloud where the content will be placed. Then click "SAVE".

- First comes the preparation.

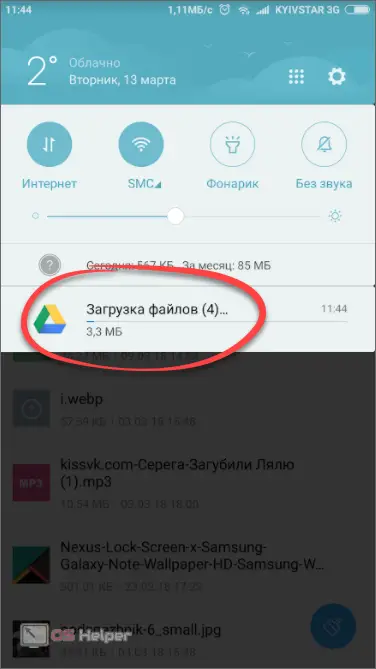
- Then the upload to the server will begin. Naturally, its speed will depend on your network connection.
That's all, the data is in the cloud and we will definitely not lose it.
See also: Sync contacts with Google on Android

Synchronization with Google
It remains to consider only the synchronization of our contacts, calendar entries, saving in games, etc. In order for all this not to be deleted, or rather, to be restored in the future, you need to set up a connection with Google. Getting Started:
Attention: our instruction will be shown on the example of a Xiaomi smartphone. In other OS versions and phone models, the names and positions of menu items may differ.
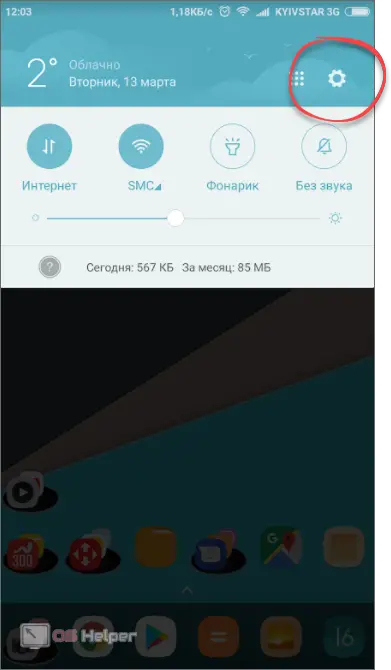
- Let's go to Android settings. Most often, they can be found by lowering the "curtain" of notifications.
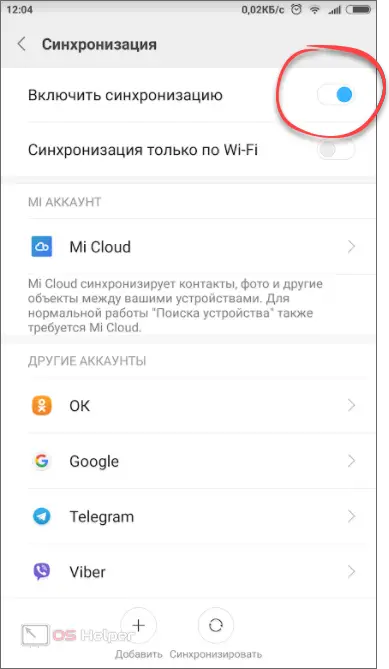
- We go to the item "Synchronization".

- We turn it on.
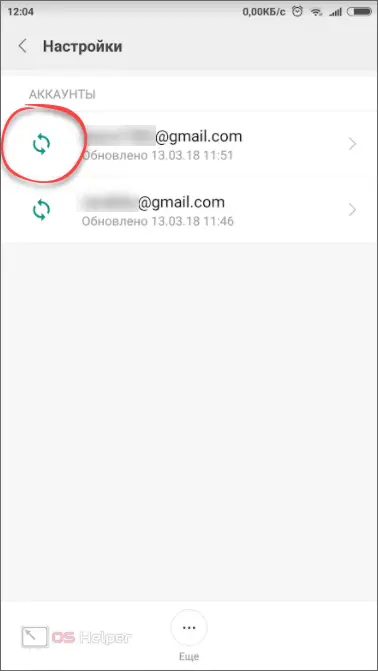
- Just before resetting the settings and formatting the phone, you need to force the synchronization. To do this, opposite our account, click the icon indicated in the screenshot below.
Model Features
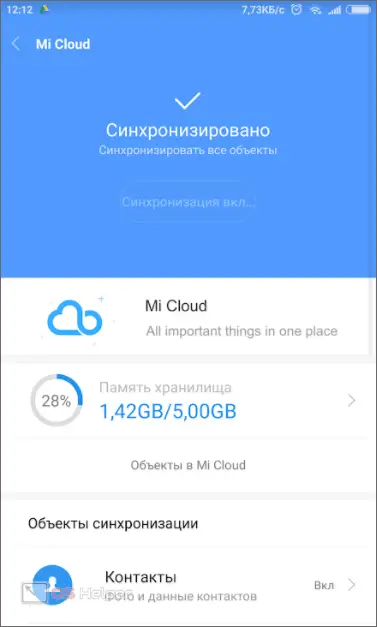
In some phones, for example, Xiaomi, synchronization can be done not only with Google. Here it will turn out to copy the data to the Mi account, from where they will then be successfully restored. And it works much more interesting than in the "naked" Android. Not only contacts, calendar entries, etc. are restored, but everything in general, including desktop settings. As a result, you get an exact copy of the phone that you had before the reset.
Doing a reset
So, after all the data is saved, we can proceed to the reset process itself. Let's start with a simple one, then gradually move on to more complex and effective options.
Through the menu
Again, everything shown below was done on our Xiaomi Redmi Note 4x test device with the Android MIUI 9 add-on installed. If you have a different model, the steps may be slightly different. However, let's start:
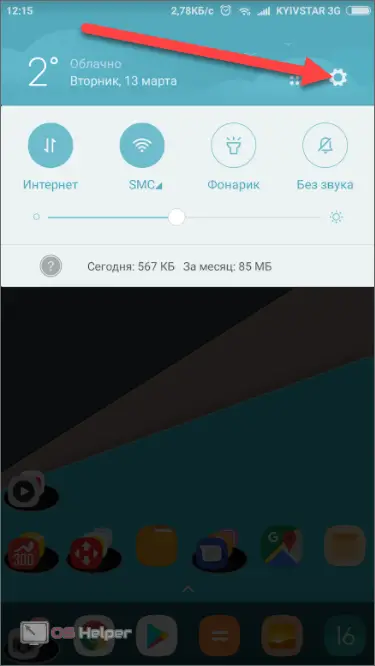
- We turn to the settings of our smartphone by lowering the notification line and tapping on the gear indicated in the screenshot.
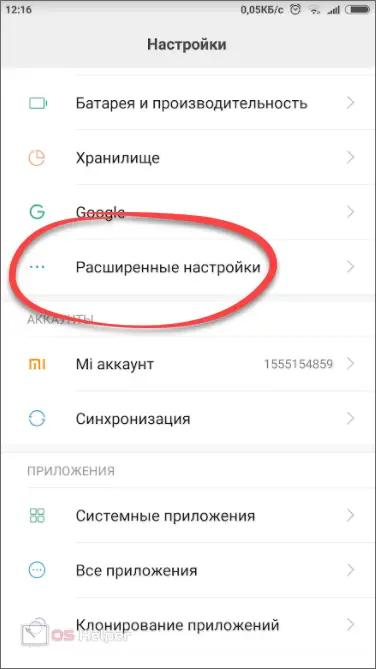
- Next, click on the advanced settings item.
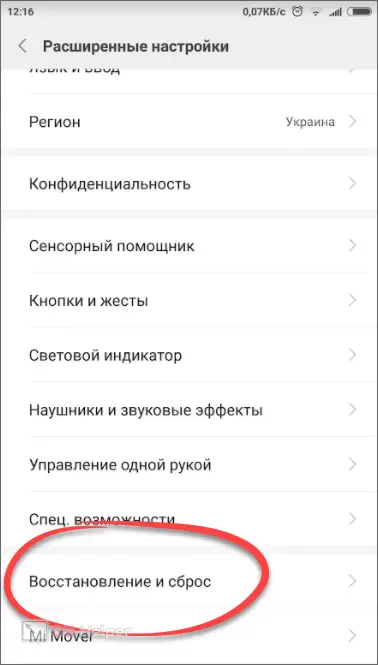
- We go to the section indicated in the picture with a red frame.
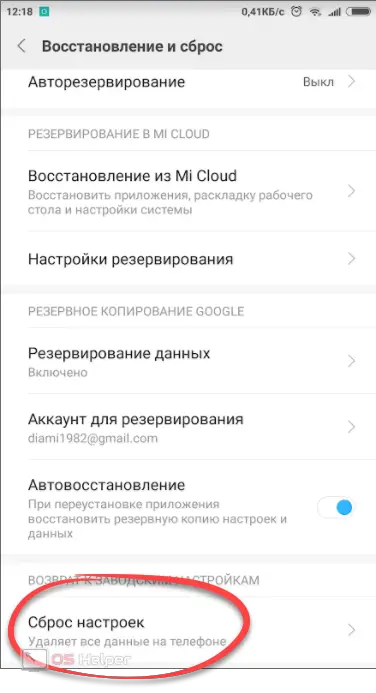
- Click on the reset option.
- There are 2 cleaning modes for Android. The first provides for a factory reset, the second completely formats the internal memory of the device. At the very bottom there is a button to start cleaning.
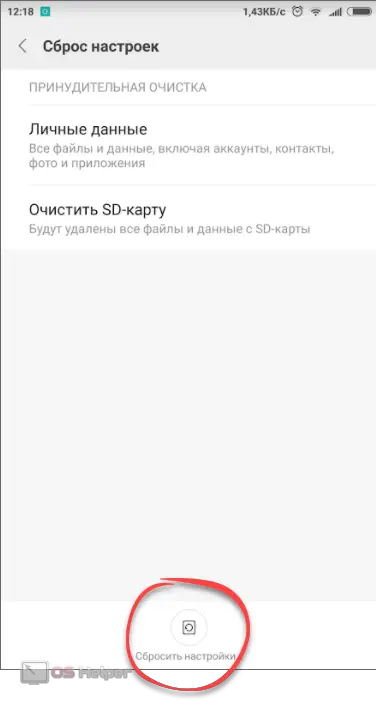
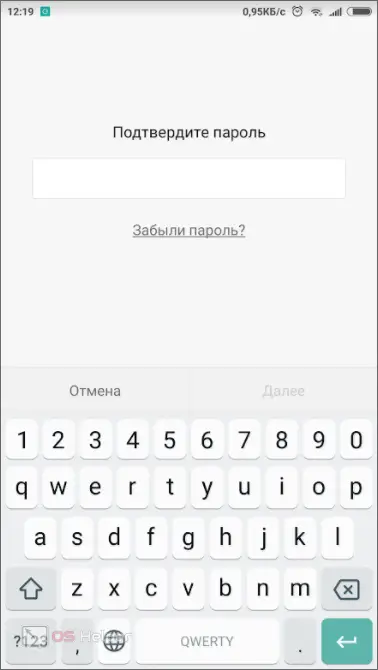
- Naturally, in order to delete everything, we will have to confirm our rights. For us, this is entering a password, you may have a pattern, etc. As soon as the verification is successful, the deletion of all user data will begin with a reboot of the device.
Service codes
 You can also reset Android to factory settings using the service code. However, it should be noted that these options do not work on all models. We will not say which code is suitable for your phone - you will have to search for this information on the network yourself. In the same way as the way to enter such codes. The fact is that there are a lot of codes themselves and devices that support them, so there is no way to describe everything.
hard reset
A hard reset (Hard Reset) is performed using a keyboard shortcut held on the device and may be needed when there is simply no access to system settings. For example, you broke the screen, the phone turned off, something does not work or the menu does not open.
It doesn't matter, you can still reset it, and it's done like this:
Attention! On each phone model (HTC, ZTE), the combination of reset buttons may be different, so use our table or find a "hot" combination on the net.
Button combinations for Hard Reset different devices:
| Asus, Acer | Power button + volume down button |
| Lenovo | Power button + volume in both directions. When vibration follows, we drop the power and press the volume several times. |
| Huawei | Volume down button and power button (hold for 10 seconds). When an image appears, then quit power. When the robot appears, move your finger to the volume up button. When the download appears, drop the volume. |
| LG: | Volume down + power button. As soon as the picture appears, drop the buttons and immediately press again. Hold until Recovery appears. |
| Samsung: | Power button + Home button + Volume up button. Sometimes volume down button + power button (Galaxy S3). |
| Sony | Power button + volume add button. The phone must be on charge. Next, firmly press the reset button. When the image appears, briefly press the power button. Then we drop it and press the volume add button several times. |
| Prestigio | Depending on the model, the volume up / down button + power button. |
| Meizu, Xiaomi, Fly | Volume up button and power button. On Meizu, after the logo appears, we throw the power button, we continue to hold the volume. |
Regular Recovery
If you have a regular Recovery, for example, Samsung, select the "Wipe data / factory reset" item by navigating with the volume buttons and activate it with the power key.
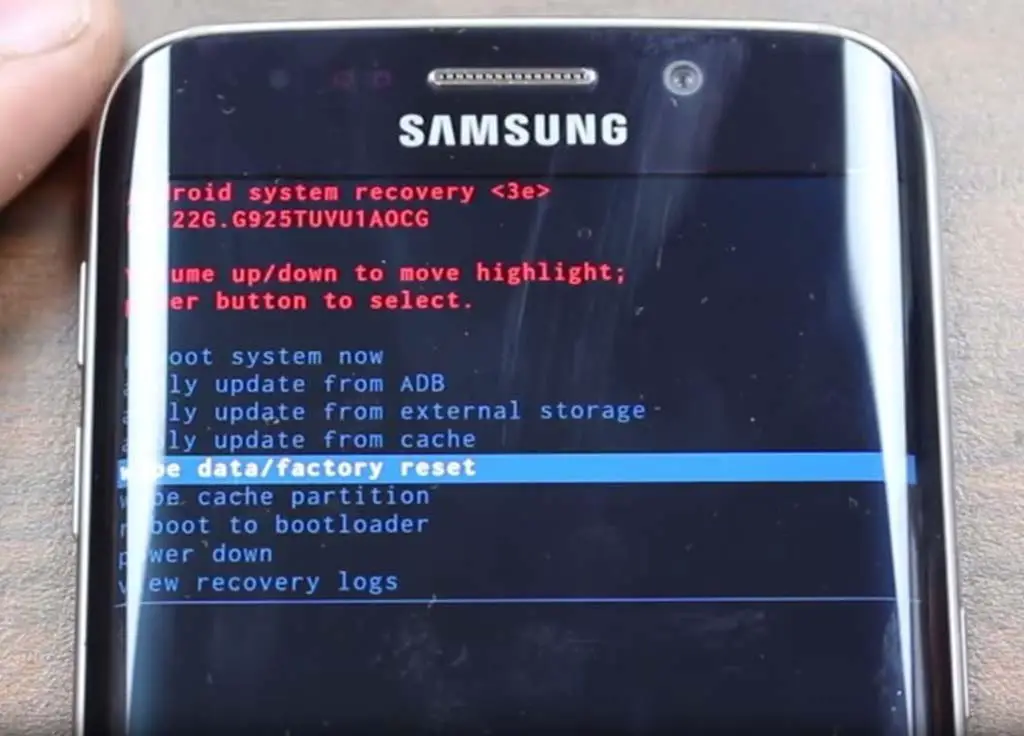
This will be followed by confirmation and, in fact, reset.
Modified Recovery
Sometimes users have a modified Recovery installed, for example, TWRP. Below you will see how to reset through it.
- When the recovery is launched (use the same button combinations as for a regular Hard Reset), go to the "Backup" section.
Attention! Here is TWRP Recovery, in other models of PreOS-software, the interface looks completely different.

- Select the system partitions to be copied. Below we will describe each of them in more detail, and you will decide where to put the checkboxes. Move the slider to the right to start copying.
| System | The operating system itself |
| Data | Your data |
| Cache | System cache |
| Cust | Language packs and settings for some applications |
| Recovery | Actually, our Recovery |
| Boot | Bootloader |
| EFS | One of the important system partitions containing: IMEI, S/N, GPSID, WIFIMAC, BTMAC, etc. |
| Persist | Another important system partition |
| Bootloader | Initial bootloader |
Note: The backup files are protected in the phone's memory. Be sure to copy them to a more secure location.
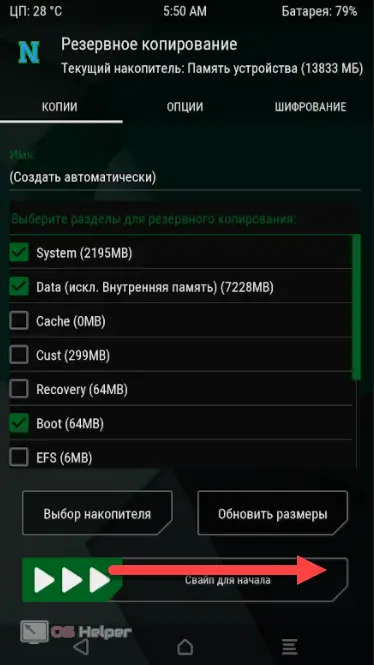
- The backup process itself looks like this:
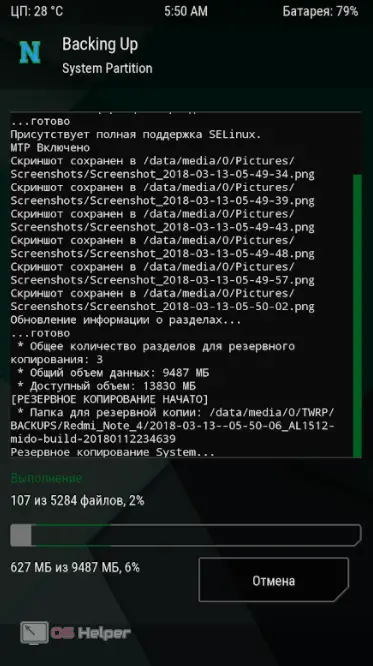
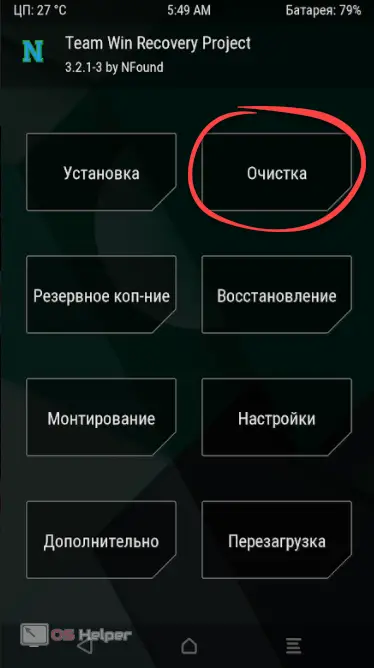
- When the backup is made, you can proceed to the reset itself. We go to the "Cleaning" section.
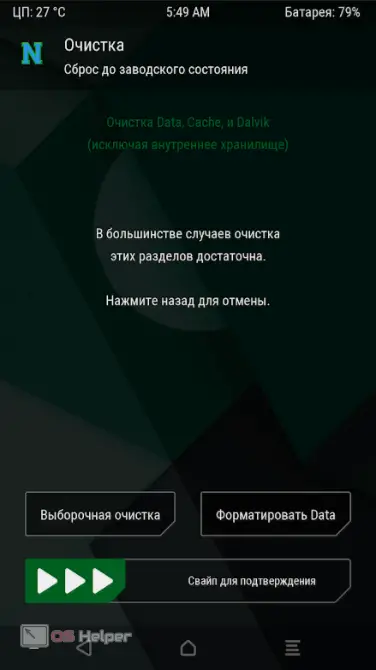
- Here you can simply reset the phone or go to the detailed cleaning settings.
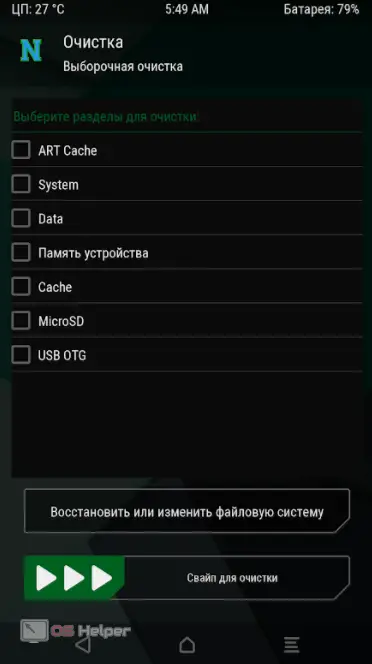
- Check the boxes on the items that need to be formatted and drag the bar to the right.
- When the cleaning is completed, go to the reboot section.
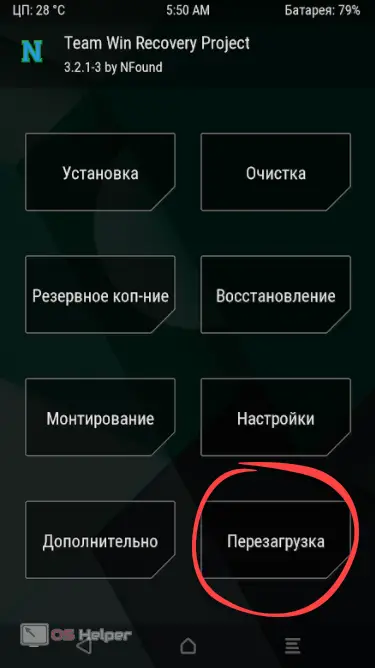
- We select the system and reboot into the Android OS, which will now be reset to 0.

Android reset apps
Among other things, there are many third-party programs that can reset your device to factory settings. We will talk about two such solutions, but you have the right to choose any program you like. So, let's look at the most interesting utilities for resetting your phone. You can download them on Google play.
Simple Factory Phone Reset
This application has a large red button, similar to the one for launching a nuclear missile.
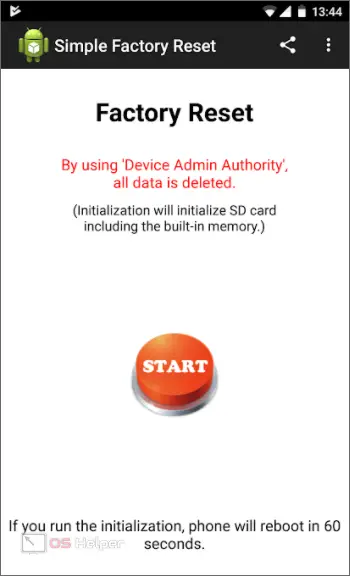
Confirmation will follow first.
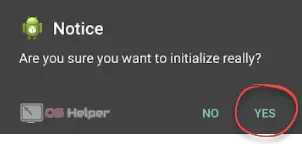
Then the system settings section will open, in which you will be asked to provide administrator access to Simple Factory Phone Reset.
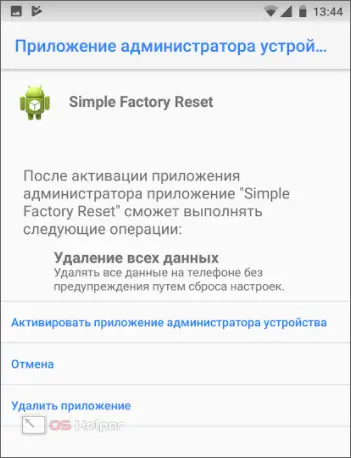
As soon as the system receives confirmation, a reset will be performed and all your data will be deleted.
Phone Factory Reset
Another program that allows you to reset Android to factory settings. It also does not differ in originality in design. There is an instruction in English and, in fact, a reset button.

Just like other applications, the utility requires administrative privileges to run.
Conclusion
So, now you, like no one else, know everything about resetting your Android phone to factory settings. There are so many ways to do this depending on the hardware and the situation - choose the most suitable one. We will say goodbye to you, but we will say something else: if you have any questions during the reset process, feel free to ask them in the comments. We will try to help everyone as much as possible.
Video instruction
We also recommend watching a video that explains how to reset Android to factory settings.